


So installieren Sie die PHP-Umgebung in Centos7: Verwenden Sie zuerst yum, um schnell die LAMP-Plattform zu erstellen. Anschließend installieren Sie PHP und verknüpfen es mit MySQL. Anschließend erstellen Sie „phpinfo();“ ; schließlich den Apache-Server neu starten.

Installieren Sie die PHP-Umgebung unter Centos7
Verwenden Sie yum, um schnell eine LAMP-Plattform zu erstellen
Experimentelle Umgebung:
[root@nmserver-7 html]# cat  /etc/redhat-release
CentOS release 7.3.1611 (AltArch)
[root@nmserver-7 html]# uname -a
Linux nmserver-7.test.com 3.10.0-514.el7.centos.plus.i686 #1 SMP Wed Jan 25 12:55:04 UTC 2017 i686 i686 i386 GNU/Linux
1. Apache installieren
1.1 Apache installieren
[root@nmserver-7 ~]# yum install httpd httpd-devel
1.2 Apache-Dienst starten
[root@nmserver-7 ~]# systemctl start httpd
1.3 Einrichten Der httpd-Dienst soll beim Booten gestartet werden
[root@nmserver-7 ~]# systemctl enable  httpd
Created symlink from /etc/systemd/system/multi-user.target.wants/httpd.service to /usr/lib/systemd/system/httpd.service.
1.4 Überprüfen Sie den Dienststatus
[root@nmserver-7 ~]# systemctl status httpd
● httpd.service - The Apache HTTP Server
   Loaded: loaded (/usr/lib/systemd/system/httpd.service; enabled; vendor preset: disabled)
   Active: active (running) since 五 2017-07-21 17:21:37 CST; 6min ago
     Docs: man:httpd(8)
           man:apachectl(8)
 Main PID: 2449 (httpd)
   Status: "Total requests: 11; Current requests/sec: 0; Current traffic:   0 B/sec"
   CGroup: /system.slice/httpd.service
           ├─2449 /usr/sbin/httpd -DFOREGROUND
           ├─2450 /usr/sbin/httpd -DFOREGROUND
           ├─2451 /usr/sbin/httpd -DFOREGROUND
           ├─2452 /usr/sbin/httpd -DFOREGROUND
           ├─2453 /usr/sbin/httpd -DFOREGROUND
           ├─2454 /usr/sbin/httpd -DFOREGROUND
           ├─2493 /usr/sbin/httpd -DFOREGROUND
           ├─2494 /usr/sbin/httpd -DFOREGROUND
           └─2495 /usr/sbin/httpd -DFOREGROUND
7月 21 17:21:35 nmserver-7.test.com systemd[1]: Starting The Apache HTTP Server...
7月 21 17:21:36 nmserver-7.test.com httpd[2449]: AH00558: httpd: Could not reliably determine the server's fully q...ssage
7月 21 17:21:37 nmserver-7.test.com systemd[1]: Started The Apache HTTP Server.
Hint: Some lines were ellipsized, use -l to show in full.rrree1.6 Bestätigen Sie, dass Port 80 lauscht
  1.5 防火墙设置开启80端口
[root@nmserver-7 ~]# firewall-cmd --permanent --zone=public  --add-service=http
success
[root@nmserver-7 ~]# firewall-cmd --permanent --zone=public  --add-service=https
success
[root@nmserver-7 ~]# firewall-cmd --reload
success
1.8 Überprüfen Sie die Server-IP
[root@nmserver-7 ~]# netstat -tulp
Active Internet connections (only servers)
Proto Recv-Q Send-Q Local Address           Foreign Address         State       PID/Program name
tcp        0      0 0.0.0.0:ssh             0.0.0.0:*               LISTEN      1084/sshd
tcp        0      0 localhost:smtp          0.0.0.0:*               LISTEN      1486/master
tcp6       0      0 [::]:ssh                [::]:*                  LISTEN      1084/sshd
tcp6       0      0 localhost:smtp          [::]:*                  LISTEN      1486/master
tcp6       0      0 [::]:http               [::]:*                  LISTEN      2449/httpd
udp        0      0 localhost:323           0.0.0.0:*                           592/chronyd
udp6       0      0 localhost:323           [::]:*                              592/chronyd
1.9 Browser-Anmeldung
Wenn der Browser nicht darauf zugreifen kann, konfigurieren Sie die Sicherheitsgruppe 80 der Alibaba Cloud-Konsole
2. Installieren Sie MySQL
2.1 MySQL installieren
[root@nmserver-7 ~]# ip addr
1: lo: <LOOPBACK,UP,LOWER_UP> mtu 65536 qdisc noqueue state UNKNOWN qlen 1
    link/loopback 00:00:00:00:00:00 brd 00:00:00:00:00:00
    inet 127.0.0.1/8 scope host lo
       valid_lft forever preferred_lft forever
    inet6 ::1/128 scope host
       valid_lft forever preferred_lft forever
2: ens33: <BROADCAST,MULTICAST,UP,LOWER_UP> mtu 1500 qdisc pfifo_fast state UP qlen 1000
    link/ether 00:0c:29:56:bc:cf brd ff:ff:ff:ff:ff:ff
    inet 192.168.8.9/24 brd 192.168.8.255 scope global ens33
       valid_lft forever preferred_lft forever
    inet6 fe80::20c:29ff:fe56:bccf/64 scope link
       valid_lft forever preferred_lft forever
3: bridge0: <NO-CARRIER,BROADCAST,MULTICAST,UP> mtu 1500 qdisc noqueue state DOWN qlen 1000
    link/ether ea:89:d5:c7:32:73 brd ff:ff:ff:ff:ff:ff
2.2 Öffnen Sie den MySQL-Dienst und stellen Sie ihn so ein, dass er beim Booten startet. Überprüfen Sie den MySQL-Status
[root@nmserver-7 ~]# yum install mariadb mariadb-server mariadb-libs mariadb-devel

root@nmserver-7 ~]# rpm -qa |grep maria
mariadb-libs-5.5.52-1.el7.i686
mariadb-5.5.52-1.el7.i686
mariadb-server-5.5.52-1.el7.i686
mariadb-devel-5.5.52-1.el7.i686
[root@nmserver-7 ~]# systemctl start  mariadb
[root@nmserver-7 ~]# systemctl enable  mariadb
Created symlink from /etc/systemd/system/multi-user.target.wants/mariadb.service to /usr/lib/systemd/system/mariadb.service.
[root@nmserver-7 ~]# systemctl status  mariadb
● mariadb.service - MariaDB database server
   Loaded: loaded (/usr/lib/systemd/system/mariadb.service; enabled; vendor preset: disabled)
   Active: active (running) since 六 2017-07-22 21:19:20 CST; 21s ago
 Main PID: 9603 (mysqld_safe)
   CGroup: /system.slice/mariadb.service
           ├─9603 /bin/sh /usr/bin/mysqld_safe --basedir=/usr
           └─9760 /usr/libexec/mysqld --basedir=/usr --datadir=/v...
7月 22 21:19:15 nmserver-7.test.com mariadb-prepare-db-dir[9524]: ...
7月 22 21:19:15 nmserver-7.test.com mariadb-prepare-db-dir[9524]: ...
7月 22 21:19:15 nmserver-7.test.com mariadb-prepare-db-dir[9524]: ...
7月 22 21:19:15 nmserver-7.test.com mariadb-prepare-db-dir[9524]: ...
7月 22 21:19:15 nmserver-7.test.com mariadb-prepare-db-dir[9524]: ...
7月 22 21:19:15 nmserver-7.test.com mariadb-prepare-db-dir[9524]: ...
7月 22 21:19:15 nmserver-7.test.com mariadb-prepare-db-dir[9524]: ...
7月 22 21:19:16 nmserver-7.test.com mysqld_safe[9603]: 170722 21...
7月 22 21:19:16 nmserver-7.test.com mysqld_safe[9603]: 170722 21...
7月 22 21:19:20 nmserver-7.test.com systemd[1]: Started MariaDB ...
2.3 Datenbank-Sicherheitseinstellungen
[root@nmserver-7 ~]# netstat -tulp
Active Internet connections (only servers)
Proto Recv-Q Send-Q Local Address           Foreign Address         State       PID/Program name
tcp        0      0 0.0.0.0:ssh             0.0.0.0:*               LISTEN      1084/sshd
tcp        0      0 0.0.0.0:mysql           0.0.0.0:*               LISTEN      9760/mysqld
tcp6       0      0 [::]:ssh                [::]:*                  LISTEN      1084/sshd
tcp6       0      0 [::]:http               [::]:*                  LISTEN      2449/httpd
udp        0      0 localhost:323           0.0.0.0:*                           592/chronyd
udp6       0      0 localhost:323           [::]:*                              592/chronyd
2.4 Beim Datenbanktest anmelden
[root@nmserver-7 ~]# mysql_secure_installation
NOTE: RUNNING ALL PARTS OF THIS SCRIPT IS RECOMMENDED FOR ALL MariaDB
      SERVERS IN PRODUCTION USE!  PLEASE READ EACH STEP CAREFULLY!
In order to log into MariaDB to secure it, we'll need the current
password for the root user.  If you've just installed MariaDB, and
you haven't set the root password yet, the password will be blank,
so you should just press enter here.
Enter current password for root (enter for none):
OK, successfully used password, moving on...
Setting the root password ensures that nobody can log into the MariaDB
root user without the proper authorisation.
Set root password? [Y/n] y
New password:
Re-enter new password:
Password updated successfully!
Reloading privilege tables..
 ... Success!
By default, a MariaDB installation has an anonymous user, allowing anyone
to log into MariaDB without having to have a user account created for
them.  This is intended only for testing, and to make the installation
go a bit smoother.  You should remove them before moving into a
production environment.
Remove anonymous users? [Y/n] y
 ... Success!
Normally, root should only be allowed to connect from 'localhost'.  This
ensures that someone cannot guess at the root password from the network.
Disallow root login remotely? [Y/n] n
 ... skipping.
By default, MariaDB comes with a database named 'test' that anyone can
access.  This is also intended only for testing, and should be removed
before moving into a production environment.
Remove test database and access to it? [Y/n] y
 - Dropping test database...
 ... Success!
 - Removing privileges on test database...
 ... Success!
Reloading the privilege tables will ensure that all changes made so far
will take effect immediately.
Reload privilege tables now? [Y/n] y
 ... Success!
Cleaning up...
All done!  If you've completed all of the above steps, your MariaDB
installation should now be secure.
Thanks for using MariaDB!
3. PHP installieren
3.1 Installieren php
[root@nmserver-7 ~]# mysql -uroot -p
Enter password:
Welcome to the MariaDB monitor.  Commands end with ; or \g.
Your MariaDB connection id is 11
Server version: 5.5.52-MariaDB MariaDB Server
Copyright (c) 2000, 2016, Oracle, MariaDB Corporation Ab and others.
Type 'help;' or '\h' for help. Type '\c' to clear the current input statement.
MariaDB [(none)]> show databases;
+--------------------+
| Database           |
+--------------------+
| information_schema |
| mysql              |
| performance_schema |
+--------------------+
3 rows in set (0.02 sec)
MariaDB [(none)]>
3.2 Kombinieren Sie PHP mit MySQL Relate
[root@nmserver-7 ~]# yum -y install php
[root@nmserver-7 ~]# rpm -ql php
/etc/httpd/conf.d/php.conf
/etc/httpd/conf.modules.d/10-php.conf
/usr/lib/httpd/modules/libphp5.so
/usr/share/httpd/icons/php.gif
/var/lib/php/session
3.3 Installieren Sie gängige PHP-Module
[root@nmserver-7 ~]# yum install php-mysql
[root@nmserver-7 ~]# rpm -ql php-mysql
/etc/php.d/mysql.ini
/etc/php.d/mysqli.ini
/etc/php.d/pdo_mysql.ini
/usr/lib/php/modules/mysql.so
/usr/lib/php/modules/mysqli.so
/usr/lib/php/modules/pdo_mysql.so
3.4 PHP testen
[root@nmserver-7 ~]# yum install -y php-gd php-ldap php-odbc php-pear php-xml php-xmlrpc php-mbstring php-snmp php-soap curl curl-devel php-bcmath
3.5 Apache-Server neu starten
[root@nmserver-7 html]# systemctl restart http
3.6 PHP testen
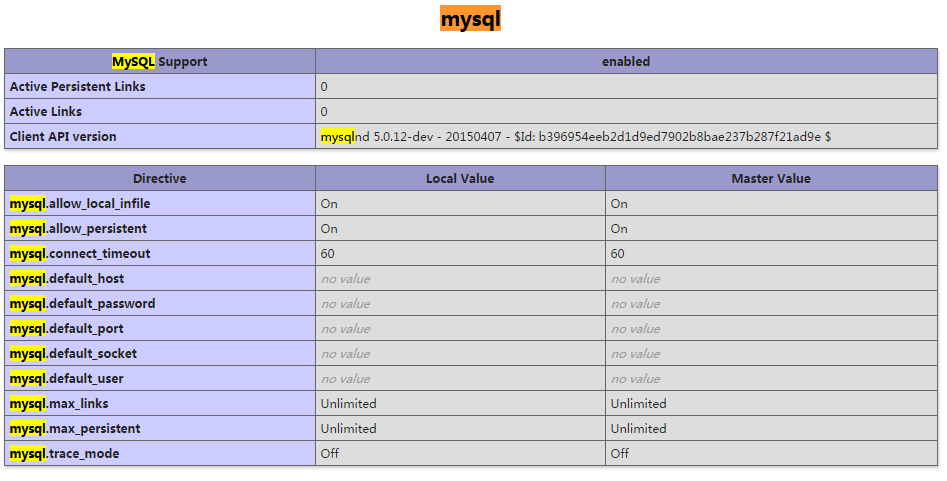
Geben Sie 192.168.8.9/info.php in den Browser Ihres Computers ein. Sie können die installierten Module sehen.
Weitere Informationen zu diesem Thema finden Sie auf der PHP-Chinese-Website!
Das obige ist der detaillierte Inhalt vonSo installieren Sie die PHP-Umgebung in Centos7. Für weitere Informationen folgen Sie bitte anderen verwandten Artikeln auf der PHP chinesischen Website!

 CentOS7怎么安装Mysql并设置开机自启动Jun 02, 2023 pm 08:36 PM
centos7不带mysql数据库了,默认的数据库是mariadb(mysql的一个分支)。可以按照以下步骤手动安装mysql数据库。1.下载rpm安装文件wgethttp://repo.mysql.com/mysql-community-release-el7.rpm2.执行rpm安装rpm-ivhmysql-community-release-el7.rpm依赖解析完成后,出现下列选项:dependenciesresolved=================================
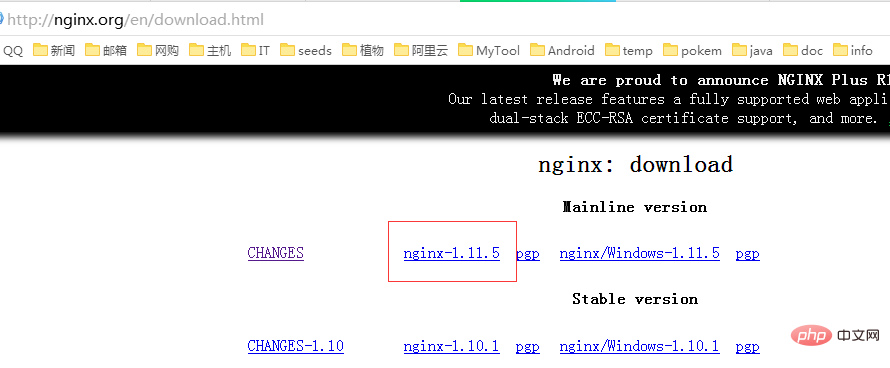 CentOS7如何安装Nginx并配置自动启动May 14, 2023 pm 03:01 PM
1、官网下载安装包选择适合linux的版本,这里选择最新的版本,下载到本地后上传到服务器或者centos下直接wget命令下载。切换到/usr/local目录,下载软件包#cd/usr/local#wgethttp://nginx.org/download/nginx-1.11.5.tar.gz2、安装nginx先执行以下命令,安装nginx依赖库,如果缺少依赖库,可能会安装失败,具体可以参考文章后面的错误提示信息。#yuminstallgcc-c++#yuminstallpcre#yumins
 centos7怎么查看php安装目录?三种方法分享Mar 22, 2023 am 10:38 AM
如果你正在使用 CentOS 7 操作系统,需要查看 PHP 安装目录以便定位配置文件、扩展等相关信息,那么就需要了解一些相关命令和技巧。下面,我们将为您介绍一些方法来查看 CentOS 7 上的 PHP 安装目录。
 怎么在CentOS7中使用Nginx和PHP7-FPM安装NextcloudMay 24, 2023 pm 08:13 PM
先决条件64位的centos7服务器的root权限步骤1-在centos7中安装nginx和php7-fpm在开始安装nginx和php7-fpm之前,我们还学要先添加epel包的仓库源。使用如下命令:yum-yinstallepel-release现在开始从epel仓库来安装nginx:yum-yinstallnginx然后我们还需要为php7-fpm添加另外一个仓库。互联网中有很个远程仓库提供了php7系列包,我在这里使用的是webtatic。添加php7-fpmwebtatic仓库:rpm
 如何在 CentOS 7 中安装并配置 Java 环境变量?Apr 22, 2023 pm 04:28 PM
安装环境:Centos764位Jdk1.864位Xshell免费版win10*64位一、先进来,你需要检查自己的openjdk是否卸载(或者判断是否存在,因为一般centos都会预装openjdk):在xshell或rpm-qa|grepjdk中输入rpm-qa|grepjavarpm-qa|grepjava第二,如果有一个对应的openjdk,并且显示了一个响应列表,那么就需要卸载它。在xshell中输入rpm-e-nodepstzdata-文件名(这个文件名是你查看的openjdk文件列表中
 CentOS7下怎么部署php7.1和开启MySQL扩展May 28, 2023 pm 03:01 PM
简单安装(yum方式)安装软件源添加epel源[root@opstrip.comopt]#rpm--import/etc/pki/rpm-gpg/rpm-gpg-key*[root@opstrip.comopt]#rpm-uvhhttp://mirrors.rit.edu/fedora/epel//7/x86_64/e/epel-release-7-9.noarch.rpm添加remi源[root@opstrip.comopt]#rpm-uvhhttp://rpms.remirepo.net/e
 Centos7改系统时区方法有哪些Mar 03, 2023 am 10:47 AM
Centos7修改系统时区的两种方法:1、使用timedatectl命令,可设定和修改时区信息,语法“timedatectl set-timezone 时区标识”;2、修改用户目录下的“.bash_profile”文件,在文件末尾追加“TZ='时区标识'; export TZ”即可。
 centos7使用rpm安装mysql5.7的方法May 27, 2023 am 08:05 AM
1.下载4个rpm包mysql-community-client-5.7.26-1.el7.x86_64.rpmmysql-community-common-5.7.26-1.el7.x86_64.rpmmysql-community-libs-5.7.26-1.el7.x86_64.rpmmysql-community-server-5.7.26-1.el7.x86_64.rpm想要用迅雷进行下载得先找到对应的rpm下载路径首先浏览器打开mysql官网:在打开的界面,按键盘f12打开开发者工具


Heiße KI -Werkzeuge

Undresser.AI Undress
KI-gestützte App zum Erstellen realistischer Aktfotos

AI Clothes Remover
Online-KI-Tool zum Entfernen von Kleidung aus Fotos.

Undress AI Tool
Ausziehbilder kostenlos

Clothoff.io
KI-Kleiderentferner

AI Hentai Generator
Erstellen Sie kostenlos Ai Hentai.

Heißer Artikel
Heiße Werkzeuge

SublimeText3 Englische Version
Empfohlen: Win-Version, unterstützt Code-Eingabeaufforderungen!

SublimeText3 chinesische Version
Chinesische Version, sehr einfach zu bedienen

WebStorm-Mac-Version
Nützliche JavaScript-Entwicklungstools

SublimeText3 Mac-Version
Codebearbeitungssoftware auf Gottesniveau (SublimeText3)

SublimeText3 Linux neue Version
SublimeText3 Linux neueste Version

