Heim >Backend-Entwicklung >Python-Tutorial >Detaillierte Einführung in das Senden von E-Mails über Python SMTP (mit Code)
Detaillierte Einführung in das Senden von E-Mails über Python SMTP (mit Code)
- 不言nach vorne
- 2018-10-09 15:39:312819Durchsuche
Dieser Artikel bietet Ihnen eine detaillierte Einführung in SMTP zum Versenden von E-Mails in Python (mit Code). Freunde in Not können darauf zurückgreifen.
Wie verwende ich Python, um den generierten Testbericht als E-Mail-Anhang zu versenden?
1. Überblick
SMTP (Simple Mail Transfer Protocol) ist ein einfaches E-Mail-Übertragungsprotokoll. Es handelt sich um eine Reihe von Regeln für die Übertragung von E-Mails von der Quelladresse zur Zieladresse. Damit wird gesteuert, wie E-Mails übertragen werden.Smtplib von Python bietet eine sehr praktische Möglichkeit zum Versenden von E-Mails, die einfach das SMTP-Protokoll kapselt.
Python unterstützt SMTP mit zwei Modulen: smtplib und email. Unter diesen ist E-Mail für die Erstellung von E-Mails und smtplib für das Senden von E-Mails verantwortlich.
Lassen Sie uns die Grundidee des Sendens eines Dateianhangs eines unbekannten MIME-Typs in Python verstehen:
0、前提:导入邮件发送模块
        from email.mime.text import MIMEText
        from email.mime.multipart import MIMEMultipart
        import smtplib
1、构造MIMEMultipart对象作为根容器
2、构造MIMEText对象作为邮件显示内容并附加到根容器
    a、读入文件内容并格式化
    b、设置附件头
3、设置根容器属性
4、得到格式化后的完整文本
5、用smtp发送邮件
6、封装成sendEmail类。
2. E-Mail-Versandelemente
Denken Sie gleichzeitig an uns. Mehrere Elemente zum Senden von E-Mails:
1、服务器。以QQ邮箱举例,则为smtp.qq.com
2、端口号。有465和587,请使用587
3、发送者。
4、密码。密码总不能直接写在文件里吧?哈哈,这里需要使用qq邮箱获取授权码。
5、收件人。(可能还不止一个)
6、发送邮件的主题subject。
7、邮件文本内容。
8、附件。
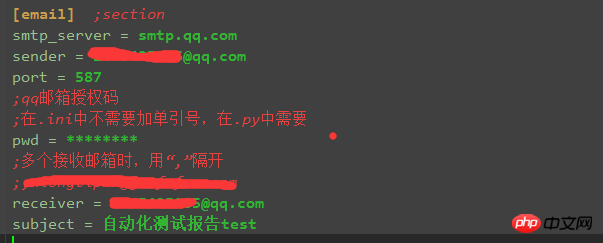
Da ich zuvor geschrieben habe, wie man die .ini-Konfigurationsdatei liest, werden in diesem Abschnitt einige Elemente zum Senden von E-Mails in die Konfigurationsdatei eingefügt . Die Konfigurationsdatei lautet wie folgt:

Das entsprechende Skript zum Lesen der Konfigurationsdatei lautet: (readConfig.py-Teil)
import os
import configparser

# config
cur_path = os.path.dirname(os.path.relpath(__file__))
configPath = os.path.join(cur_path,'config.ini')
conf = configparser.ConfigParser()
conf.read(configPath)

def get_smtpServer(smtpServer):
    smtp_server = conf.get('email',smtpServer)
    return smtp_server
#
......
Drei, E-Mail-Teil
Nachdem Sie das E-Mail-Stammcontainerobjekt MIMEMultipart() erstellt haben, müssen Sie den Stammcontainer verwenden, um verschiedene Elemente der E-Mail zu definieren, z E-Mail-Betreff, Absender von, Empfänger an, E-Mail-Text, E-Mail-Anhänge usw.
Wie lege ich Betreff und Absender der E-Mail fest?
# 构建根容器
msg = MIMEMultipart()

# 邮件主题、发送人、收件人、内容,此部分可以来自配置文件,也可以直接填入
msg['Subject'] = self.mail_subject  # u'自动化测试报告'
msg['from'] = self.mail_sender
msg['to'] = self.mail_pwd
Wie definiere ich den Hauptteil des E-Mail-Textes?
# 邮件正文部分body,1、可以用HTML自己自定义body内容;2、读取其他文件的内容为body
# body = "您好,<p>这里是使用Python登录邮箱,并发送附件的测试"
with open(reportFile,'r',encoding='UTF-8') as f:
     body = f.read()
msg.attach(MIMEText(_text=body, _subtype='html', _charset='utf-8'))  # _charset 是指Content_type的类型</p>
Wie füge ich Anhänge zu E-Mails hinzu?
# 添加附件
attachment = MIMEText(_text=open(reportFile, 'rb').read(), _subtype='base64',_charset= 'utf-8')
attachment['Content-Type'] = 'application/octet-stream'
attachment['Content-Disposition'] = 'attachment;filename = "result.html"'
msg.attach(attachment)
Wie sende ich?
Vier Schritte des Sendens: Serververbindung herstellen, bei der Mailbox anmelden, E-Mail senden und beenden.
Es ist ungefähr so:
try:
      smtp = smtplib.SMTP_SSL(host=self.mail_smtpserver, port=self.mail_port)  # 继承自SMTP
except:
      smtp = smtplib.SMTP()
      smtp.connect(self.mail_smtpserver, self.mail_port)

# smtp.set_debuglevel(1)
# 创建安全连接,加密SMTP
smtp.starttls()     # Puts the connection to the SMTP server into TLS mode.
# 用户名和密码
smtp.login(user=self.mail_sender, password=self.mail_pwd)

# 函数:sendmail(self, from_addr, to_addrs, msg, mail_options=[],rcpt_options=[]):
smtp.sendmail(self.mail_sender, self.mail_receiverList, msg.as_string())
smtp.quit()
hat darin einen Satz smtp.starttls() hinzugefügt. Dieser Satz wird zur Verschlüsselung der SMTP-Sitzung verwendet, um sicherzustellen, dass E-Mails sicher gesendet werden und nicht abgehört werden können.
Nachdem Sie das SMTP-Objekt erstellt haben, rufen Sie sofort die Methode starttls() auf.
Tatsächlich ist das gesamte E-Mail-Versandmodul abgeschlossen.
4. Probleme
Ich bin während dieses Vorgangs auf mehrere Probleme gestoßen und werde sie hier veröffentlichen, um sie mit Ihnen zu teilen.
Fehler 535
Auslösender Fehler: smtplib.SMTPAuthenticationError: (535, b'Error:
xc7xebxcaxb9xd3xc3xcaxdaxc8xa8xc2xebxb5xc7xc2xbcxa1xa3xcfxeaxc7xe9xc7xebxbfxb4:
http://service.mail.qq.com/cg...')
Lösung: Klicken Sie auf den letzten Link, es liegt tatsächlich am Problem mit dem Autorisierungscode
Der Fehler bleibt bestehen, nachdem die Autorisierung ersetzt wurde Code, 535
Lösung: Tauschen Sie den Port aus. Weil es zwei SSL-Protokollports für das QQ-Postfach gibt: 465/587.
Fehler: smtplib.SMTPAuthenticationError: (530, b'Zuerst muss ein STARTTLS-Befehl ausgegeben werden.')
Lösung: Vor login() hinzufügen: smtp.starttls()
5. Alle codieren
Diese Datei hängt von anderen Dateien ab und dient daher nur als Referenz, die Methode ist jedoch dieselbe.
import smtplib
from email.mime.text import MIMEText
from email.mime.multipart import MIMEMultipart
from email.mime.base import MIMEBase

class SendEmail(object):
    '''
    发送邮件模块封装,属性均从config.ini文件获得
    '''
    def __init__(self, smtpServer, mailPort, mailSender, mailPwd, mailtoList, mailSubject):
        self.mail_smtpserver = smtpServer
        self.mail_port = mailPort
        self.mail_sender = mailSender
        self.mail_pwd = mailPwd
        # 接收邮件列表
        self.mail_receiverList = mailtoList
        self.mail_subject = mailSubject
        # self.mail_content = mailContent

    def sendFile(self, reportFile):
        '''
        发送各种类型的附件
        '''
        # 构建根容器
        msg = MIMEMultipart()

        # 邮件正文部分body,1、可以用HTML自己自定义body内容;2、读取其他文件的内容为body
        # body = "您好,<p>这里是使用Python登录邮箱,并发送附件的测试"
        with open(reportFile,'r',encoding='UTF-8') as f:
            body = f.read()

        # _charset 是指Content_type的类型
        msg.attach(MIMEText(_text=body, _subtype='html', _charset='utf-8'))

        # 邮件主题、发送人、收件人、内容
        msg['Subject'] = self.mail_subject  # u'自动化测试报告'
        msg['from'] = self.mail_sender
        msg['to'] = self.mail_pwd

        # 添加附件
        attachment = MIMEText(_text=open(reportFile, 'rb').read(), _subtype='base64',_charset= 'utf-8')
        attachment['Content-Type'] = 'application/octet-stream'
        attachment['Content-Disposition'] = 'attachment;filename = "result.html"'
        msg.attach(attachment)

        try:
            smtp = smtplib.SMTP_SSL(host=self.mail_smtpserver, port=self.mail_port)  # 继承自SMTP
        except:
            smtp = smtplib.SMTP()
            smtp.connect(self.mail_smtpserver, self.mail_port)

        # smtp.set_debuglevel(1)
        # 创建安全连接,加密SMTP
        smtp.starttls()     # Puts the connection to the SMTP server into TLS mode.
        # 用户名和密码
        smtp.login(user=self.mail_sender, password=self.mail_pwd)

        # 函数:sendmail(self, from_addr, to_addrs, msg, mail_options=[],rcpt_options=[]):
        smtp.sendmail(self.mail_sender, self.mail_receiverList, msg.as_string())
        smtp.quit()

# 调试代码
if __name__ == "__main__":
    mail_smtpserver = 'smtp.qq.com'
    mail_port = 587
    mail_sender = '@qq.com'
    mail_pwd = ''
    mail_receiverList = ['@qq.com', '@163.com']
    mail_subject = u'自动化测试报告'
    s = SendEmail(mail_smtpserver, mail_port, mail_sender, mail_pwd, mail_receiverList, mail_subject)
    s.sendFile('F:\Python_project\PythonLearnning_2018\send_email\sendEmail_Test.html.tar.gz')
    print('--- test end --- ')</p>
Das obige ist der detaillierte Inhalt vonDetaillierte Einführung in das Senden von E-Mails über Python SMTP (mit Code). Für weitere Informationen folgen Sie bitte anderen verwandten Artikeln auf der PHP chinesischen Website!

