Heim >Betrieb und Instandhaltung >Betrieb und Wartung von Linux >Verwenden Sie DescribeCommands, um die erstellten Cloud Assistant-Befehle abzufragen
Verwenden Sie DescribeCommands, um die erstellten Cloud Assistant-Befehle abzufragen
- 坏嘻嘻Original
- 2018-09-27 14:26:481986Durchsuche
Basierend auf der Einführung in die Verwendung von DescribeCommands zum Abfragen der erstellten Cloud-Assistent-Befehle konzentriert sich dieser Artikel auf die spezifischen Schritte. Der Inhalt dieses Artikels ist kompakt und ich hoffe, dass Sie etwas daraus gewinnen können.
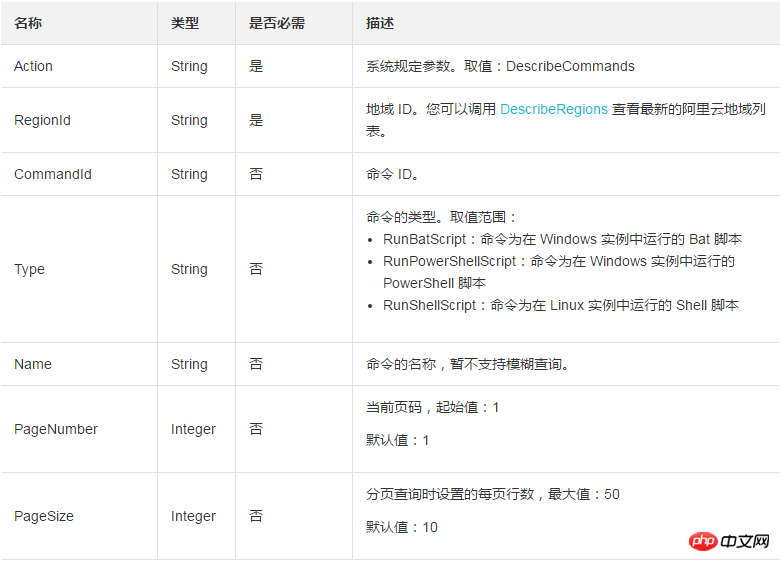
DescribeCommands
Anforderungsparameter

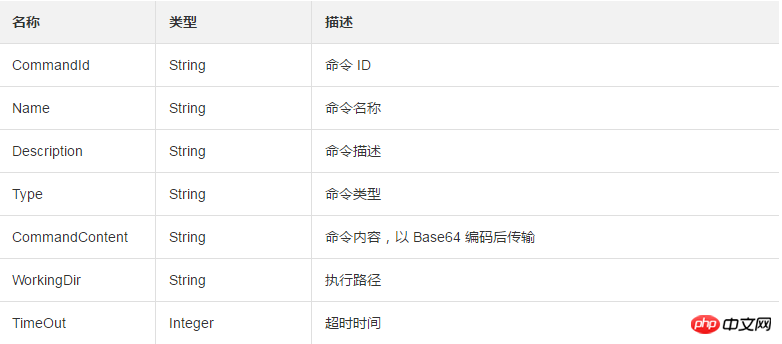
Rückgabeparameter

Datensatztyp CommandSetType

CommandTypeCommandType

Beispiel
Anfragebeispiel
https://ecs.aliyuncs.com/?Action=DescribeCommands
&RegionId=cn-hangzhou
&<公共请求参数>
Normales Rückgabebeispiel
XML-Format
<DescribeCommandsResponse>
    <TotalCount>5</TotalCount>
    <Commands>
        <Command>
                <Name>Test</Name>
                <WorkingDir></WorkingDir>
                <CommandContent>ZWNobyAxMjM=</CommandContent>
                <Timeout>3600</Timeout>
                <Type>RunShellScript</Type>
                <CommandId>c-7d2a745b412b4601b2d47f6a768d3a14</CommandId>
                <Description>test</Description>
        </Command>
        <Command>
                <Name>Test1</Name>
                <WorkingDir></WorkingDir>
                <CommandContent>Y2QgL3Jvb3Q=</CommandContent>
                <Timeout>3600</Timeout>
                <Type>RunShellScript</Type>
                <CommandId>c-7d2a745b412b4601b2d47f6a768d3a15</CommandId>
                <Description>test1</Description>
        </Command>
        <Command>
                <Name>Test2</Name>
                <WorkingDir></WorkingDir>
                <CommandContent>eXVtIHVwZGF0ZQ==</CommandContent>
                <Timeout>3600</Timeout>
                <Type>RunShellScript</Type>
                <CommandId>c-7d2a745b412b4601b2d47f6a768d3a16</CommandId>
                <Description>test2</Description>
        </Command>
        <Command>
                <Name>Test3</Name>
                <WorkingDir></WorkingDir>
                <CommandContent>c2VydmljZSBuZ2lueCByZWxvYWQ=</CommandContent>
                <Timeout>3600</Timeout>
                <Type>RunShellScript</Type>
                <CommandId>c-7d2a745b412b4601b2d47f6a768d3a17</CommandId>
                <Description>test3</Description>
        </Command>
        <Command>
                <Name>Test4</Name>
                <WorkingDir></WorkingDir>
                <CommandContent>bHM=</CommandContent>
                <Timeout>120</Timeout>
                <Type>RunShellScript</Type>
                <CommandId>c-7d2a745b412b4601b2d47f6a768d3a18</CommandId>
                <Description>test4</Description>
        </Command>
    <PageNumber>1</PageNumber>
    <RequestId>E69EF3CC-94CD-42E7-8926-F133B86387C0</RequestId>
    <PageSize>10</PageSize>
</DescribeCommandsResponse>
JSON-Format
{
    "TotalCount": 5,
    "Commands": {
        "Command": [
            {
                "Name": "Test",
                "WorkingDir": "",
                "CommandContent": "ZWNobyAxMjM=",
                "Timeout": 3600,
                "Type": "RunShellScript",
                "CommandId": "c-7d2a745b412b4601b2d47f6a768d3a14",
                "Description": "test"
            },
            {
                "Name": "Test1",
                "WorkingDir": "",
                "CommandContent": "Y2QgL3Jvb3Q=",
                "Timeout": 3600,
                "Type": "RunShellScript",
                "CommandId": "c-7d2a745b412b4601b2d47f6a768d3a15",
                "Description": "test1"
            },
            {
                "Name": "Test2",
                "WorkingDir": "",
                "CommandContent": "eXVtIHVwZGF0ZQ==",
                "Timeout": 3600,
                "Type": "RunShellScript",
                "CommandId": "c-7d2a745b412b4601b2d47f6a768d3a16",
                "Description": "test2"
            },
            {
                "Name": "Test3",
                "WorkingDir": "",
                "CommandContent": "c2VydmljZSBuZ2lueCByZWxvYWQ=",
                "Timeout": 3600,
                "Type": "RunShellScript",
                "CommandId": "c-7d2a745b412b4601b2d47f6a768d3a17",
                "Description": "test3"
            },
            {
                "Name": "Test4",
                "WorkingDir": "",
                "CommandContent": "bHM=",
                "Timeout": 3600,
                "Type": "RunShellScript",
                "CommandId": "c-7d2a745b412b4601b2d47f6a768d3a18",
                "Description": "test4"
            },
        ]
    },
    "PageNumber": 1,
    "RequestId": "E69EF3CC-94CD-42E7-8926-F133B86387C0",
    "PageSize": 10
}
Beispiel für Ausnahmerückgabe
XML-Format
<Error>
    <RequestId>E69EF3CC-94CD-42E7-8926-F133B86387C0</RequestId>
    <HostId>ecs.aliyuncs.com</HostId>
    <Code>MissingParameter.RegionId</Code>
    <Message>The input parameter “RegionId” that is mandatory for processing this request is not supplied.</Message>
</Error>
JSON-Format
{
    "RequestId": "E69EF3CC-94CD-42E7-8926-F133B86387C0",
    "HostId": "ecs.aliyuncs.com"
    "Code": "MissingParameter.RegionId"
    "Message": "The input parameter “RegionId” that is mandatory for processing this request is not supplied."
}
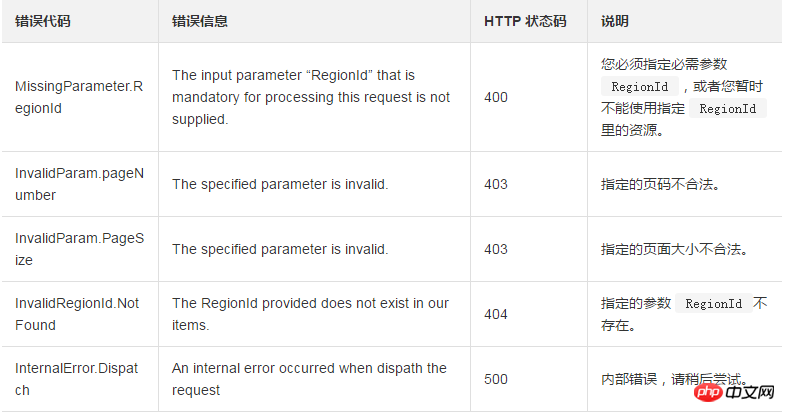
Fehlercode
Im Folgenden sind die für diese Schnittstelle spezifischen Fehlercodes aufgeführt. Weitere Fehlercodes finden Sie im API Error Center.

Das obige ist der detaillierte Inhalt vonVerwenden Sie DescribeCommands, um die erstellten Cloud Assistant-Befehle abzufragen. Für weitere Informationen folgen Sie bitte anderen verwandten Artikeln auf der PHP chinesischen Website!
In Verbindung stehende Artikel
Mehr sehen- Erfahren Sie, wie Sie den Nginx-Server unter Linux installieren
- Detaillierte Einführung in den wget-Befehl von Linux
- Ausführliche Erläuterung von Beispielen für die Verwendung von yum zur Installation von Nginx unter Linux
- Detaillierte Erläuterung der Worker-Verbindungsprobleme in Nginx
- Detaillierte Erläuterung des Installationsprozesses von Python3 unter Linux

