Heim >Web-Frontend >CSS-Tutorial >So erzielen Sie mit reinem CSS den besonderen Effekt, Fassbier zu holen (Quellcode beigefügt)
So erzielen Sie mit reinem CSS den besonderen Effekt, Fassbier zu holen (Quellcode beigefügt)
- 不言Original
- 2018-08-27 09:43:552169Durchsuche
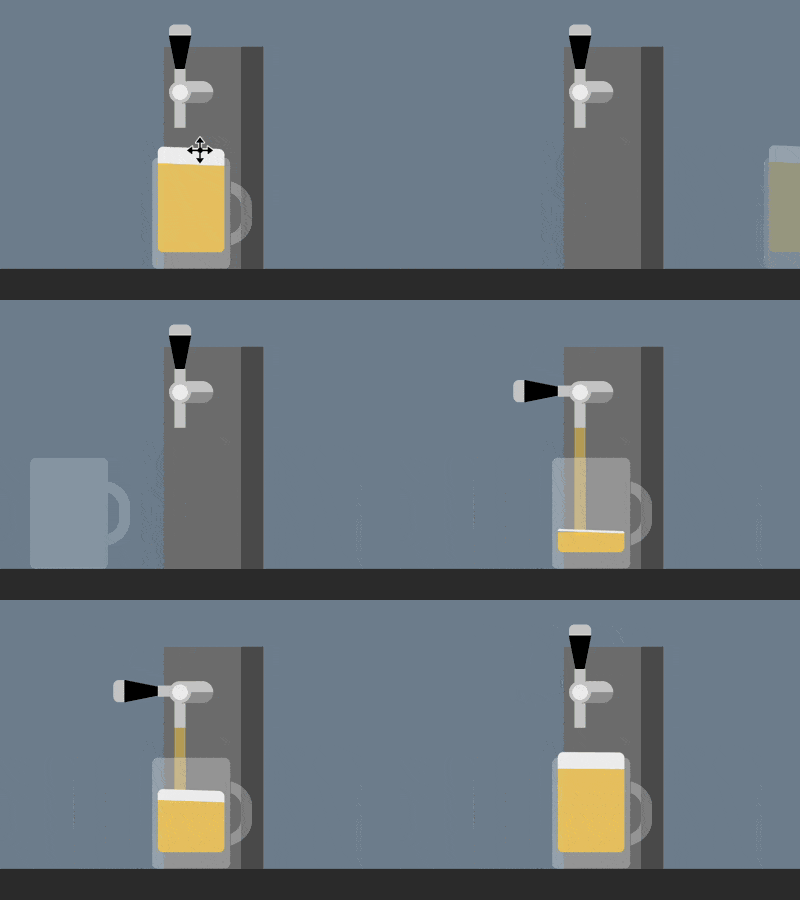
Der Inhalt dieses Artikels befasst sich mit der Verwendung von reinem CSS, um die Spezialeffekte von Fassbier zu realisieren (Quellcode ist beigefügt). Ich hoffe, dass dies der Fall ist Dir helfen.
Effektvorschau

Quellcode-Download
https://github.com/comehope/front-end-daily -challenges
Code-Interpretation
definiert dom. Der Behälter enthält ein .keg-Element, das ein Weinfass darstellt, und ein .glass-Element, das ein Bierglas darstellt. Das Weinfass hat zwei untergeordnete Elemente, .handle stellt den Griff dar, .pipe stellt den Wasserauslass dar und das Weinglas hat 1 untergeordnetes Element .beer, das Bier darstellt:
<div>
    <div>
        <span></span>
        <span></span>
    </div>
    <div>
        <span></span>
    </div>
</div>
Zentrierte Anzeige:
body {
    margin: 0;
    height: 100vh;
    display: flex;
    justify-content: center;
    background: linear-gradient(
        lightslategray 300px,
        #333 300px
    );
}
Definieren Sie die Behältergröße und die allgemeinen Attribute des Pseudoelements:
.container {
    width: 700px;
    height: 300px;
    position: relative;
}

.container *::before,
.container *::after {
    content: '';
    position: absolute;
}
Zeichnen Sie das Weinfass:
.keg {
    position: absolute;
    width: 90px;
    height: 200px;
    background: linear-gradient(
        to right,
        #777 70px,
        #555 70px
    );
    bottom: 0;
    left: 310px;
}
Zeichnen Sie die Wasserleitung und ihre Halterung:
.keg .pipe {
    position: absolute;
    width: 10px;
    height: 40px;
    background-color: #ccc;
    top: 33px;
    left: 10px;
}

.keg .pipe::before {
    width: 40px;
    height: 20px;
    background:
        radial-gradient(
            circle at 10px 10px,
            #eee 7px,
            #ccc 7px, #ccc 10px,
            transparent 10px
        ),
        linear-gradient(
            #ccc 50%,
            #999 50%
        );
    border-radius: 10px;
    top: -2px;
    left: -5px;
}
Zeichne den Griff:
.keg .handle {
    position: absolute;
    border-style: solid;
    border-width: 50px 10px 0 10px;
    border-color: black transparent transparent transparent;
    top: -10px;
    left: 5px;
}

.keg .handle::before {
    width: 20px;
    height: 10px;
    background-color: #ccc;
    top: -60px;
    left: -10px;
    border-radius: 5px 5px 0 0;
}

.keg .handle::after {
    width: 10px;
    height: 20px;
    background-color: #ccc;
    top: -20px;
    left: -5px;
}
Zeichne das Weinglas:
.glass {
    position: absolute;
    width: 70px;
    height: 100px;
    color: rgba(255, 255, 255, 0.3);
    background-color: currentColor;
    bottom: 0;
    left: 300px;
    border-radius: 5px;
}

.glass::before {
    width: 50px;
    height: 40px;
    border: 10px solid;
    top: 20px;
    right: -20px;
    border-radius: 0 40% 40% 0;
    clip-path: inset(0 0 0 72%);
}
Zeichne das Bier und den Schaum im Glas:
.beer {
    position: absolute;
    width: 60px;
    height: 80px;
    background-color: rgba(255, 206, 84, 0.8);
    bottom: 15px;
    left: 5px;
    border-radius: 0 0 5px 5px;
    border-top: solid rgba(255, 206, 84, 0.8);
}

.beer::before {
    width: inherit;
    height: 15px;
    background-color: #eee;
    top: -15px;
    border-radius: 5px 5px 0 0;
}
Erstelle als nächstes die Animation.
Fügen Sie den Animationseffekt des heruntergedrückten Weinglasgriffs hinzu:
.keg .handle {
    transform-origin: center 50px;
    animation: handle 5s infinite;
}

@keyframes handle {
    10%, 60% {
        transform: rotate(0deg);
    }

    20%, 50% {
        transform: rotate(-90deg);
    }
}
Fügen Sie den Animationseffekt des eingefüllten Bieres hinzu:
.beer {
    animation: fillup 5s infinite;
}

@keyframes fillup {
    0%, 20% {
        height: 0px;
        border-width: 0px;
    }

    40% {
        height: 40px;
    }

    80%, 100% {
        height: 80px;
        border-width: 5px;
    }
}
Fügen Sie den Animationseffekt des Bieres hinzu Schaum steigt auf:
.beer::before {
    animation:
        wave 0.5s infinite alternate,
        fillup-foam 5s linear infinite;
}

@keyframes fillup-foam {
    0%, 20% {
        top: 0;
        height: 0;
    }

    60%, 100% {
        top: -15px;
        height: 15px;
    }
}

@keyframes wave {
    from {
        transform: skewY(-3deg);
    }

    to {
        transform: skewY(3deg);
    }
}
Erhöhen Sie die Wirkung des aus dem Auslauf strömenden Bieres:
.keg .pipe::after {
    width: 10px;
    background-color: rgba(255, 206, 84, 0.5);
    animation: flow 5s infinite;
}

@keyframes flow {
    0%, 15% {
        top: 40px;
        height: 0;
    }

    20% {
        height: 115px;
    }

    40% {
        height: 75px;
    }

    55% {
        top: 40px;
        height: 50px;
    }

    60%, 100% {
        top: 80px;
        height: 0;
    }
}
Zum Schluss erhöhen Sie die Wirkung des Glasgleitens:
.glass {
    animation: slide 5s ease infinite;
}

@keyframes slide {
    0% {
        left: 0;
        filter: opacity(0);
    }

    20%, 80% {
        left: 300px;
        filter: opacity(1);
    }

    100% {
        left: 600px;
        filter: opacity(0);
    }
}
Fertig!
Verwandte Empfehlungen:
So verwenden Sie reines CSS, um einen Sanduhr-Animationseffekt zu implementieren
So verwenden Sie CSS und D3, um eine Reihe von Laternen zu implementieren (mit Code)Das obige ist der detaillierte Inhalt vonSo erzielen Sie mit reinem CSS den besonderen Effekt, Fassbier zu holen (Quellcode beigefügt). Für weitere Informationen folgen Sie bitte anderen verwandten Artikeln auf der PHP chinesischen Website!

