Heim >Backend-Entwicklung >C#.Net-Tutorial >Verwenden Sie das Unity-Skript, um die Auflösung anzupassen, um einen hochauflösenden Screenshot von der Kamera zu erstellen
Verwenden Sie das Unity-Skript, um die Auflösung anzupassen, um einen hochauflösenden Screenshot von der Kamera zu erstellen
- php是最好的语言Original
- 2018-07-27 11:22:178506Durchsuche
Als ich kürzlich an einem Projekt arbeitete, musste ich einen hochauflösenden Screenshot im Spiel machen, den ich studiert und in ein Skript für die zukünftige Verwendung geschrieben habe.
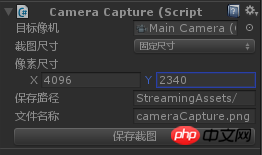
Das Skript kann die Auflösung anpassen und mit der Kamera hochauflösende Screenshots erstellen. Sie können Code verwenden, um dynamisch Screenshots zu erstellen, oder Sie können Screenshots im Bearbeitungsmodus erstellen.
Achten Sie auf das richtige Seitenverhältnis des Screenshots. Wenn das Seitenverhältnis falsch ist, kann es zu Problemen kommen.
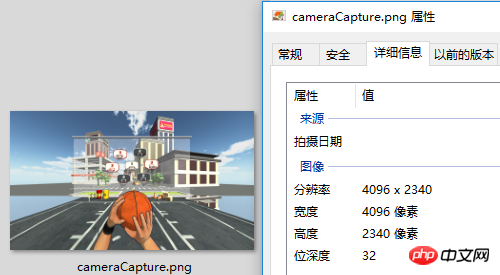
Screenshot-Effekt:


Skript:
CameraCapture.cs
using UnityEngine;
using System.IO;

/// <summary>
/// 相机截图
/// <para>ZhangYu 2018-07-06</para>
/// </summary>
public class CameraCapture : MonoBehaviour {

    // 截图尺寸
    public enum CaptureSize {
        CameraSize,
        ScreenResolution,
        FixedSize
    }

    // 目标摄像机
    public Camera targetCamera;
    // 截图尺寸
    public CaptureSize captureSize = CaptureSize.CameraSize;
    // 像素尺寸
    public Vector2 pixelSize;
    // 保存路径
    public string savePath = "StreamingAssets/";
    // 文件名称
    public string fileName = "cameraCapture.png";

    #if UNITY_EDITOR
    private void Reset() {
        targetCamera = GetComponent<Camera>();
        pixelSize = new Vector2(Screen.currentResolution.width, Screen.currentResolution.height);
    }
    #endif

    /// <summary> 保存截图 </summary>
    /// <param name="camera">目标摄像机</param>
    public void saveCapture() {
        Vector2 size = pixelSize;
        if (captureSize == CaptureSize.CameraSize) {
            size = new Vector2(targetCamera.pixelWidth, targetCamera.pixelHeight);
        } else if (captureSize == CaptureSize.ScreenResolution) {
            size = new Vector2(Screen.currentResolution.width, Screen.currentResolution.height);
        }
        string path = Application.dataPath + "/" + savePath + fileName;
        saveTexture(path, capture(targetCamera, (int)size.x, (int)size.y));
    }

    /// <summary> 相机截图 </summary>
    /// <param name="camera">目标相机</param>
    public static Texture2D capture(Camera camera) {
        return capture(camera, Screen.width, Screen.height);
    }

    /// <summary> 相机截图 </summary>
    /// <param name="camera">目标相机</param>
    /// <param name="width">宽度</param>
    /// <param name="height">高度</param>
    public static Texture2D capture(Camera camera, int width, int height) {
        RenderTexture rt = new RenderTexture(width, height, 0);
        rt.depth = 24;
        rt.antiAliasing = 8;
        camera.targetTexture = rt;
        camera.RenderDontRestore();
        RenderTexture.active = rt;
        Texture2D texture = new Texture2D(width, height, TextureFormat.ARGB32, false, true);
        Rect rect = new Rect(0, 0, width, height);
        texture.ReadPixels(rect, 0, 0);
        texture.filterMode = FilterMode.Point;
        texture.Apply();
        camera.targetTexture = null;
        RenderTexture.active = null;
        Destroy(rt);
        return texture;
    }

    /// <summary> 保存贴图 </summary>
    /// <param name="path">保存路径</param>
    /// <param name="texture">Texture2D</param>
    public static void saveTexture(string path, Texture2D texture) {
        File.WriteAllBytes(path, texture.EncodeToPNG());
        #if UNITY_EDITOR
        Debug.Log("已保存截图到:" + path);
        #endif
    }

}
Skripteditor:
CameraCaptureEditor.cs
using UnityEditor;
using UnityEngine;

/// <summary>
/// 相机截图 编辑器
/// <para>ZhangYu 2018-07-06</para>
/// </summary>
[CanEditMultipleObjects]
[CustomEditor(typeof(CameraCapture))]
public class CameraCaptureEditor : Editor {

    public override void OnInspectorGUI() {
        // 属性
        CameraCapture script = (CameraCapture)target;
        int selected = (int)script.captureSize;

        // 重绘GUI
        EditorGUI.BeginChangeCheck();
        drawProperty("targetCamera", "目标像机");
        string[] options = new string[] { "像机尺寸", "屏幕尺寸", "固定尺寸"};
        selected = EditorGUILayout.Popup("截图尺寸", selected, options, GUILayout.ExpandWidth(true));
        script.captureSize = (CameraCapture.CaptureSize)selected;
        if (script.captureSize == CameraCapture.CaptureSize.FixedSize) {
            drawProperty("pixelSize", "像素尺寸");
            EditorGUILayout.HelpBox("请保持正确的宽高比!\n否则截图区域可能出现错误。", MessageType.Info);
        }
        drawProperty("savePath", "保存路径");
        drawProperty("fileName", "文件名称");

        // 保存截图按钮
        bool isPress = GUILayout.Button("保存截图", GUILayout.ExpandWidth(true));
        if (isPress) script.saveCapture();
        if (EditorGUI.EndChangeCheck()) serializedObject.ApplyModifiedProperties();
    }

    private void drawProperty(string property, string label) {
        EditorGUILayout.PropertyField(serializedObject.FindProperty(property), new GUIContent(label), true);
    }

}
Verwandte Artikel:
Vuforia Unity-Kamerabildzugriff
Verwendung von Direct2D in Unity
Ähnliche Videos:
Das obige ist der detaillierte Inhalt vonVerwenden Sie das Unity-Skript, um die Auflösung anzupassen, um einen hochauflösenden Screenshot von der Kamera zu erstellen. Für weitere Informationen folgen Sie bitte anderen verwandten Artikeln auf der PHP chinesischen Website!
In Verbindung stehende Artikel
Mehr sehen- .Net Core-Grafikverifizierungscode
- Laden der .NET Core-Konfigurationsdatei und DI-Injektion von Konfigurationsdaten
- Dokumentation zum .NET Core CLI-Tool dotnet-publish
- asp.net verwendet .net-Steuerelemente, um Dropdown-Navigationsmenüs zu erstellen
- So erhalten Sie den Namen des Controllers in Asp.net MVC

