Heim >Web-Frontend >js-Tutorial >Parsen benutzerdefinierter Objekte in js
Parsen benutzerdefinierter Objekte in js
- 不言Original
- 2018-07-14 15:01:111558Durchsuche
Dieser Artikel stellt hauptsächlich die Analyse benutzerdefinierter Objekte in js vor. Jetzt kann ich ihn mit allen teilen, die ihn benötigen
1. Literal erstelltes Objekt
var person = {
    name: "sun",
    age: 18,
    work: function () {
        console.log(this.name + "is working...");
    },
    address: {
        home: "大屯里xxx路xxx小区xx单元xxx室",
        phone: "123456789",
    }
};
person.work();
console.log(person.address.home);
2. Datenbeschreibung und Zugriffsbeschreibungseinstellung
var person = {
    age: 18,
    address: {
        home: "大屯里xxx路xxx小区xx单元xxx室",
        phone: "123456789",
    }
};
Object.defineProperties(person, {
    name: {
        value: "sun",        // 该属性的值,可被读取
        writable: true,      // 表示能否修改属性的值,默认值为true
        configurable: true,  // 表示能否delete该属性并重新定义,直接在对象上定义的属性默认值为true
        enumerable: true     // 表示能否通过for-in枚举,直接在对象上定义的属性默认值为true
    },
    work: {
        value: function(){
            console.log(this.name + "is working...");
            },
        // 通过Object.defineProperty和Object.defineProperties定义属性,
        // 如果没有声明writable、configurable、enumerable,它们的默认值都是false
    }
});
person.work();
console.log(person.address.home);
3. abrufen und festlegen
var circle = {
    value: 10,
    get girth(){
        return 2 * 3.14 * this.R
    },
    get area(){
        return 3.4 * this.R * this.R
    },
};
Object.defineProperty(circle, "R", {
    get : function () {
        return this.value;
    },
    set : function (val) {
        console.log("半径被修改了!");
        this.value = val;
    }
});
circle.R = 100;
console.log("girth: " + circle.girth + "area: " + circle.area);
4. Datenbeschreibung und Zugriffsbeschreibung prüfen
var circle = {
    R: 10,
    // __proto__: null,
    get area(){
        return 3.4 * this.R * this.R
    },
};
Object.defineProperty(circle, "site", {
    value: [0, 2.2, 4.1],
    // enumerable: true,  // 是否可配置(读取),不设置为true时,Object.keys(circle))和Object.values(circle))将获取不到该键值对
});
console.log("R" in circle);  // 检查属性
console.log(circle.hasOwnProperty("R"));  // 检查自有的属性
console.log(circle.propertyIsEnumerable("R"));   // 检查属性是否是可枚举的
// Object对象的方法
console.log(Object.keys(circle));
console.log(Object.values(circle));
console.log(Object.getOwnPropertyNames(circle));  // 检查对象自身所有属性
console.log(Object.getOwnPropertyDescriptor(circle, "R")); // 得到circle对象关于R属性的描述
2. Prototyp
1.Prototyp-Interpretation
- 每一次创建函数,解析器都会向函数中添加一个属性:prototype
- 如果函数作为普通函数调用prototype,没有任何作用
- 当该函数以构造函数的形式调用时,它会有一个隐含的属性__proto__指向其原型对象
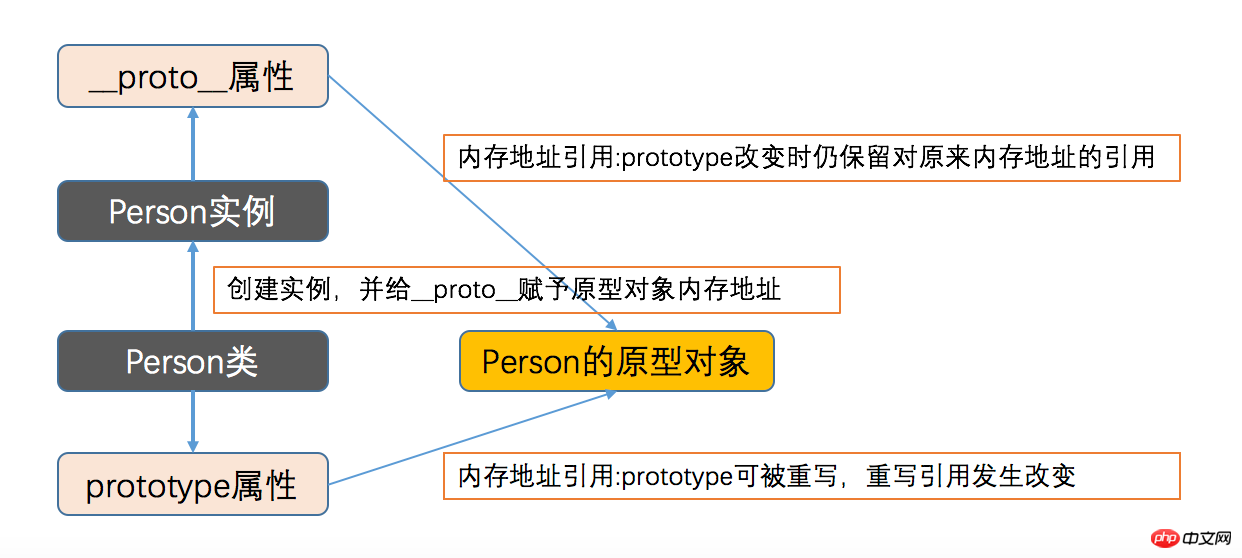
- 每个实例有各自的__proto__指向原型对象的prototype, 也就是原型对象中的属性和方法被调用函数"共享"
- 当类的原型对象prototype指向的内存地址发生改变时,已创建实例的__proto__ !== prototype,也就是不会被覆盖。而新创建的实例仍然是__proto__ === prototyp
function Person(name, age) {
    this.name = name;
    this.age = age;
}
// Person.prototype.gender = "male";
// Person.prototype.sayHello = function () {
//     return this.name + ", " + this.age + "years old."
// };
Person.prototype = {
    gender: "male",
    sayHello: function () {
        return this.name + ", " + this.age + "years old."
    }
};
var p1 = new Person("孙悟空", 2000);
p1.sayHello();
console.log(Person.prototype);
console.log(Person.prototype.constructor === Person);
2.Prototyp und __Proto__

function Person() {}
var obj1 = { gender: "male"};  // 创建两个内存地址
var obj2 = { age: 200 };
Person.prototype = obj1;
var p1 = new Person();
console.log(p1.__proto__ === Person.prototype);
console.log(p1.__proto__.gender);
console.log(Person.prototype);
Person.prototype = obj2;
var p2 = new Person();
console.log(p2.__proto__.age);
console.log(Person.prototype);
console.log(p1.__proto__.age);    // undefined
console.log(p2.__proto__.gender); // undefined
console.log(p1.__proto__ === Person.prototype);  // false,表示当prototype指向的内存地址改变时,已经创建的实例对象的__proto__仍指向原来的内存地址
console.log(p2.__proto__ === Person.prototype);
function Person() {}
Person.prototype = {name: "xxx", age: 100,};
var p1 = new Person();
console.log(p1.__proto__.name);
Person.prototype = { price: 998,};
var p2 = new Person();
console.log(p2.__proto__.price);
console.log(p1.__proto__.price); // undefined
console.log(p2.__proto__.name); // undefiend
console.log(p1.__proto__ === Person.prototype); // false, 原型对象的内存地址引用已发生改变
console.log(p1.__proto__.age); // __proto__指向的内存地址被保留
console.log(p2.__proto__ === Person.prototype); // truefunction Person() {}
Person.prototype = { price: 60 };
var p1 = new Person();
Person.prototype = { price: 998};
var p2 = new Person();
console.log(p1.__proto__ === Person.prototype); // 依然是false
console.log(p2.__proto__ === Person.prototype); // true3. Teilbarkeit des Prototyps
// prototype非常类似python中的静态属性和静态方法。每个实例都可以访问同一块内存空间。
function Person() {}
Person.prototype = {price: 60};
var p1 = new Person();
var p2 = new Person();
console.log(p1.__proto__.price);
console.log(p2.__proto__.price);
console.log(Person.prototype.price);
4. Vererbung des Prototyps
// 当访问实例对象的一个属性或方法时,它会先在对象自身中查找,如果有则直接使用;如果没有则在原型对象中继续查找,如果有则直接使用
function Person() {}
Person.prototype = {price: 60};
var p1 = new Person();
var p2 = new Person();
console.log(p1.price);
console.log(p2.price);
console.log(Person.prototype.price);
3. Klasse
1 . Klassenkapselung
// 字面量方法(工厂方法) -- 直接在var obj = {}内部写代码,缺点是只实例化一次
// 构造函数方法        -- 只用构造函数声明this,缺点是可扩展性差,数据重复
// 原型方法           -- 只用prototype声明共有的属性和方法,缺点是实例的数据相同,不满足多态
1. Gemischte Konstruktor-/Prototyp-Methode
// 最广泛的使用方法
function Person(name, age) {
    this.name = name;
    this.age = age;
}
// prototype写在外面是为了保证其动态增加公共属性和方法
Person.prototype.sayHello = function () {
    console.log(this.name + ", " + this.age + " years old.");  // 把共有的属性和方法封装到prototype中
};
var p = new Person("孙悟空", 2000);
p.sayHello();
2. Dynamische Prototyp-Methode
// 我把它写给Person的属性,让父类也能够访问
function Person(name, age) {
    Person.group = Person.prototype.group = "西天取经组";
    Person.toString = Person.prototype.toString = function (){
        console.log("Person: " + Person.group)
    };
    this.name = name;
    this.age = age;
    this.sayHello = function () {
      console.log(this.name + ", " + this.age + "years old.")
    };
}
var person = new Person("孙悟空", 2000);
console.log(person.constructor); // 检查构造器函数
console.log(person instanceof Person);  // 检查是否为其原型类
person.sayHello();
Person.toString();
3. Gemischte Factory-Methode
// 也是常用的方法
function Person(name, age) {
    this.name = name;
    this.age = age;
    if (typeof Person._initialized === "undefined"){
        Person.prototype.sayHello = function () {
            console.log(this.name + ", " + this.age + " years old.");
        };
        Person._initialized = true;
    }
}
var p = new Person("孙悟空", 2000);
p.sayHello();
4. Besprechen Sie die Klassenstruktur noch einmal
// 混合工厂方法  -- 存在与工厂方法类似的问题,不建议使用
function Person(name, age) {
    var obj = {};
    obj.name = name;
    obj.age = age;
    obj.sayHello = function () {
        console.log(this.name + ", " + this.age + " years old.");
    };
    return obj
}
var p = new Person("孙悟空", 2000);
p.sayHello();
2. Benutzerdefinierte Klasse
function Person(name, age) {
    // 静态属性
    Person.group = "西天取经四人组,暗合金木水火土";
    // 静态方法
    Person.introduce = function () {
        console.log("贫僧自东土大唐而来")
    };
    // 实例属性
    this.name = name;
    this.age = age;
    // 实例方法,应该写在prototype中
    this.say = function () {
        console.log("hello, i'm " + this.name);
    };
    Person.prototype.introduce = Person.introduce; // 此时Person类和其实例都可以使用introduce方法
    // 父类使用实例方法
    Person.example = Person.prototype.example = function (self) {
        self = self || this;
        console.log(self.name + " " + self.age);
    }
}
// 在python中,实例可以访问父类的属性和方法,父类也可以使用实例方法
// 在java和js中,实例不能调用父类的静态属性和静态方法,父类不能使用实例方法
// 如果想让实例和父类共享一个属性或者方法,就只能放到方法区并创建引用
var sun = new Person("孙悟空", 2000);
Person.introduce();  // 父类调用静态方法
sun.say();
sun.introduce();     // 实例调用静态方法
Person.example(sun); // 父类调用实例方法
sun.example();       // 子类调用实例方法
// 可见,prototype是父类和实例的沟通桥梁
3. Klassenvererbung
1. Kopieren Sie das Vererbungsliteralobjekt (Instanz)
function Person(name, age) {
    this.name = name;
    this.age = age;
    this.sayHello = function () {
      console.log(this.name + ", " + this.age + "years old.")
    };
}
function New(Person) {
    return function () {
        var obj = {"__proto__": Person.prototype};  // 必须写在这里
        Person.apply(obj, arguments);  // arguments同this一样,是默认自带的关键字,用于存储传入的参数
        return obj
    }
}
var temp = New(Person);
var p1 = temp("孙悟空", 2000);
var p2 = temp("猪八戒", 1);
p1.sayHello();
p2.sayHello();
2 .Aufrufen und Anwenden der Objektvererbung implementieren
var person = {
    name: "Li",
    age: 16,
    address: {
        home: "none",
        city: "none",
    },
    say: function(){
        console.log("hello, guy.")
    }
};
var child = {gender:"female",};
function extendDeeply (p, c){
    var c = c || {};
    for (var prop in p) {
        if (typeof p[prop] === "object") {
            c[prop] = (p[prop].constructor === Array) ? [] : {};
            extendDeeply(p[prop], c[prop]);
        } else {
            c[prop] = p[prop];
        }
    }
}
extendDeeply(person, child);
console.log(child);
child.say();rrree3.Prototype-Kettenvererbung
function Person(name, age) {
    this.name = name;
    this.age = age;
    this.address = {
        home: "none",
        city: "none",
    }
}
Person.prototype.say = function () {
    console.log("hello, guy.")
};
// 它继承的只是实例对象this,无法继承父类原型prototyp
function Child(name, age) {
    Person.call(this, name, age);
    this.gender = "female";
}
var child = new Child("Li", 16);
console.log(child);
// child.say(); 报错: child.say is not a function.
4.create implementiert die Klassenvererbung
对象继承的缺点:只继承了实例对象的可访问的属性和方法,没有继承原型
5.Object.create implementiert die Klassenvererbung – die empfohlene Weg
// 原型链继承
function Person() {}
Person.prototype.name = "Person";
Person.prototype.toString = function () {
    console.log(this.name);
};
function Child(name, age) {
    this.age = age;
    this.name = name;
}
Child.prototype = Person.prototype;
Child.prototype.constructor = Child;
var child = new Child("Li", 16);
console.log(child.name + " " + child.age);
child.toString();
// 其缺点是之继承了原型,没有继承实例
5. Kombinationsvererbung – der empfohlene Weg
function Person(name, age) {
    this.name = name;
    this.age = age;
    this.address = {
        home: "none",
        city: "none",
    }
}
Person.prototype.say = function () {
    console.log("hello, guy.")
};
function Child(P, name, age) {
    function F() {}
    F.prototype = new P(name, age);
    var c = new F();
    return c;
}
Child.prototype.constructor = Child;  // 无法修正
var child = new Child(Person, "Li", 16);
console.log(child);
console.log(child.name);
child.say();
console.log(child.constructor);  // 结果为[Function: Person],构造器指向无法修正
console.log(child instanceof Child);  // false
console.log(child instanceof Person); // true
6. Zusammenfassung der Vererbung
// Object.create继承,实现原理和上面的create类似
// 1.创建父类
function Person() {}
Person.prototype.sayPerson = function () {
    console.log("hello, Person.")
};
// 2.创建子类
function Child(gender) {this.gender = gender;}
// 3.create继承
// Object.create的第二个参数是属性描述
Child.prototype = Object.create(Person.prototype, {
    name: {
        value: "Li",
        writable: true,
        enumerable: true,
        configurable: true,
    },
    age: {
        value: 16,
        writable:true,
        configurable:true,
        enumerable:true,
    },
});  // 重写子类prototype
Child.prototype.constructor = Child;  // constructor 修正
// 4.在create之后写子类的prototype
Child.prototype.sayChild = function () {
    console.log("hello, Child.")
};
var child = new Child("female");
console.log(child);
console.log(child.name + " " + child.age);
child.sayChild();
child.sayPerson();
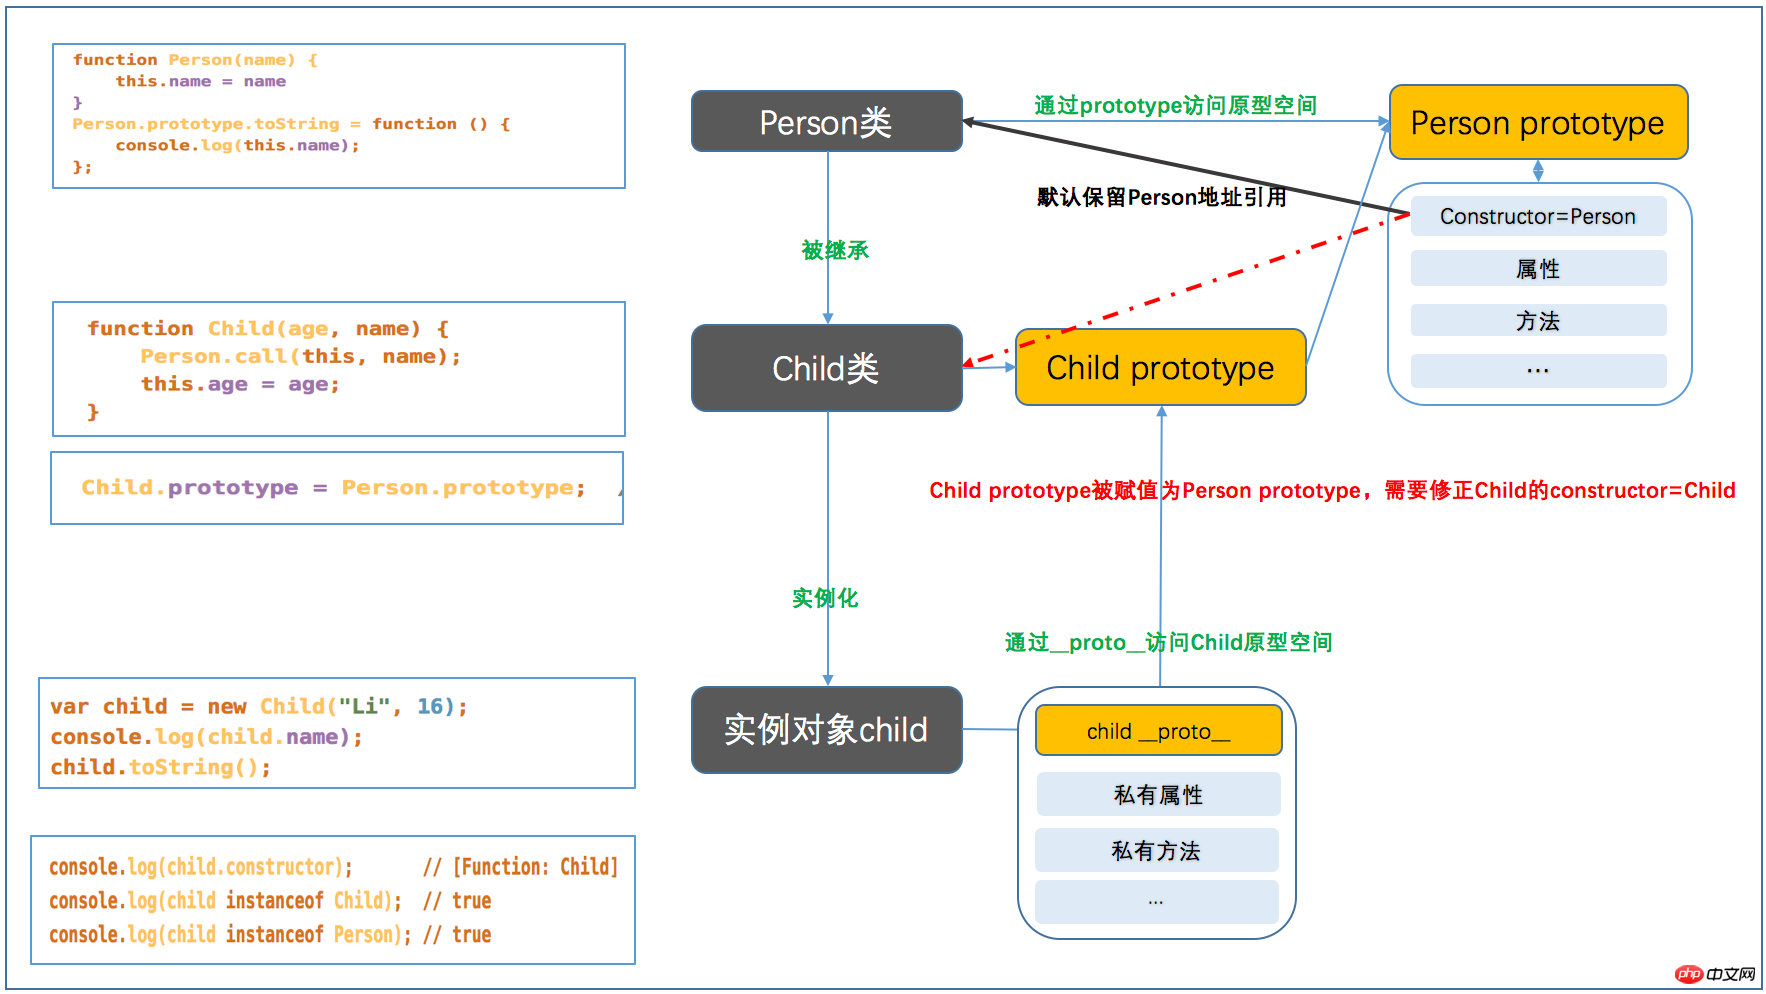
7. Die Beziehung zwischen Prototyp, Konstruktor und __proto__ in der Vererbung
 Das Obige ist der gesamte Inhalt dieses Artikels. Ich hoffe, dass er für das Lernen aller hilfreich ist. Weitere verwandte Inhalte finden Sie auf der chinesischen PHP-Website.
Verwandte Empfehlungen:
Analyse des Ereignismodells in jsWie man js-Variablenwerte an PHP übergibt
Das obige ist der detaillierte Inhalt vonParsen benutzerdefinierter Objekte in js. Für weitere Informationen folgen Sie bitte anderen verwandten Artikeln auf der PHP chinesischen Website!
Stellungnahme:
Der Inhalt dieses Artikels wird freiwillig von Internetnutzern beigesteuert und das Urheberrecht liegt beim ursprünglichen Autor. Diese Website übernimmt keine entsprechende rechtliche Verantwortung. Wenn Sie Inhalte finden, bei denen der Verdacht eines Plagiats oder einer Rechtsverletzung besteht, wenden Sie sich bitte an admin@php.cn
Vorheriger Artikel:Analyse des Ereignismodells in jsNächster Artikel:Analyse des Ereignismodells in js
In Verbindung stehende Artikel
Mehr sehen- Eine eingehende Analyse der Bootstrap-Listengruppenkomponente
- Detaillierte Erläuterung des JavaScript-Funktions-Curryings
- Vollständiges Beispiel für die Generierung von JS-Passwörtern und die Erkennung der Stärke (mit Download des Demo-Quellcodes)
- Angularjs integriert WeChat UI (weui)
- Wie man mit JavaScript schnell zwischen traditionellem Chinesisch und vereinfachtem Chinesisch wechselt und wie Websites den Wechsel zwischen vereinfachtem und traditionellem Chinesisch unterstützen – Javascript-Kenntnisse

