Heim >Backend-Entwicklung >PHP-Tutorial >So verwenden Sie MixPHP zur Entwicklung von API-Schnittstellen
So verwenden Sie MixPHP zur Entwicklung von API-Schnittstellen
- 不言Original
- 2018-07-11 14:11:233809Durchsuche
Dieser Artikel stellt hauptsächlich vor, wie man MixPHP zum Entwickeln von API-Schnittstellen verwendet. Jetzt kann ich ihn mit Ihnen teilen.
MixPHP ist eine gängige Software, die auf Swoole basiert Als speicherbasiertes PHP-Hochleistungs-Framework eignen sich die Hochleistungsfunktionen des Frameworks sehr gut für die Entwicklung von API-Schnittstellen, und MixPHP kommt dem traditionellen MVC-Framework sehr nahe, sodass die Entwicklung von Schnittstellen sehr einfach ist.
Das Folgende ist ein einfaches Beispiel für die Entwicklung einer API-Schnittstelle:
Rufen Sie einen Artikel aus der Tabelle articles über id ab.
URL für den Zugriff auf diese Schnittstelle:
http://www.e.com/articles/details?id=1
Die Datenbanktabellenstruktur ist wie folgt:
CREATE TABLE `articles` (
  `id` int(10) unsigned NOT NULL AUTO_INCREMENT,
  `title` varchar(255) NOT NULL,
  `content` varchar(255) NOT NULL,
  `dateline` timestamp NOT NULL DEFAULT CURRENT_TIMESTAMP,
  PRIMARY KEY (`id`)
) ENGINE=InnoDB DEFAULT CHARSET=utf8;
Schritt 1
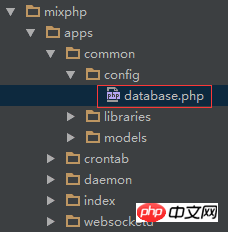
Ändern Sie die Datenbankkonfigurationsdatei , MixPHP In der Anwendungskonfigurationsdatei beziehen sich Informationen zur Datenbank auf die Datei common/config/database.php.

Schritt 2
Ändern Sie die Anwendungskonfigurationsdatei:
Ändern Sie das Standardausgabeformat der Antwortkomponente in das JSON-Format.
Ändern Sie das 404/500-Fehlerausgabeformat in das JSON-Format.

Die standardmäßige 404/500-Antwort des Frameworks ist eine Webseite, und der API-Dienst muss auf JSON-Daten reagieren. Normalerweise andere herkömmliche MVC Frameworks müssen an vielen Stellen geändert werden, um diese Anforderung zu erfüllen. MixPHP selbst stellt diese Konfiguration bereit, und Sie müssen nur die Konfiguration ändern.
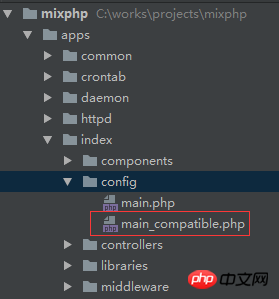
Die Standard-Webanwendung von MixPHP verfügt über zwei Konfigurationsdateien, nämlich:
main.php: wird bei der Bereitstellung in mix-httpd verwendet.
main_kompatible.php: wird bei der Bereitstellung in Apache/PHP-FPM verwendet.
Bei der Entwicklung der API empfehlen wir, sie unter Apache/PHP-FPM zu entwickeln und sie dann auf mix-httpd bereitzustellen, wenn sie online geht. Der Wechsel erfolgt jedenfalls nahtlos.
Jetzt ändern wir den Standardformatschlüssel unter dem Antwortschlüssel in mixhttpError::FORMAT_JSON wie folgt:
// 响应
'response' => [
    // 类路径
    'class'         => 'mix\http\compatible\Response',
    // 默认输出格式
    'defaultFormat' => mix\http\Response::FORMAT_JSON,
    // json
    'json'          => [
        // 类路径
        'class' => 'mix\http\Json',
    ],
    // jsonp
    'jsonp'         => [
        // 类路径
        'class' => 'mix\http\Jsonp',
        // callback键名
        'name'  => 'callback',
    ],
    // xml
    'xml'           => [
        // 类路径
        'class' => 'mix\http\Xml',
    ],
],
Dann ändern wir den Formatschlüssel unter dem Fehlerschlüssel in der Datei main_kompatible.php in mixhttpError: :FORMAT_JSON wie folgt:
// 错误
'error'    => [
    // 类路径
    'class'  => 'mix\http\Error',
    // 输出格式
    'format' => mix\http\Error::FORMAT_JSON,
],
Schritt 3
Erstellen Sie einen Controller:
apps/index/controllers/ArticlesController.php
<?php namespace apps\index\controllers;

use mix\facades\Request;
use mix\http\Controller;
use apps\index\messages\ErrorCode;
use apps\index\models\ArticlesForm;

class ArticlesController extends Controller
{

    public function actionDetails()
    {
        // 使用模型
        $model             = new ArticlesForm();
        $model->attributes = Request::get();
        $model->setScenario('actionDetails');
        if (!$model->validate()) {
            return ['code' => ErrorCode::INVALID_PARAM];
        }
        // 获取数据
        $data = $model->getDetails();
        if (!$data) {
            return ['code' => ErrorCode::ERROR_ID_UNFOUND];
        }
        // 响应
        return ['code' => ErrorCode::SUCCESS, 'data' => $data];
    }

}
Erstellen Sie eine Fehlercodeklasse:
apps/index/messages/ErrorCode.php
<?php namespace apps\index\messages;

class ErrorCode
{

    const SUCCESS = 0;
    const INVALID_PARAM = 100001;
    const ERROR_ID_UNFOUND = 200001;

}
Erstellen Sie ein Formularvalidierungsmodell :
apps/index/models/ArticlesForm.php
<?php namespace apps\index\models;
use mix\validators\Validator;
use apps\common\models\ArticlesModel;
class ArticlesForm extends Validator
{
public $id;
// 规则
public function rules()
{
return [
'id' => ['integer', 'unsigned' => true, 'maxLength' => 10],
];
}
// 场景
public function scenarios()
{
return [
'actionDetails' => ['required' => ['id']],
];
}
// 获取详情
public function getDetails()
{
return (new ArticlesModel())->getRowById($this->id);
}
}Erstellen Sie ein Datentabellenmodell:
apps/common/models/ArticlesModel.php
<?php namespace apps\common\models;
use mix\facades\RDB;
class ArticlesModel
{
const TABLE = 'articles';
// 获取一行数据通过id
public function getRowById($id)
{
$sql = "SELECT * FROM `" . self::TABLE . "` WHERE id = :id";
$row = RDB::createCommand($sql)->bindParams([
'id' => $id,
])->queryOne();
return $row;
}
}Das Obige ist das Schreiben des gesamten Codes.
Schritt 4
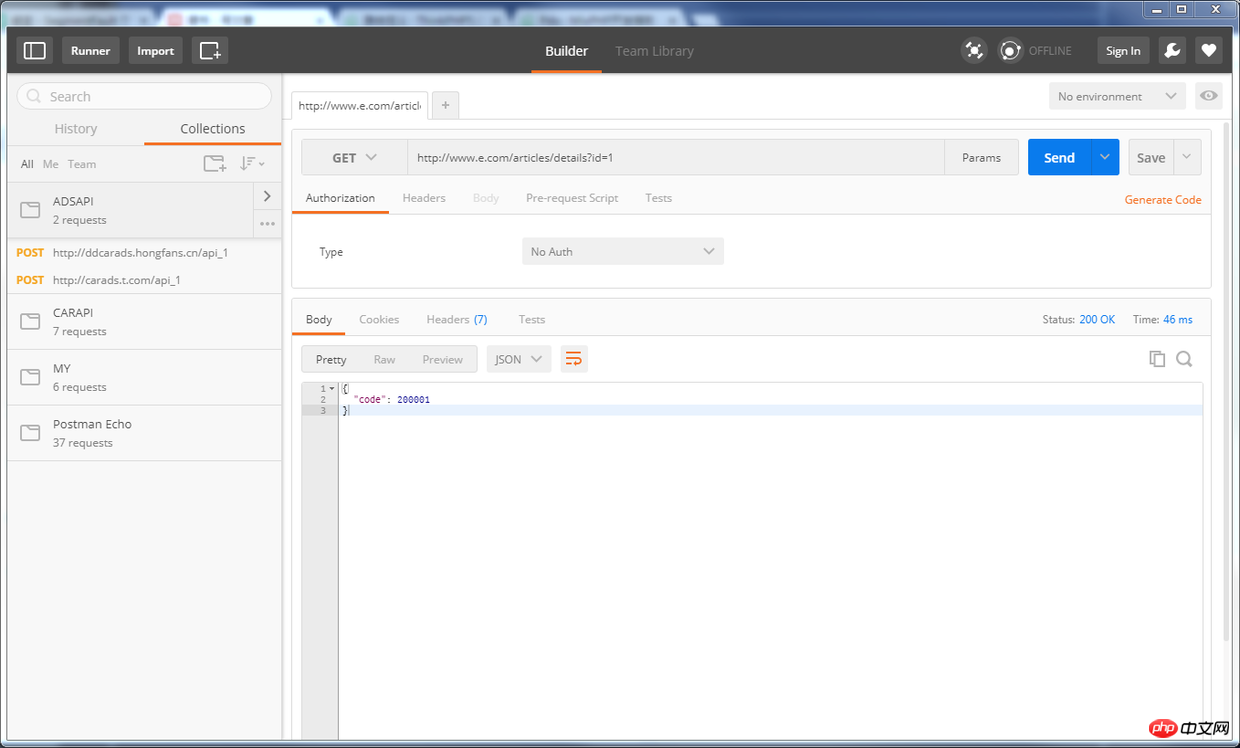
Verwenden Sie Postman zum Testen wie folgt:

Die Schnittstellenentwicklung und -tests sind abgeschlossen, nicht wahr? einfach?
Das Obige ist der gesamte Inhalt dieses Artikels. Ich hoffe, dass er für das Studium aller hilfreich ist. Weitere verwandte Inhalte finden Sie auf der chinesischen PHP-Website.
Verwandte Empfehlungen:
Analyse asynchroner Aufgaben durch Lernen von Swoole
Einführung in Swoole durch Lernen von Swoole
Das obige ist der detaillierte Inhalt vonSo verwenden Sie MixPHP zur Entwicklung von API-Schnittstellen. Für weitere Informationen folgen Sie bitte anderen verwandten Artikeln auf der PHP chinesischen Website!
In Verbindung stehende Artikel
Mehr sehen- So verwenden Sie cURL zum Implementieren von Get- und Post-Anfragen in PHP
- So verwenden Sie cURL zum Implementieren von Get- und Post-Anfragen in PHP
- So verwenden Sie cURL zum Implementieren von Get- und Post-Anfragen in PHP
- So verwenden Sie cURL zum Implementieren von Get- und Post-Anfragen in PHP
- Alle Ausdruckssymbole in regulären Ausdrücken (Zusammenfassung)

