
Heim >Web-Frontend >js-Tutorial >vue-cli Installations- und Konfigurations-Webpack
vue-cli Installations- und Konfigurations-Webpack
- php中世界最好的语言Original
- 2018-06-13 11:10:073914Durchsuche
这次给大家带来vue-cli安装与配置webpack,vue-cli安装与配置webpack的注意事项有哪些,下面就是实战案例,一起来看一下。
本文章适合初学者学习,如有错请提出。近期对vue比较感兴趣,所以准备用vue写一个blog。早期先对vue脚手架了解一下,对于新手官网建议先不用vue-cli,但我觉得如果没有任何的依据凭自己写一个项目(包括webpack的配置等)这无疑是浪费时间的而且都最后还是是而非的。所以我觉得完全可以用脚手架建一个webpack项目,然后我们可以具体对应它生成的文件学习(当然这只是我的学习方法,我认为这样比较好学,但不一定人人都是这样的)。
在学习的过程中发现网上许多的简介都已经过期(vue发展的过快了吧。。。。),所以我结合自己的项目和网上的资料备注一下,希望和其他的人一起讨论。这个适合的版本为:nodejs(6.10.2)、vue(2.5.2)、vue-router(3.0.1)和webpack(3.6.0)的。适合的环境为windows的,其他的系统我也不知道可不可以用。
一、vue-cli安装与配置webpack
1、默认电脑已经安装了node,不会的请百度然后先安装nodejs。
2、安装好nodejs之后,全局安装vue-cli:npm install -g vue-cli。
3、新建webpack项目:vue init webpack projectname(这是比较完整的,我们学习用这个比较好)、vue init webpack-simple projectname(简易版的)。
注意:projectname项目名不能用中文。
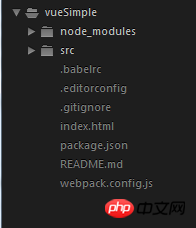
4、“vue init webpack-simple projectname”创建新项目的目录结构:
生成新项目时并没有安装依赖,需要进入新的项目安装依赖:cd projectname -> npm install。
新建项目时,会需要填一些东西,但如果你都不想填也无所谓,全部默认、全部yes都行:
(1)、Project name:——项目名称
(2)、Project description:——项目描述
(3)、Author:——作者
(4)、Vue build:——构建模式,一般默认选择第一种
(5)、Install vue-router?:——是否安装引入vue-router,这里选是,vue-router是路由组件,后面构建项目会用到
(6)、Use ESLint to lint your code?:——eslint的格式验证非常严格,多一个空格少一个空格都会报错。个人觉得如果是平时练习的话可以选yes因为这个可以规范自己js代码的书写规范。但在实际开发项目中不建议使用,会影响开发效率。
(7)、Setup unit tests with Karma + Mocha 以及Setup e2e tests with Nightwatch这两个是测试,可以不用安装。
“vue init webpack projectname”创建新项目的目录结构:
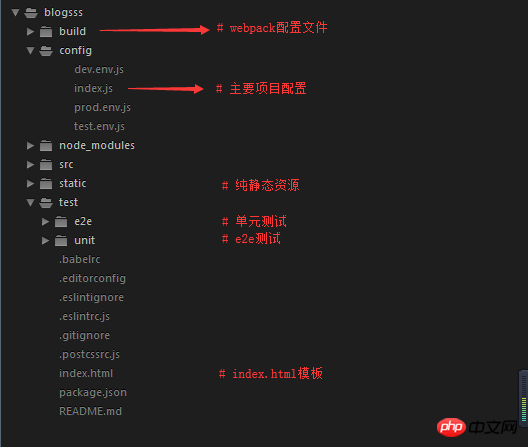

二、build目录下配置文件之check-versions.js
这个文件并不是十分重要,只要稍微了解就行了。
/**
* 验证版本
*/
'use strict'
//chalk是一个颜色插件。可以通过
const chalk = require('chalk')
//semver一个版本控制插件
const semver = require('semver')
const packageConfig = require('../package.json')
//shelljss是nodejs对与多进程的支持,是对于child_process封装
const shell = require('shelljs')
function exec (cmd) {
return require('child_process').execSync(cmd).toString().trim()
}
const versionRequirements = [
{//对应node的版本
name: 'node',
//当前环境版本,semver.clean把当前环境版本信息转化规定格式,也是' =v1.2.3 '->'1.2.3'
currentVersion: semver.clean(process.version),
//要求版本,对应package.json的engines所配置的信息
versionRequirement: packageConfig.engines.node
}
]
//npm环境中
if (shell.which('npm')) {
versionRequirements.push({
name: 'npm',
//执行方法得到版本号
currentVersion: exec('npm --version'),
versionRequirement: packageConfig.engines.npm
})
}
module.exports = function () {
const warnings = []
for (let i = 0; i < versionRequirements.length; i++) {
const mod = versionRequirements[i]
//如果版本号不符合package.json文件中指定的版本号,就执行下面的代码
if (!semver.satisfies(mod.currentVersion, mod.versionRequirement)) {
warnings.push(mod.name + ': ' +
chalk.red(mod.currentVersion) + ' should be ' +
chalk.green(mod.versionRequirement)
)
}
}
if (warnings.length) {
console.log('')
console.log(chalk.yellow('To use this template, you must update following to modules:'))
console.log()
for (let i = 0; i < warnings.length; i++) {
const warning = warnings[i]
console.log(' ' + warning)
}
console.log()
process.exit(1)
}
}三、build目录下配置文件之utils.js
这个文件主要用于处理有关于css方面的,主要对后面vue-loader.conf.js文件有关系,对webpack配置loaders方面也有影响。
/**
 * webpack开发环境:主要用来处理css-loader和vue-style-loader
 */

'use strict'
const path = require('path')
const config = require('../config')
//引入extract-text-webpack-plugin插件,用来将css提取到单独的css文件中
const ExtractTextPlugin = require('extract-text-webpack-plugin')
const packageConfig = require('../package.json')

exports.assetsPath = function (_path) {
 //process.env.NODE_ENV在bulid.js中定义
 //如果为生产环境assetsSubDirectory为“static”,否则也为“static”
 //config.build.assetsSubDirectory与config.dev.assetsSubDirectory都在config/index中定义
 const assetsSubDirectory = process.env.NODE_ENV === 'production'
  ? config.build.assetsSubDirectory
  : config.dev.assetsSubDirectory

 //path.join和path.posix.join区别前者返回完整路径,后者返回完整路径的相对路径
 //例:path.join是E:/shishans/blogsss/static,path.posix.join是static
 return path.posix.join(assetsSubDirectory, _path)
}

exports.cssLoaders = function (options) {
 options = options || {}

 //css-loader的基本配置
 const cssLoader = {
  loader: 'css-loader',
  options: {
   //option用于配置loder的
   //是否开启cssMap,默认是false
   //一般我们会压缩js或者css以节省宽带,但在开发压缩就很难调试
   //所以用sourceMap进行关联,给出对应的sourceMap文件
   sourceMap: options.sourceMap
  }
 }

 const postcssLoader = {
  loader: 'postcss-loader',
  options: {
   sourceMap: options.sourceMap
  }
 }

 // generate loader string to be used with extract text plugin
 function generateLoaders (loader, loaderOptions) {
  //将上面的基础配置放到一个数据中
  const loaders = options.usePostCSS ? [cssLoader, postcssLoader] : [cssLoader]
  //如果该函数传递了单独的loder就加入到loaders数组中例如:sass或者less之类的
  if (loader) {
   loaders.push({
    //加载对应的loader
    loader: loader + '-loader',
    //es6方法Object.assign:主要用于合并对象的,浅拷贝
    options: Object.assign({}, loaderOptions, {
     sourceMap: options.sourceMap
    })
   })
  }

  // Extract CSS when that option is specified
  // (which is the case during production build)
  // extract自定义属性,用ExtractTextPlugin.extract控制是否把文件单独提取
  // true:单独提取,false表示不提取
  if (options.extract) {
   return ExtractTextPlugin.extract({
    use: loaders,
    fallback: 'vue-style-loader'
   })
  } else {
   //[].concat()方法用于连接数组
   return ['vue-style-loader'].concat(loaders)
  }
 }

 // https://vue-loader.vuejs.org/en/configurations/extract-css.html
 return {
  css: generateLoaders(),//返回[cssLoader, vue-style-loader]
  postcss: generateLoaders(),//返回[cssLoader, vue-style-loader]
  less: generateLoaders('less'),//返回[cssLoader, vue-style-loader, less]
  sass: generateLoaders('sass', { indentedSyntax: true }),
  scss: generateLoaders('sass'),
  stylus: generateLoaders('stylus'),
  styl: generateLoaders('stylus')
 }
}

// Generate loaders for standalone style files (outside of .vue)
// 这个方法主要处理import这种方式导入的文件类型的打包
exports.styleLoaders = function (options) {
 const output = []
 const loaders = exports.cssLoaders(options)

 for (const extension in loaders) {
  const loader = loaders[extension]
  output.push({
   test: new RegExp('\\.' + extension + '$'),
   use: loader
  })
 }

 return output
}

//用于返回脚手架错误的函数
exports.createNotifierCallback = () => {
 //使用node-notifier来发送桌面消息,包括应用状态改变以及错误信息
 const notifier = require('node-notifier')

 return (severity, errors) => {
  if (severity !== 'error') return

  const error = errors[0]
  const filename = error.file && error.file.split('!').pop()

  notifier.notify({
   title: packageConfig.name,
   message: severity + ': ' + error.name,
   subtitle: filename || '',
   icon: path.join(__dirname, 'logo.png')
  })
 }
}
四、build目录下配置文件之webpack.base.conf.js
从这个文件开始,webpack配置文件正式开始,前面的相当于是这个文件参数般的存在。而实际上这个也不是正式会运行的配置文件。一个项目有2中情况:开发环境和生成环境。这2中环境一些方面的配置是不一样的,比如在生产环境我们会对js和css进行压缩以减少宽带。这个文件实际上是这2中环境通用的配置。下面的webpack.dev.conf.js文件(开发环境)、
webpack.prod.conf.js(生产环境),这2个文件才是实际环境运行使用的配置文件。
/**
 * webpack开发环境和生成环境通用的配置
 */

'use strict'
const path = require('path')
const utils = require('./utils')
const config = require('../config')
const vueLoaderConfig = require('./vue-loader.conf')

//获取对应文件路径的函数
//因为该文件是在项目的二级文件build下,所以要加上../这样才能找到像src这样的目录
function resolve (dir) {
 //join方法用于将多个字符串结合成一个路径字符串
 //path在node中会经常用到可以仔细了解一下path的各种方法
 //__dirname:获取当前文件所在目录的完整绝对路径
 return path.join(__dirname, '..', dir)
}

//eslint用来检查我们写的js代码是否满足指定的规则
const createLintingRule = () => ({
 test: /\.(js|vue)$/,
 loader: 'eslint-loader',
 enforce: 'pre',
 include: [resolve('src'), resolve('test')],
 options: {
  formatter: require('eslint-friendly-formatter'),
  emitWarning: !config.dev.showEslintErrorsInOverlay
 }
})

module.exports = {
 context: path.resolve(__dirname, '../'),
 entry: {
  //入口文件是src下的main.js
  app: './src/main.js'
 },
 output: {
  path: config.build.assetsRoot,
  filename: '[name].js',
  publicPath: process.env.NODE_ENV === 'production'
   ? config.build.assetsPublicPath
   : config.dev.assetsPublicPath
 },
 resolve: {
  //自动解析确定的扩展,在引入模块时不带扩展名
  //例如:import somejs from "@/some"
  extensions: ['.js', '.vue', '.json'],
  alias: {
   // 后面的$符号指精确匹配
   // 也就是说只能使用 import vuejs from "vue" 这样的方式导入vue.esm.js文件
   'vue$': 'vue/dist/vue.esm.js',
   // resolve('src') 其实在这里就是项目根目录中的src目录
   // 例如引用src目录下的some.js方法:import somejs from "@/some.js"
   // 用@来代替../src
   '@': resolve('src'),
  }
 },
 module: {
  rules: [
   ...(config.dev.useEslint ? [createLintingRule()] : []),
   {
    test: /\.vue$/,
    loader: 'vue-loader',
    options: vueLoaderConfig
   },
   {
    test: /\.js$/,
    loader: 'babel-loader',
    include: [resolve('src'), resolve('test'), resolve('node_modules/webpack-dev-server/client')]
   },
   {
    test: /\.(png|jpe?g|gif|svg)(\?.*)?$/,
    loader: 'url-loader',
    options: {
     limit: 10000,
     name: utils.assetsPath('img/[name].[hash:7].[ext]')
    }
   },
   {
    test: /\.(mp4|webm|ogg|mp3|wav|flac|aac)(\?.*)?$/,
    loader: 'url-loader',
    options: {
     limit: 10000,
     name: utils.assetsPath('media/[name].[hash:7].[ext]')
    }
   },
   {
    test: /\.(woff2?|eot|ttf|otf)(\?.*)?$/,
    loader: 'url-loader',
    options: {
     limit: 10000,
     name: utils.assetsPath('fonts/[name].[hash:7].[ext]')
    }
   }
  ]
 },
 node: {
  // prevent webpack from injecting useless setImmediate polyfill because Vue
  // source contains it (although only uses it if it's native).
  setImmediate: false,
  // prevent webpack from injecting mocks to Node native modules
  // that does not make sense for the client
  dgram: 'empty',
  fs: 'empty',
  net: 'empty',
  tls: 'empty',
  child_process: 'empty'
 }
}
五、build目录下配置文件之webpack.dev.conf.js
webpack.prod.conf.js也差不多。这2者之间的差别以后再讨论。
/**
 * 此文件用于开发环境下的webpack配置
 * 就本项目执行npm run dev 和 npm run start都会用到这个文件的配置
 * 具体可以参考JavaScript中"scripts"的配置
 */
'use strict'
const utils = require('./utils')
const webpack = require('webpack')
const config = require('../config')
const merge = require('webpack-merge')
const path = require('path')
const baseWebpackConfig = require('./webpack.base.conf')
const CopyWebpackPlugin = require('copy-webpack-plugin')
//生成html文件
const HtmlWebpackPlugin = require('html-webpack-plugin')
//friendly-errors-webpack-plugin:把webpack的错误和日志搜集起来展现给用户
const FriendlyErrorsPlugin = require('friendly-errors-webpack-plugin')
const portfinder = require('portfinder')

const HOST = process.env.HOST
const PORT = process.env.PORT && Number(process.env.PORT)

const devWebpackConfig = merge(baseWebpackConfig, {
 module: {
  rules: utils.styleLoaders({ sourceMap: config.dev.cssSourceMap, usePostCSS: true })
 },
 // cheap-module-eval-source-map is faster for development
 // devtool是开发工具选项,用来指定如何生成sourcemap文件,cheap-module-eval-source-map此款soucemap文件性价比最高
 // 生产环境:#source-map
 // 开发环境:#cheap-module-eval-source-map 编译消耗小
 devtool: config.dev.devtool,

 // these devServer options should be customized in /config/index.js
 devServer: {
  clientLogLevel: 'warning',
  historyApiFallback: {
   rewrites: [
    { from: /.*/, to: path.posix.join(config.dev.assetsPublicPath, 'index.html') },
   ],
  },
  hot: true,
  contentBase: false, // since we use CopyWebpackPlugin.
  compress: true,
  host: HOST || config.dev.host,
  port: PORT || config.dev.port,
  open: config.dev.autoOpenBrowser,
  overlay: config.dev.errorOverlay
   ? { warnings: false, errors: true }
   : false,
  publicPath: config.dev.assetsPublicPath,
  proxy: config.dev.proxyTable,
  quiet: true, // necessary for FriendlyErrorsPlugin
  watchOptions: {
   poll: config.dev.poll,
  }
 },
 plugins: [
  // DefinePlugin内置webpack插件,专门用来定义全局变量的
  // 下面定义一个全局变量 process.env 并且值是如下
  new webpack.DefinePlugin({
   'process.env': require('../config/dev.env')
  }),
  // 这个插件帮助你实现无刷新加载,关于内部实现原理
  new webpack.HotModuleReplacementPlugin(),
  new webpack.NamedModulesPlugin(), // HMR shows correct file names in console on update.
  new webpack.NoEmitOnErrorsPlugin(),
  // https://github.com/ampedandwired/html-webpack-plugin
  new HtmlWebpackPlugin({
   filename: 'index.html',
   template: 'index.html',
   inject: true
  }),
  // copy custom static assets
  new CopyWebpackPlugin([
   {
    from: path.resolve(__dirname, '../static'),
    to: config.dev.assetsSubDirectory,
    ignore: ['.*']
   }
  ])
 ]
})

module.exports = new Promise((resolve, reject) => {
 portfinder.basePort = process.env.PORT || config.dev.port
 portfinder.getPort((err, port) => {
  if (err) {
   reject(err)
  } else {
   // publish the new Port, necessary for e2e tests
   process.env.PORT = port
   // add port to devServer config
   devWebpackConfig.devServer.port = port

   // Add FriendlyErrorsPlugin
   devWebpackConfig.plugins.push(new FriendlyErrorsPlugin({
    compilationSuccessInfo: {
     messages: [`Your application is running here: http://${devWebpackConfig.devServer.host}:${port}`],
    },
    onErrors: config.dev.notifyOnErrors
    ? utils.createNotifierCallback()
    : undefined
   }))

   resolve(devWebpackConfig)
  }
 })
})
六、config目录下之index.js
这个文件配置了一些全局属性,分别dev和build用于区别开发环境和生产环境不同的地方。
7. Zusammenfassung
In vue2.5.2 wurden die Dateien dev-server.js und dev-client.js im Build-Verzeichnis gelöscht und verwendet Stattdessen wird webpack.dev.conf.js verwendet. Konfigurieren Sie daher den lokalen Zugriff in webpack.dev.conf.js. Ich werde in diesem Artikel nicht näher darauf eingehen, wie man es konfiguriert und später bei der Verwendung im Detail versteht.
Ich glaube, dass Sie die Methode beherrschen, nachdem Sie den Fall in diesem Artikel gelesen haben. Weitere spannende Informationen finden Sie in anderen verwandten Artikeln auf der chinesischen PHP-Website.
Empfohlene Lektüre:
Kehren Sie nach dem Teilen der Applet-Entwicklungsseite zur Startseite zurück
Benutzerdefinierte dynamische Komponenten der UI-Komponentenbibliothek von Vue
Das obige ist der detaillierte Inhalt vonvue-cli Installations- und Konfigurations-Webpack. Für weitere Informationen folgen Sie bitte anderen verwandten Artikeln auf der PHP chinesischen Website!
In Verbindung stehende Artikel
Mehr sehen- Eine eingehende Analyse der Bootstrap-Listengruppenkomponente
- Detaillierte Erläuterung des JavaScript-Funktions-Curryings
- Vollständiges Beispiel für die Generierung von JS-Passwörtern und die Erkennung der Stärke (mit Download des Demo-Quellcodes)
- Angularjs integriert WeChat UI (weui)
- Wie man mit JavaScript schnell zwischen traditionellem Chinesisch und vereinfachtem Chinesisch wechselt und wie Websites den Wechsel zwischen vereinfachtem und traditionellem Chinesisch unterstützen – Javascript-Kenntnisse