
Heim >Web-Frontend >HTML-Tutorial >Ausführliche Erläuterung der Schritte zur dynamischen Implementierung von Kreisdiagrammen in HTML5+Canvas
Ausführliche Erläuterung der Schritte zur dynamischen Implementierung von Kreisdiagrammen in HTML5+Canvas
- php中世界最好的语言Original
- 2018-05-07 17:45:393774Durchsuche
Dieses Mal werde ich Ihnen eine detaillierte Erklärung der Schritte zur dynamischen Implementierung eines Kreisdiagramms mit HTML5+Canvas geben. Was sind die Vorsichtsmaßnahmen für die dynamische Implementierung eines Kreisdiagramms mit HTML5+Canvas? Praktischer Fall, werfen wir einen Blick darauf.
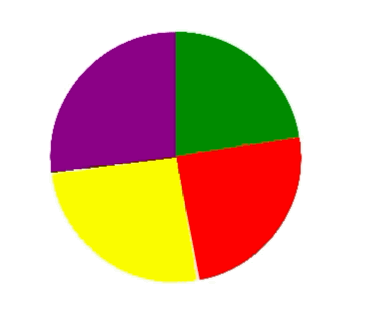
Schauen wir uns zunächst die Renderings an
Dies bezieht sich nicht auf Bibliotheken von Drittanbietern wie jquery, sondern nutzt nur die Funktionen von dom Betrieb und Leinwand Geschrieben.
Leinwand-Kreiszeichnungen sind grob in Vollkreise und Hohlkreise unterteilt.
Basierend auf der Bedarfsanalyse wissen wir, dass der Kreis ein geschlossener Kreis ist.
1. Zeichnen Sie zunächst einen ausgefüllten Kreis mit Leinwand
//伪代码
var canvas = document.createElement("canvas");
var ctx = canvas.getContext('2d');
ctx.beginPath();
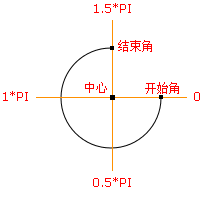
ctx.arc(圆心x轴坐标,圆心y轴坐标,半径,开始角,结束角);
ctx.fillStyle = 'green';
ctx.closePath();
ctx.fill();
2. Zeichnen Sie ein Kreisdiagramm in verschiedenen Farben
//伪代码
var canvas = document.createElement("canvas");
var ctx = canvas.getContext('2d');
ctx.beginPath();
ctx.arc(圆心x轴坐标,圆心y轴坐标,半径,绿色开始角,绿色结束角);
ctx.fillStyle = 'green';
ctx.closePath();
ctx.fill();
ctx.beginPath();
ctx.arc(圆心x轴坐标,圆心y轴坐标,半径,红色开始角,红色结束角);
ctx.fillStyle = 'red';
ctx.closePath();
ctx.fill();
ctx.beginPath();
ctx.arc(圆心x轴坐标,圆心y轴坐标,半径,黄色开始角,黄色结束角);
ctx.fillStyle = 'yellow';
ctx.closePath();
ctx.fill();
ctx.beginPath();
ctx.arc(圆心x轴坐标,圆心y轴坐标,半径,紫色开始角,紫色结束角);
ctx.fillStyle = 'purple';
ctx.closePath();
ctx.fill();
3. Dynamisches Zeichnen eines Kreisdiagramms
Im Internet werden im Allgemeinen drei Methoden zum dynamischen Zeichnen von Kreisen empfohlen: requestAnimationFrame, setInterval (Timing) und dynamische Winkelberechnung.
Hier verwende ich die erste requestAnimationFrame-Methode.
Ich habe während des Schreibvorgangs ein Problem festgestellt, das heißt, beim dynamischen Zeichnen eines Kreises wird dieser nicht basierend auf den Koordinaten des Kreismittelpunkts gezeichnet. Um dieses Problem zu lösen, müssen Sie jedes Mal, wenn Sie einen Kreis zeichnen, die Koordinaten des Leinwandpinsels als Koordinaten des ursprünglichen Kreismittelpunkts neu definieren.
<!DOCTYPE html>
<html>
<head>
<meta charset="utf-8">
<title></title>
<style>
#graph {
/* border: 1px solid black;
height: 100%;
width: 100%;
box-sizing: border-box;*/
}
</style>
</head>
<body>
<p id="circle" style="width: 500px;float: left;"></p>
</body>
</html>
<script type="text/javascript">
(function(window,undefined){
var data = [
{"product":"产品1","sales":[192.44 ,210.54 ,220.84 ,230.11 ,220.85 ,210.59 ,205.49 ,200.55 ,195.71 ,187.46 ,180.66 ,170.90]},
{"product":"产品2","sales":[122.41 ,133.16 ,145.65 ,158.00 ,164.84 ,178.62 ,185.70 ,190.13 ,195.53 ,198.88 ,204.32 ,210.91]},
{"product":"产品3","sales":[170.30 ,175.00 ,170.79 ,165.10 ,165.62 ,160.92 ,155.92 ,145.77 ,145.17 ,140.27 ,135.99 ,130.33]},
{"product":"产品4","sales":[165.64 ,170.15 ,175.10 ,185.32 ,190.90 ,190.01 ,187.05 ,183.74 ,177.24 ,181.90 ,179.54 ,175.98]}
]
var dom_circle = document.getElementById('circle');
if(dom_circle != undefined && dom_circle != null)
{
var canvas = document.createElement("canvas");
dom_circle.appendChild(canvas);
var ctx = canvas.getContext('2d');
var defaultStyle = function(Dom,canvas){
if(Dom.clientWidth <= 300)
{
canvas.width = 300;
Dom.style.overflowX = "auto";
}
else{
canvas.width = Dom.clientWidth;
}
if(Dom.clientHeight <= 300)
{
canvas.height = 300;
Dom.style.overflowY = "auto";
}
else
{
canvas.height = Dom.clientHeight;
}
//坐标轴区域
//注意,实际画折线图区域还要比这个略小一点
return {
p1:'green',
p2:'red',
p3:'yellow',
p4:'purple',
x: 0 , //坐标轴在canvas上的left坐标
y: 0 , //坐标轴在canvas上的top坐标
maxX: canvas.width , //坐标轴在canvas上的right坐标
maxY: canvas.height , //坐标轴在canvas上的bottom坐标
r:(canvas.width)/2, //起点
ry:(canvas.height)/2, //起点
cr: (canvas.width)/4, //半径
startAngle:-(1/2*Math.PI), //开始角度
endAngle:(-(1/2*Math.PI)+2*Math.PI), //结束角度
xAngle:1*(Math.PI/180) //偏移量
};
}
//画圆
var tmpAngle = -(1/2*Math.PI);
var ds = null;
var sum = data[0]['sales'][0]+data[0]['sales'][1]+data[0]['sales'][2]+data[0]['sales'][3]
var percent1 = data[0]['sales'][0]/sum * Math.PI * 2 ;
var percent2 = data[0]['sales'][1]/sum * Math.PI * 2 + percent1;
var percent3 = data[0]['sales'][2]/sum * Math.PI * 2 + percent2;
var percent4 = data[0]['sales'][3]/sum * Math.PI * 2 + percent3;
console.log(percent1);
console.log(percent2);
console.log(percent3);
console.log(percent4);
var tmpSum = 0;
var drawCircle = function(){
if(tmpAngle >= ds.endAngle)
{
return false;
}
else if(tmpAngle+ ds.xAngle > ds.endAngle)
{
tmpAngle = ds.endAngle;
}
else{
tmpAngle += ds.xAngle;
tmpSum += ds.xAngle
}
// console.log(ds.startAngle+'***'+tmpAngle);
// console.log(tmpSum);
// ctx.clearRect(ds.x,ds.y,canvas.width,canvas.height);
if(tmpSum > percent1 && tmpSum <percent2)
{
ctx.beginPath();
ctx.moveTo(ds.r,ds.ry);
ctx.arc(ds.r,ds.ry,ds.cr,ds.startAngle+percent1,tmpAngle);
ctx.fillStyle = ds.p2;
}
else if(tmpSum > percent2 && tmpSum <percent3)
{
ctx.beginPath();
ctx.moveTo(ds.r,ds.ry);
ctx.arc(ds.r,ds.ry,ds.cr,ds.startAngle+percent2,tmpAngle);
ctx.fillStyle = ds.p3;
}
else if(tmpSum > percent3 )
{
ctx.beginPath();
ctx.moveTo(ds.r,ds.ry);
ctx.arc(ds.r,ds.ry,ds.cr,ds.startAngle+percent3,tmpAngle);
ctx.fillStyle = ds.p4;
}
else{
ctx.beginPath();
ctx.moveTo(ds.r,ds.ry);
ctx.arc(ds.r,ds.ry,ds.cr,ds.startAngle,tmpAngle);
ctx.fillStyle = ds.p1;
}
ctx.closePath();
ctx.fill();
requestAnimationFrame(drawCircle);
}
this.toDraw = function(){
ds= defaultStyle(dom_circle,canvas);
// console.log(tmpAngle);
// console.log(ds.xAngle)
ctx.clearRect(ds.x,ds.y,canvas.width,canvas.height);
drawCircle();
}
this.toDraw();
var self = this;
window.onresize = function(){
self.toDraw()
}
}
})(window);
</script>
Ich glaube, dass Sie die Methode beherrschen, nachdem Sie den Fall in diesem Artikel gelesen haben. Weitere spannende Informationen finden Sie in anderen verwandten Artikeln auf der chinesischen PHP-Website!
Empfohlene Lektüre:
Ausführliche Erklärung zur Multithread-Entwicklung und -Nutzung von H5+WebWorkers
H5-Offline-Anwendung und Client-Speicher Ausführliche Erklärung zur Verwendung
Das obige ist der detaillierte Inhalt vonAusführliche Erläuterung der Schritte zur dynamischen Implementierung von Kreisdiagrammen in HTML5+Canvas. Für weitere Informationen folgen Sie bitte anderen verwandten Artikeln auf der PHP chinesischen Website!