Heim >Web-Frontend >js-Tutorial >Ausführliche Erläuterung der Verwendung ausgewählter Einbaukomponenten
Ausführliche Erläuterung der Verwendung ausgewählter Einbaukomponenten
- php中世界最好的语言Original
- 2018-04-28 15:45:202076Durchsuche
Dieses Mal werde ich Ihnen die Verwendung ausgewählter Einbaukomponenten ausführlich erläutern. Welche Vorsichtsmaßnahmen sind bei der Verwendung ausgewählter Einbaukomponenten zu beachten? Hier ist ein praktischer Fall .
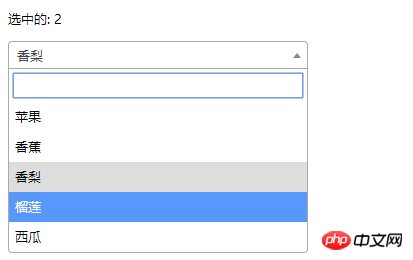
1. Integriertes jQuery-Plug-in eines Drittanbieters (select2)
<!DOCTYPE html>
<html>
<head>
  <meta charset="UTF-8">
  <title></title>
  <link rel="stylesheet" href="js/select2/select2.min.css" />
  <style>
    html, body {
 font: 13px/18px sans-serif;
}
select {
 min-width: 300px;
}
  </style>
</head>
<body>
<p id="el">
  <p>选中的: {{ selected }}</p>
  <select2 :options="options" v-model="selected"></select2>
</p>
  <script src="js/jQuery-2.1.4.min.js"></script>
  <script src="js/select2/select2.min.js"></script>
  <script src="http://cdnjs.cloudflare.com/ajax/libs/vue/2.1.3/vue.js"></script>
<script>
  Vue.component('select2', {
    props: ['options', 'value'],
    template: '<select><slot></slot></select>',
    mounted: function () {
      var vm = this;// init select2
      $(this.$el).select2({ data: this.options }).val(this.value).trigger('change').on('change', function () {
        // emit event on change.
        vm.$emit('input', this.value)
      })
    },
    watch: {
      value: function (value) {
          // update value
        $(this.$el).val(value).trigger('change')
      },
      options: function (options) {
         // update options
        $(this.$el).empty().select2({ data: options })
      }
    },
    destroyed: function () {
      $(this.$el).off().select2('destroy')
    }
  })
var vm = new Vue({
  el: '#el',
  data: {
    selected: 2,
    options: [
      { id: 0, text: '苹果' },
      { id: 1, text: '香蕉' },
      { id: 2, text: '香梨' },
      { id: 3, text: '榴莲' },
      { id: 4, text: '西瓜' }
    ]
  }
})
</script>
</body>
</html>
 2 >
2 >
<!DOCTYPE html>
<html lang="en">
<head>
<meta charset="utf-8">
  <style>
  *{
    padding: 0;
    margin: 0;
  }
  ul,li {
    list-style: none;
  }
  li {
    line-height: 2em;
  }
  li:hover {
    background-color: #f9f9f9;
    border-radius:5px;
    cursor: pointer;
  }
  input{
    cursor:pointer;
    outline:none;
  }
  #app {
    margin-top: 20px;
  }
  #app h2 {
    text-align: center;
  }
  .wrap {
    background-color: rgba(56, 170, 214, 0.45);
    border-radius: 20px;
    width: 300px;
    margin: 40px;
    padding: 20px;
  }
  input[type="button"] {
    font-size:14px;
    margin-left:2px;
    padding:2px 5px;
    background-color:rgb(228, 33, 33);
    color:white;
    border:1px solid rgb(228, 33, 33);
    border-radius:5px;
  }
  .clearFix {
    padding-left:
  }
  input.keyWord {
    border: 1px solid #777777;
    border-radius: 10px;
    height: 30px;
    width: 80%;
    padding-left: 10px;
    font-size: 16px;
  }
  ul.list {
    margin: 20px 0;
  }
  ul.list li {
    padding: 10px 0 0 10px;
  }
</style>
</head>
 <body>
 <p id="app">
    <p style="float: left;">
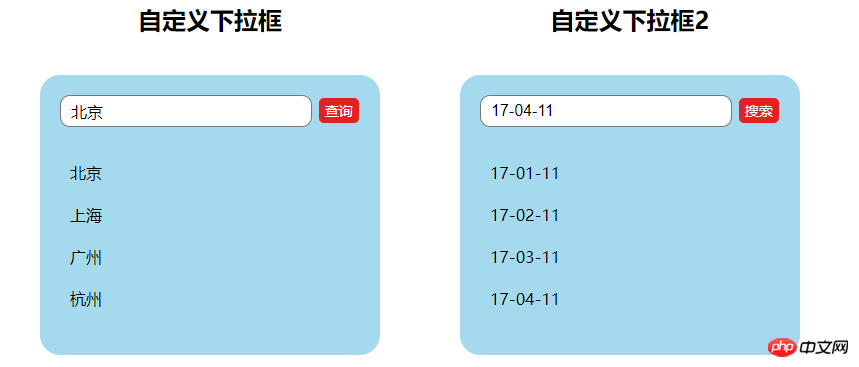
      <h2>自定义下拉框</h2>
      <custom-select btn-value="查询" v-bind:list="list1"></custom-select>
    </p>
    <p style="float: left;">
      <h2>自定义下拉框2</h2>
      <custom-select btn-value="搜索" v-bind:list="list2"></custom-select>
    </p>
  </p>
  <p id="app1">
    <custom-select></custom-select>
  </p>
    <script src="http://cdnjs.cloudflare.com/ajax/libs/vue/2.1.3/vue.js"></script>
 <script>
    Vue.component("custom-select",{
      data(){
        return {
          selectShow:false,
          val:""
        }
      },
      props:["btnValue","list"],
      template:`<section class="wrap">
            <p class="searchIpt clearFix">
              <p class="clearFix">
                <input type="text" class="keyWord" :value="val" @click="selectShow = !selectShow" />
                <input type="button" :value="btnValue" />
                <span></span>
              </p>
              <custom-list
                v-show="selectShow"
                :list="list"
                v-on:receive="changeValueHandle"
              >
              </custom-list>
            </p>
           </section>`,
      methods:{
        changeValueHandle(value){
          this.val = value;
        }
      }
    });
    Vue.component("custom-list",{
      props:["list"],
      template:`<ul class="list">
              <li v-for="item in list" @click="selectValueHandle(item)">{{item}}
              </li>
           </ul>`,
      methods:{
        selectValueHandle:function(item){
          this.$emit("receive",item)
        }
      }
    })
    new Vue({
      el:"#app",
      data:{
        list1:['北京','上海','广州','杭州'],
        list2:['17-01-11','17-02-11','17-03-11','17-04-11'],
      }
    })
  </script>
  </body>
</html>
Ich glaube, dass Sie die Methode beherrschen, nachdem Sie den Fall in diesem Artikel gelesen haben. Weitere spannende Informationen finden Sie in anderen verwandten Artikeln auf der chinesischen PHP-Website! 
Detaillierte Erläuterung der Schritte zum Deduplizieren von JSON-Arrays mit JS
So deduplizieren Sie Daten beim Zusammenführen mehrere Arrays
Das obige ist der detaillierte Inhalt vonAusführliche Erläuterung der Verwendung ausgewählter Einbaukomponenten. Für weitere Informationen folgen Sie bitte anderen verwandten Artikeln auf der PHP chinesischen Website!
In Verbindung stehende Artikel
Mehr sehen- Eine eingehende Analyse der Bootstrap-Listengruppenkomponente
- Detaillierte Erläuterung des JavaScript-Funktions-Curryings
- Vollständiges Beispiel für die Generierung von JS-Passwörtern und die Erkennung der Stärke (mit Download des Demo-Quellcodes)
- Angularjs integriert WeChat UI (weui)
- Wie man mit JavaScript schnell zwischen traditionellem Chinesisch und vereinfachtem Chinesisch wechselt und wie Websites den Wechsel zwischen vereinfachtem und traditionellem Chinesisch unterstützen – Javascript-Kenntnisse

