Heim >Backend-Entwicklung >PHP-Tutorial >PHP + MySQL implementiert die Artikelverwaltung und die gemeinsame Nutzung von Anzeigecode
PHP + MySQL implementiert die Artikelverwaltung und die gemeinsame Nutzung von Anzeigecode
- 小云云Original
- 2018-03-15 10:00:313518Durchsuche
Dieser Artikel teilt Ihnen hauptsächlich die PHP+MySQL-Implementierung der Artikelverwaltung und des Anzeigecodes mit. Ich hoffe, dass er allen helfen kann.
1. Erforderliche Ordner und Dateien erstellen
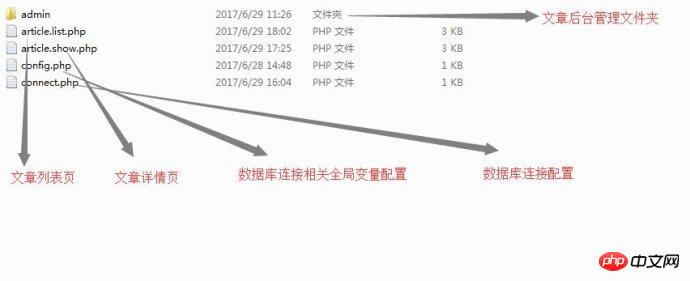
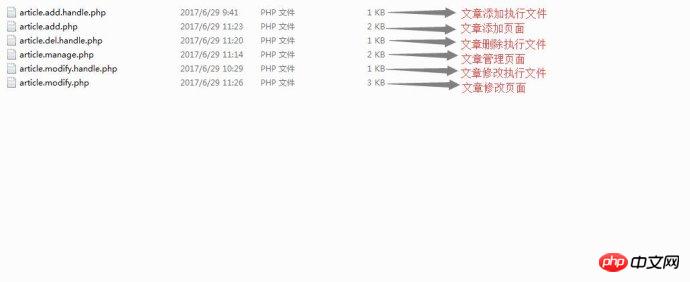
2. Neu erstellen entsprechende Verwaltungs- und Ausführungsdateien im Ordner admin
3.Konfiguration config.php Inhalt, konfiguriert hauptsächlich die Konstanten im Zusammenhang mit der Datenbankverbindung
defined('DS') or define('DS',DIRECTORY_SEPARATOR);

defined('PATH') or define('PATH',dirname(__FILE__));

define('HOST','localhost');

define('USERNAME','root');

define('PASSWORD','root');
4.Konfigurieren Sie die Datenbankverbindungsdatei connect.php, konfigurieren Sie hauptsächlich die Initialisierung im Zusammenhang mit der relevanten Datenbankverbindung
require_once(dirname(__FILE__).DIRECTORY_SEPARATOR.'config.php');

$connect  = mysqli_connect(HOST,USERNAME,PASSWORD);

mysqli_select_db($connect,'lgc');

mysqli_query($connect,'set names utf8');
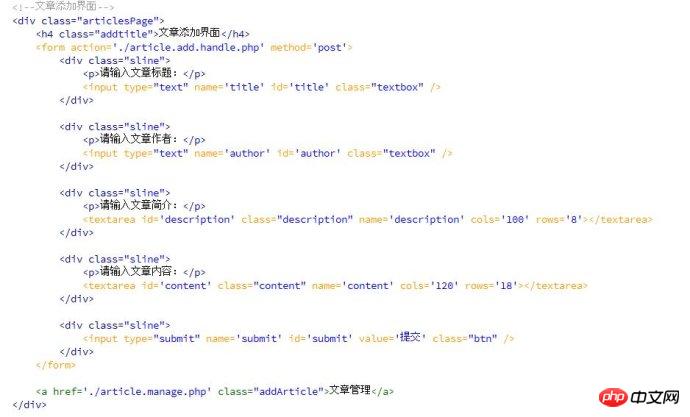
5. Konfigurieren Sie den hinzuzufügenden ArtikelHTMLSeite
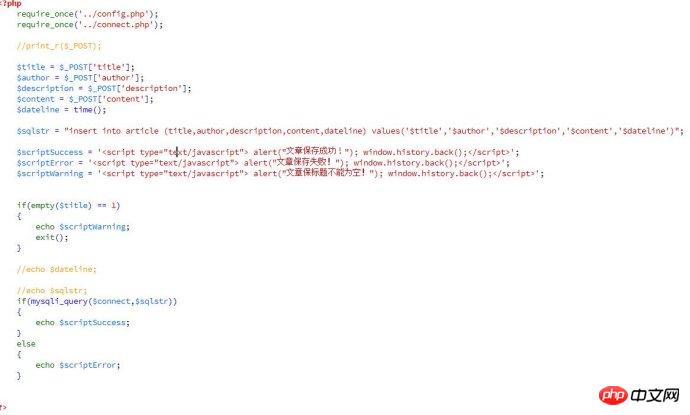
6.Artikelzusatzverwaltung konfigurieren
7 .Konfigurieren Sie die Artikelbearbeitungsseite. HTML Der Inhalt stimmt mit der Seite zum Hinzufügen von Artikeln überein, nur die Aktion verweist auf Article.modify.handle.php
require_once('../config.php');

require_once('../connect.php');

$id = $_GET['id'];


$modifySqlstr = "select * from article where id = $id";

$arr = array();

if($con = mysqli_query($connect,$modifySqlstr))
{
         while($row = mysqli_fetch_assoc($con) )
         {
                   $arr2 = $row;
         }
}
Der HTML-Inhalt wird hier weggelassen (wobei das der Artikelergänzungsseite HTMl relativ konsistent bleibt)…
8.配置文章编辑页面执行文件
require_once('../config.php');

require_once('../connect.php');


//print_r($_POST);

$id = $_POST['id'];

$title = $_POST['title'];

$author = $_POST['author'];

$description = $_POST['description'];

$content = $_POST['content'];

$dateline = time();


$modifySql = "update article set title='$title', author = '$author', description = '$description', content = '$content' where id = $id";

$scriptSuccess = '

$scriptError = '


if(mysqli_query($connect,$modifySql)){
      echo $scriptSuccess;
}else{
      echo $scriptError;
}


mysqli_close($connect);
9. 配置文章删除执行文件
require_once('../config.php');
require_once('../connect.php');

$id = $_GET['id'];
$delStr = "delete from article where id = $id";
$scriptSuccess = '
$scriptError = '


if(mysqli_query($connect,$delStr))
{
    echo $scriptSuccess;
}else{
    echo $scriptError;
}10.配置文章管理页面
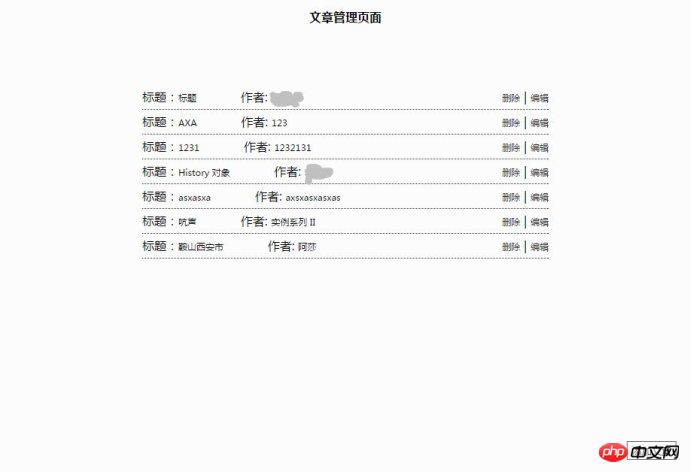
执行php代码:
-- 查询获取所有文章信息:
require_once('../config.php');
require_once('../connect.php');

$con = mysqli_query($connect,'select * from article');
$arr = array();

while($row = mysqli_fetch_array($con,MYSQLI_ASSOC) )
{
     $arr[] = $row;
}

//print_r($arr);
-- 遍历生成文章信息列表:

11.配置文章列表(详情)展示页面:
require_once('./config.php');
require_once('./connect.php');

$id = $_SERVER['QUERY_STRING'];

if(empty($id)){
     $sql = 'select * from article order by dateline desc';
}else{
      $id = $_GET['id'];
$sql = "select * from article where id = $id "; //配置文章详情展示页面
}
$con = mysqli_query($connect,$sql);$arr = array();while($row = mysqli_fetch_array($con,MYSQLI_ASSOC)){ $arr[] = $row;}
//遍历生成文章首页文章列表

12. 总结:
mysqli_query(connection,query,resultmode);
在判断是否插入成功,或者查询成功的时候,不能直接把mysqli_query(参数)当成if语句的条件,在因为针对成功的 SELECT、SHOW、DESCRIBE 或 EXPLAIN 查询,将返回一个mysqli_result 对象,并不是返回一个布尔值;在针对其他的成功的查询,例如update等,则返回布尔值true,失败则返回false;
object(mysqli_result)#2 (5) { ["current_field"]=> int(0) ["field_count"]=> int(6) ["lengths"]=> NULL ["num_rows"]=> int(1) ["type"]=> int(0) } ; 在返回对象的时候 $object = mysqli_query(参数); 然后可以用$object -> num_rows 的值来确定是否匹配查询到内容!
相关推荐:
Das obige ist der detaillierte Inhalt vonPHP + MySQL implementiert die Artikelverwaltung und die gemeinsame Nutzung von Anzeigecode. Für weitere Informationen folgen Sie bitte anderen verwandten Artikeln auf der PHP chinesischen Website!
In Verbindung stehende Artikel
Mehr sehen- So verwenden Sie cURL zum Implementieren von Get- und Post-Anfragen in PHP
- So verwenden Sie cURL zum Implementieren von Get- und Post-Anfragen in PHP
- So verwenden Sie cURL zum Implementieren von Get- und Post-Anfragen in PHP
- So verwenden Sie cURL zum Implementieren von Get- und Post-Anfragen in PHP
- Alle Ausdruckssymbole in regulären Ausdrücken (Zusammenfassung)

