Heim >Datenbank >MySQL-Tutorial >Detaillierte Erläuterung der Installation der MySQL5.7.18-Instanz auf Centos7.3
Detaillierte Erläuterung der Installation der MySQL5.7.18-Instanz auf Centos7.3
- 小云云Original
- 2018-01-17 09:21:242323Durchsuche
In diesem Artikel wird hauptsächlich das detaillierte Tutorial zur Installation von MySQL5.7.18 auf Centos7.3 vorgestellt. Freunde, die es benötigen, können darauf zurückgreifen.
1 Überprüfen Sie die Linux-Release-Version
[root@typecodes ~]# cat /etc/redhat-release
CentOS Linux-Release 7.2.1511 (Core)
2 Laden Sie das offizielle MySQL Yum Repository herunter
Beziehen Sie Yum entsprechend der Linux-Distributionsversion (CentOS und Fedora sind beide Red Hat-Serien) vom offiziellen MySQL (http://dev.mysql.com/downloads/repo). /yum/) Repository.
[root@typecodes ~]# wget -i http://dev.mysql.com/get/mysql57-community-release-el7-7.noarch.rpm
--2016-02-03 18:36:02-- http://dev.mysql.com/get/mysql57-community-release-el7-7.noarch.rpm
Resolving dev.mysql.com (dev.mysql.com)... 137.254.60.11
Connecting to dev.mysql.com (dev.mysql.com)|137.254.60.11|:80... connected.
HTTP request sent, awaiting response... 302 Found
Location: http://repo.mysql.com//mysql57-community-release-el7-7.noarch.rpm [following]
--2016-02-03 18:36:04-- http://repo.mysql.com//mysql57-community-release-el7-7.noarch.rpm
Resolving repo.mysql.com (repo.mysql.com)... 104.102.164.25
Connecting to repo.mysql.com (repo.mysql.com)|104.102.164.25|:80... connected.
HTTP request sent, awaiting response... 200 OK
Length: 8984 (8.8K) [application/x-redhat-package-manager]
Saving to: ‘mysql57-community-release-el7-7.noarch.rpm'
100%[=============================================================================================================================>] 8,984  --.-K/s in 0s
2016-02-03 18:36:07 (68.4 MB/s) - ‘mysql57-community-release-el7-7.noarch.rpm' saved [8984/8984]
3 安装MySQL的Yum Repository
安装完MySQL的Yum Repository,每次执行yum update都会检查MySQL是否更新。
[root@typecodes ~]# yum -y install mysql57-community-release-el7-7.noarch.rpm
Loaded plugins: axelget, fastestmirror, langpacks
Examining mysql57-community-release-el7-7.noarch.rpm: mysql57-community-release-el7-7.noarch
Marking mysql57-community-release-el7-7.noarch.rpm to be installed
Resolving Dependencies
--> Running transaction check
---> Package mysql57-community-release.noarch 0:el7-7 will be installed
--> Finished Dependency Resolution
Dependencies Resolved
=======================================================================================================================================================================
 Package          Arch      Version     Repository             Size
=======================================================================================================================================================================
Installing:
 mysql57-community-release      noarch      el7-7      /mysql57-community-release-el7-7.noarch      7.8 k
Transaction Summary
=======================================================================================================================================================================
Install 1 Package
Total size: 7.8 k
Installed size: 7.8 k
Downloading packages:
Running transaction check
Running transaction test
Transaction test succeeded
Running transaction
 Installing : mysql57-community-release-el7-7.noarch                            1/1
 Verifying : mysql57-community-release-el7-7.noarch                           1/1
Installed:
 mysql57-community-release.noarch 0:el7-7
Complete!
3 Installieren Sie die Serverversion der MySQL-Datenbank
[root@typecodes ~]# yum -y install mysql-community-server
Loaded plugins: axelget, fastestmirror, langpacks
No metadata available for base
No metadata available for epel
No metadata available for extras
repomd.xml                                  | 2.5 kB 00:00:00
update mysql-connectors-community metadata successfully
repomd.xml                                  | 2.5 kB 00:00:00
update mysql-tools-community metadata successfully
repomd.xml                                  | 2.5 kB 00:00:00
update mysql57-community metadata successfully
No metadata available for updates
mysql-connectors-community                              | 2.5 kB 00:00:00
mysql-tools-community                               | 2.5 kB 00:00:00
mysql57-community                                | 2.5 kB 00:00:00
(1/3): mysql-tools-community/x86_64/primary_db                         | 24 kB 00:00:01
(2/3): mysql57-community/x86_64/primary_db                          | 28 kB 00:00:01
(3/3): mysql-connectors-community/x86_64/primary_db                        | 8.6 kB 00:00:02
Loading mirror speeds from cached hostfile
 * base: mirrors.aliyun.com
 * epel: mirrors.neusoft.edu.cn
 * extras: mirrors.163.com
 * updates: mirrors.163.com
Resolving Dependencies
--> Running transaction check
---> Package mysql-community-server.x86_64 0:5.7.10-1.el7 will be installed
--> Processing Dependency: mysql-community-common(x86-64) = 5.7.10-1.el7 for package: mysql-community-server-5.7.10-1.el7.x86_64
--> Processing Dependency: mysql-community-client(x86-64) = 5.7.10-1.el7 for package: mysql-community-server-5.7.10-1.el7.x86_64
--> Running transaction check
---> Package mysql-community-client.x86_64 0:5.7.10-1.el7 will be installed
--> Processing Dependency: mysql-community-libs(x86-64) = 5.7.10-1.el7 for package: mysql-community-client-5.7.10-1.el7.x86_64
---> Package mysql-community-common.x86_64 0:5.7.10-1.el7 will be installed
--> Running transaction check
---> Package mariadb-libs.x86_64 1:5.5.44-2.el7.centos will be obsoleted
--> Processing Dependency: libmysqlclient.so.18()(64bit) for package: 2:postfix-2.10.1-6.el7.x86_64
--> Processing Dependency: libmysqlclient.so.18(libmysqlclient_18)(64bit) for package: 2:postfix-2.10.1-6.el7.x86_64
---> Package mysql-community-libs.x86_64 0:5.7.10-1.el7 will be obsoleting
--> Running transaction check
---> Package mysql-community-libs-compat.x86_64 0:5.7.10-1.el7 will be obsoleting
--> Finished Dependency Resolution
Dependencies Resolved
=======================================================================================================================================================================
 Package           Arch       Version        Repository        Size
=======================================================================================================================================================================
Installing:
 mysql-community-libs        x86_64      5.7.10-1.el7       mysql57-community      2.2 M
  replacing mariadb-libs.x86_64 1:5.5.44-2.el7.centos
 mysql-community-libs-compat      x86_64      5.7.10-1.el7       mysql57-community      2.0 M
  replacing mariadb-libs.x86_64 1:5.5.44-2.el7.centos
 mysql-community-server        x86_64      5.7.10-1.el7       mysql57-community      142 M
Installing for dependencies:
 mysql-community-client        x86_64      5.7.10-1.el7       mysql57-community       24 M
 mysql-community-common        x86_64      5.7.10-1.el7       mysql57-community      269 k
Transaction Summary
=======================================================================================================================================================================
Install 3 Packages (+2 Dependent packages)
Total download size: 171 M
Downloading packages:
mysql-community-server-5.7.10-1.el7.x86_64.rpm                         | 142 MB 00:03:42
mysql-community-libs-compat-5.7.10-1.el7.x86_64.rpm                        | 2.0 MB 00:00:03
mysql-community-libs-5.7.10-1.el7.x86_64.rpm                         | 2.2 MB 00:00:05
mysql-community-client-5.7.10-1.el7.x86_64.rpm                         | 24 MB 00:00:41
warning: /var/cache/yum/x86_64/7/mysql57-community/packages/mysql-community-common-5.7.10-1.el7.x86_64.rpm: Header V3 DSA/SHA1 Signature, key ID 5072e1f5: NOKEY00 ETA
Public key for mysql-community-common-5.7.10-1.el7.x86_64.rpm is not installed
mysql-community-common-5.7.10-1.el7.x86_64.rpm                         | 269 kB 00:00:01
Retrieving key from file:///etc/pki/rpm-gpg/RPM-GPG-KEY-mysql
Importing GPG key 0x5072E1F5:
 Userid  : "MySQL Release Engineering <mysql-build>"
 Fingerprint: a4a9 4068 76fc bd3c 4567 70c8 8c71 8d3b 5072 e1f5
 Package : mysql57-community-release-el7-7.noarch (@/mysql57-community-release-el7-7.noarch)
 From  : /etc/pki/rpm-gpg/RPM-GPG-KEY-mysql
Running transaction check
Running transaction test
Transaction test succeeded
Running transaction
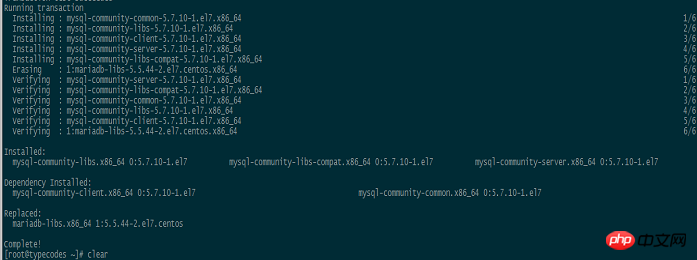
 Installing : mysql-community-common-5.7.10-1.el7.x86_64                           1/6
 Installing : mysql-community-libs-5.7.10-1.el7.x86_64                           2/6
 Installing : mysql-community-client-5.7.10-1.el7.x86_64                           3/6
 Installing : mysql-community-server-5.7.10-1.el7.x86_64                           4/6
 Installing : mysql-community-libs-compat-5.7.10-1.el7.x86_64                          5/6
 Erasing : 1:mariadb-libs-5.5.44-2.el7.centos.x86_64                           6/6
 Verifying : mysql-community-server-5.7.10-1.el7.x86_64                           1/6
 Verifying : mysql-community-libs-compat-5.7.10-1.el7.x86_64                          2/6
 Verifying : mysql-community-common-5.7.10-1.el7.x86_64                           3/6
 Verifying : mysql-community-libs-5.7.10-1.el7.x86_64                           4/6
 Verifying : mysql-community-client-5.7.10-1.el7.x86_64                           5/6
 Verifying : 1:mariadb-libs-5.5.44-2.el7.centos.x86_64                           6/6
Installed:
 mysql-community-libs.x86_64 0:5.7.10-1.el7   mysql-community-libs-compat.x86_64 0:5.7.10-1.el7   mysql-community-server.x86_64 0:5.7.10-1.el7
Dependency Installed:
 mysql-community-client.x86_64 0:5.7.10-1.el7          mysql-community-common.x86_64 0:5.7.10-1.el7
Replaced:
 mariadb-libs.x86_64 1:5.5.44-2.el7.centos
Complete!
[root@typecodes ~]# clear</mysql-build>
Letzter Screenshot:

4 Starten die Datenbank:
[root@typecodes ~]# systemctl start mysqld.service
Verwenden Sie dann den Befehl systemctl status mysqld.service, um den Dienststatus anzuzeigen, nachdem die MySQL-Datenbank gestartet wurde:

5 Get das anfängliche Passwort
Nachdem Sie YUM zum Installieren und Starten des MySQL-Dienstes verwendet haben, druckt der MySQL-Prozess automatisch das anfängliche Passwort des Root-Benutzers im Prozessprotokoll:
#######从mysql进程日志中获取root用户的初始密码:ra%yk7urCBIh
[root@typecodes ~]# grep "password" /var/log/mysqld.log
2016-02-03T10:42:17.272166Z 1 [Note] A temporary password is generated for root@localhost: ra%yk7urCBIh
2016-02-03T10:42:36.776875Z 2 [Note] Access denied for user 'root'@'localhost' (using password: NO)
2016-02-03T10:42:52.063138Z 3 [Note] Access denied for user 'root'@'localhost' (using password: NO)
2016-02-03T10:42:57.564373Z 4 [Note] Access denied for user 'root'@'localhost' (using password: NO)
2016-02-03T10:43:01.477007Z 5 [Note] Access denied for user 'root'@'localhost' (using password: NO)
2016-02-03T10:46:03.642008Z 6 [Note] Access denied for user 'root'@'localhost' (using password: NO)
2016-02-03T10:46:11.217889Z 7 [Note] Access denied for user 'root'@'localhost' (using password: NO)
2016-02-03T10:47:44.755199Z 0 [Note] Shutting down plugin 'validate_password'
2016-02-03T10:47:46.505844Z 0 [Note] Shutting down plugin 'sha256_password'
2016-02-03T10:47:46.505851Z 0 [Note] Shutting down plugin 'mysql_native_password'
6 Ändern Sie das Passwort des Root-Benutzers
Verwenden Sie Abschnitt 5. Rufen Sie das Anfangspasswort des Root-Benutzers ab und ändern Sie es dann:
set global validate_password_policy =0;//Der Standardwert ist 1, also MITTEL Das gerade festgelegte Passwort muss der Länge entsprechen und Zahlen, Klein- oder Großbuchstaben sowie Sonderzeichen enthalten.
set global validate_password_length=4;//指定了密码中数据的长度
alter user root@localhost identified by 'crow';//修改密码
Fernzugriffsrechte erhöhen
GRANT ALL PRIVILEGES ON *.* TO 'root'@'%' IDENTIFIED BY 'crow' WITH GRANT OPTION;
FLUSH PRIVILEGES;
MySQL beenden und dann den Dienst neu starten
systemctl restart mysqld
Port 3306 in der Firewall öffnen
firewall-cmd --zone=public --add-port=3306/tcp --permanent
Firewall neu starten
firewall-cmd --reload
[root@typecodes ~]# mysql -uroot -p
Enter password:    #######输入默认的root密码后回车
Welcome to the MySQL monitor. Commands end with ; or \g.
Your MySQL connection id is 2
Server version: 5.7.10
Copyright (c) 2000, 2015, Oracle and/or its affiliates. All rights reserved.
Oracle is a registered trademark of Oracle Corporation and/or its
affiliates. Other names may be trademarks of their respective
owners.
Type 'help;' or '\h' for help. Type '\c' to clear the current input statement.
mysql> ALTER USER 'root'@'localhost' IDENTIFIED BY 'new password';
Query OK, 0 rows affected (0.00 sec)
mysql> exit
Bye
7 Installation abgeschlossen
Zu diesem Zeitpunkt ist die Installation der MySQL5.7.10-Datenbank mithilfe der YUM-Methode in CentOS7 abgeschlossen. Wie unten gezeigt, können Sie sich mit dem neuen Root-Passwort bei MySQL anmelden.
[root@typecodes ~]# mysql -uroot -ppassword
mysql: [Warning] Using a password on the command line interface can be insecure.
Welcome to the MySQL monitor. Commands end with ; or \g.
Your MySQL connection id is 3
Server version: 5.7.10 MySQL Community Server (GPL)
Copyright (c) 2000, 2015, Oracle and/or its affiliates. All rights reserved.
Oracle is a registered trademark of Oracle Corporation and/or its
affiliates. Other names may be trademarks of their respective
owners.
Type 'help;' or '\h' for help. Type '\c' to clear the current input statement.
mysql> use mysql;
Reading table information for completion of table and column names
You can turn off this feature to get a quicker startup with -A
Database changed
mysql> show databases;
+--------------------+
| Database   |
+--------------------+
| information_schema |
| mysql    |
| performance_schema |
| sys    |
+--------------------+
4 rows in set (0.00 sec)
mysql> clear
mysql> exit
Bye
[root@typecodes ~]# clear
Anhang 1: Konfigurationsinformationen der MySQL-Datenbank anzeigen
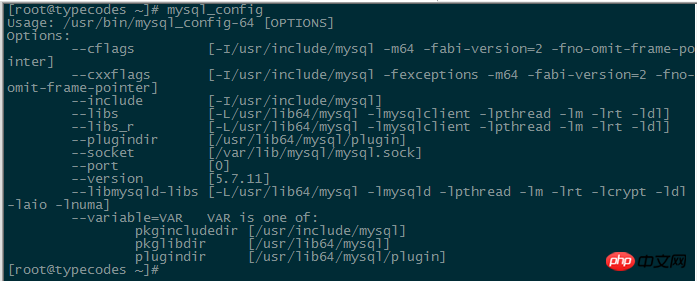
Die MySQL-Konfigurationsdatei ist weiterhin /etc/my.cnf. Weitere Installationsinformationen können über den Befehl mysql_config angezeigt werden. Darunter sind die dynamischen Bibliotheksdateien im Verzeichnis /usr/lib64/mysql gespeichert.

Anhang 2: Für C/C++ und andere Entwickler
Aufgrund der Notwendigkeit, Header-Dateien wie mysql.h zu verwenden, müssen Sie Folgendes ausführen Folgender Befehl zum Installieren von MySQL: Nur die Entwicklungsversion.
[root@typecodes ~]# yum -y install mysql-community-devel
Anhang 3: Löschen des MySQL-Repositorys
Da das Yum-Repository von MySQL in Abschnitt 3 installiert wurde, werden Updates jedes Mal überprüft, wenn in Zukunft eine Yum-Operation ausgeführt wird. Wenn Sie diesen automatischen Prüfvorgang entfernen möchten, können Sie den folgenden Befehl verwenden, um das MySQL-Repository zu deinstallieren.
[root@typecodes ~]# yum -y remove mysql57-community-release-el7-7.noarch
update 2017.04.10 11:10
Mit der oben genannten leckeren Methode können Sie auch die neueste Version mysql5.7.18 installieren, die derzeit auf der offiziellen MySQL-Website verfügbar ist. Ersetzen Sie einfach die Version des rmp-Pakets in Abschnitt 2 und die folgenden Schritte bleiben unverändert.
wget -i -c http://dev.mysql.com/get/mysql57-community-release-el7-10.noarch.rpm
Verwandte Empfehlungen:
So ändern Sie das Passwort in MySQL5.7.18
Tutorial zur Installation der dekomprimierten Version von MySQL5.7.18 unter Windows
Das obige ist der detaillierte Inhalt vonDetaillierte Erläuterung der Installation der MySQL5.7.18-Instanz auf Centos7.3. Für weitere Informationen folgen Sie bitte anderen verwandten Artikeln auf der PHP chinesischen Website!

