Heim >Web-Frontend >js-Tutorial >Einführung in verschiedene Methoden zur Implementierung von Fortschrittsbalken in JavaScript
Einführung in verschiedene Methoden zur Implementierung von Fortschrittsbalken in JavaScript
- 黄舟Original
- 2017-11-21 09:54:038638Durchsuche
In unserem vorherigen Artikel haben wir Ihnen Beispiele für die JavaScript-Implementierung von Fortschrittsbalken vorgestellt. Wir alle wissen, dass Fortschrittsbalken in tatsächlichen Projekten immer noch sehr nützlich sind. Heute werden wir weiterhin die Vorteile der JavaScript-Implementierung von Fortschrittsbalken vorstellen. Welche Wege!
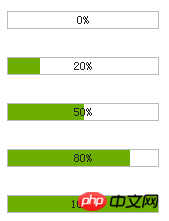
Werfen wir zunächst einen Blick auf den endgültigen Effekt:

Der erste Schritt, im Grunde
Erstellen Sie den Basiscode und Sehen Sie sich die Effektdemonstration an:
<!DOCTYPE html PUBLIC "-//W3C//DTD XHTML 1.0 Transitional//EN" "http://www.w3.org/TR/xhtml1/DTD/xhtml1-transitional.dtd">
<html xmlns="http://www.w3.org/1999/xhtml">
<head>
<title>制作进度条的两种方法</title>
<meta http-equiv="Content-Type" content="text/html; charset=gb2312" />
<style>
*{
    margin:0;
    padding:0;
}
body{font-size:12px;}h1{font-size:15px;}
.wrap{
    font-size: 12px;
    margin:40px auto;
    width:400px;
}
/*进度条样式*/
.progressbar_1{
    background-color:#eee;
    height:16px;
    width:150px;
    border:1px solid #bbb;
    color:#222;
}
.progressbar_1 .bar {
    background-color:#6CAF00;
    height:16px;
    width:0;
}
</style>
</head>
<body>
<div class="wrap">
    <h1>1,构建基本的HTML结构和CSS样式</h1>


    0%的状态:
    <div class="progressbar_1">
        <div class="bar"></div>
    </div>


    50%的状态:
    <div class="progressbar_1">
        <div class="bar" style="width: 50%;"></div>
    </div>


    80%的状态:
    <div class="progressbar_1">
        <div class="bar" style="width: 80%;"></div>
    </div>


    100%的状态:
    <div class="progressbar_1">
        <div class="bar" style="width: 100%;"></div>
    </div>


    这步非常简单,相信大家都能看明白。
</div>
</body>
</html>
Der zweite Schritt besteht darin, der Fortschrittsleiste eine Textanzeige hinzuzufügen
<!DOCTYPE html PUBLIC "-//W3C//DTD XHTML 1.0 Transitional//EN" "http://www.w3.org/TR/xhtml1/DTD/xhtml1-transitional.dtd">
<html xmlns="http://www.w3.org/1999/xhtml">
<head>
<title>制作进度条的两种方法</title>
<meta http-equiv="Content-Type" content="text/html; charset=gb2312" />
<style>
*{
    margin:0;
    padding:0;
}
body{font-size:12px;}h1{font-size:15px;}
.wrap{
    font-size: 12px;
    margin:40px auto;
    width:400px;
}
/*进度条样式*/
.progressbar_1{
    background-color:#eee;
    color:#222;
    height:16px;
    width:150px;
    border:1px solid #bbb;
}
.progressbar_1 .bar {
    background-color:#6CAF00;
    height:16px;
    width:0;
}
/*绝对定位*/
.progressbar_2{
    background-color:#eee;
    color:#222;
    height:16px;
    width:150px;
    border:1px solid #bbb;
    text-align:center;
    position:relative;
}
.progressbar_2 .bar {
    background-color:#6CAF00;
    height:16px;
    width:0;
    position:absolute;
    left:0;
    top:0;
}
.progressbar_2 .text {
    height:16px;
    position:absolute;
    left:0;
    top:0;
    width:100%;
    line-height:16px;
}
/*绝对定位 + z-index */
.progressbar_3{
    background-color:#eee;
    color:#222;
    height:16px;
    width:150px;
    border:1px solid #bbb;
    text-align:center;
    position:relative;
}
.progressbar_3 .bar {
    background-color:#6CAF00;
    height:16px;
    width:0;
    position:absolute;
    left:0;
    top:0;
    z-index:10;
}
.progressbar_3 .text {
    height:16px;
    position:absolute;
    left:0;
    top:0;
    width:100%;
    line-height:16px;

    z-index:100;
}
</style>
</head>
<body>
<div class="wrap">
    <h1>2,给进度条增加文字显示</h1>


    一个进度条需要包含对应的进度文字显示,本例中,我希望文字显示在进度条的中间。
    接下来,我们在进度条元素内增加一个显示 文字的div。


    很显然,直接添加div后,div会占据原先绿色进度条的位置。看下面例子:

        <div class="progressbar_1">
        <div >50%</div>
        <div class="bar" style="width: 50%;"></div>
    </div>


    那么有什么办法使得文字 和 绿色进度条 同时显示在 一起呢?


    估计你也想到了,那就是绝对定位。通过对父元素添加相对定位,然后给子元素添加绝对定位,设置子元素的左边距和上边距都为0。


    看下面的例子:


    <div class="progressbar_2">
        <div class="text">50%</div>
        <div class="bar" style="width: 50%;"></div>
    </div>


    这时你会发现文字被遮盖了,相信你第一时间就会想到用 z-index 去设置他们的层级关系。

    对,我也选择的是它。通过给他们设置不同的z-index值来确定层级关系,值越大越显示在上面。看下面例子:


    <div class="progressbar_3">
        <div class="text">50%</div>
        <div class="bar" style="width: 50%;"></div>
    </div>


    <div class="progressbar_3">
        <div class="text">80%</div>
        <div class="bar" style="width: 80%;"></div>
    </div>


    <div class="progressbar_3">
        <div class="text">100%</div>
        <div class="bar" style="width: 100%;"></div>
    </div>
        这是第一种方式,也是目前最为流行的 制作进度条的方式。

    他的原理就是采用 相对定位和绝对定位,然后通过背景不同来控制进度。
    接下来我们看第二种方式制作进度条。
 </div>
</body>
</html>
Sein Prinzip besteht darin, relative Positionierung und absolute Positionierung zu verwenden und dann den Fortschritt durch verschiedene Hintergründe zu steuern. Als nächstes schauen wir uns die zweite Möglichkeit an, einen Fortschrittsbalken zu erstellen.
Der dritte Schritt, die zweite Möglichkeit, einen Fortschrittsbalken zu erstellen – Bilder + Hintergrundbilder direkt verwenden
<!DOCTYPE html PUBLIC "-//W3C//DTD XHTML 1.0 Transitional//EN" "http://www.w3.org/TR/xhtml1/DTD/xhtml1-transitional.dtd">
<html xmlns="http://www.w3.org/1999/xhtml">
<head>
<title></title>
<meta http-equiv="Content-Type" content="text/html; charset=gb2312" />
<style>
*{
    margin:0;
    padding:0;
}
body{font-size:12px;}h1{font-size:15px;}
.wrap{
    font-size: 12px;
    margin:40px auto;
    width:400px;
}
/*不带文字*/
.progress{
    border:0;
    width: 152px;
    height: 18px;
    background:url(img/progress.gif) no-repeat -100px 50%;
}
/*带文字显示*/
.progressbar_3{
    width:152px;
    position:relative;
    height:18px;
    text-align:center;
    position:relative;
    color:#222;
}
.progressbar_3 .text{
    width:152px;
    position:absolute;
    left:0;
    top:0;
    height:18px;
    line-height:18px;
    z-index:100;
}
.progressbar_3 .progress{
    width:152px;
    position:absolute;
    left:0;
    top:0;
    height:18px;
    z-index:10;
}
</style>
</head>
<body>
<div class="wrap">
    <h1>3,制作进度条的第二种方式---直接使用图片+背景图片</h1>
      <img class="progress lazy"  src="/static/imghwm/default1.png"  data-src="img/bg.gif"      style="max-width:90%"  style="max-width:90%" title="0%" alt="0%"  style="background-position:-152px 50%;"/>
       <img class="progress lazy"  src="/static/imghwm/default1.png"  data-src="img/bg.gif"      style="max-width:90%"  style="max-width:90%" title="20%" alt="20%"  style="background-position:-120px 50%;"/>
        <img class="progress lazy"  src="/static/imghwm/default1.png"  data-src="img/bg.gif"      style="max-width:90%"  style="max-width:90%" title="50%" alt="50%"  style="background-position:-76px 50%;"/>
         <img class="progress lazy"  src="/static/imghwm/default1.png"  data-src="img/bg.gif"      style="max-width:90%"  style="max-width:90%" title="80%" alt="80%"  style="background-position:-30px 50%;"/>
        <img class="progress lazy"  src="/static/imghwm/default1.png"  data-src="img/bg.gif"      style="max-width:90%"  style="max-width:90%" title="100%" alt="100%"  style="background-position: 0 50%;"/>

    如果你想在上面进度条上添加进度显示的文字,你应该知道怎么办了(如果你仔细阅读过前面的例子的话)。

    对,就是使用绝对定位+相对定位来控制。
    <div class="progressbar_3">
        <div class="text">0%</div>
        <img class="progress lazy"  src="/static/imghwm/default1.png"  data-src="img/bg.gif"      style="max-width:90%"  style="max-width:90%" title="0%" alt="0%"  style="background-position:-152px 50%;"/>
    </div>
    <div class="progressbar_3">
        <div class="text">20%</div>
        <img class="progress lazy"  src="/static/imghwm/default1.png"  data-src="img/bg.gif"      style="max-width:90%"  style="max-width:90%" title="20%" alt="20%"  style="background-position:-120px 50%;"/>
    </div>
    <div class="progressbar_3">
        <div class="text">50%</div>
        <img class="progress lazy"  src="/static/imghwm/default1.png"  data-src="img/bg.gif"      style="max-width:90%"  style="max-width:90%" title="50%" alt="50%"  style="background-position:-76px 50%;"/>
    </div>
    <div class="progressbar_3">
        <div class="text">80%</div>
        <img class="progress lazy"  src="/static/imghwm/default1.png"  data-src="img/bg.gif"      style="max-width:90%"  style="max-width:90%" title="80%" alt="80%"  style="background-position:-30px 50%;"/>
    </div>
    <div class="progressbar_3">
        <div class="text">100%</div>
        <img class="progress lazy"  src="/static/imghwm/default1.png"  data-src="img/bg.gif"      style="max-width:90%"  style="max-width:90%" title="100%" alt="100%"  style="background-position: 0 50%;"/>
    </div>
    这种方式的原理就是 利用 一张img图片,然后给img图片又设置背景图,通过背景图的background position 属性 来显示不同的部分。

    当然这种方式 对图片有点要求 。你仔细一点就会发现,宽度是img的2倍。

    另外图片必须是gif透明的,也就是说空心的。呵呵。看不到进度条。

    总的来说,这应该算一个技巧,在实际项目中,也是能使用的。
<p style="float:right;">Dev By <a href="http://www.jb51.net" >jb51.net</a></p>
</div>
</body>
</html>
Der vierte Schritt: Anwenden
Schauen wir uns zum Schluss eine einfache Anwendung an:
<!DOCTYPE html PUBLIC "-//W3C//DTD XHTML 1.0 Transitional//EN" "http://www.w3.org/TR/xhtml1/DTD/xhtml1-transitional.dtd">
<html xmlns="http://www.w3.org/1999/xhtml">
<head>
<title></title>
<meta http-equiv="Content-Type" content="text/html; charset=gb2312" />

<style>
*{
    margin:0;
    padding:0;
}
body{font-size:12px;}h1{font-size:15px;}
.wrap{
    font-size: 12px;
    margin:40px auto;
    width:400px;
}

/*不带文字*/
.progress{
    border:0;
    width: 152px;
    height: 18px;
    background:url(img/progress.gif) no-repeat -100px 50%;
}
/*带文字显示*/
.progressbar_3{
    width:152px;
    position:relative;
    height:18px;
    text-align:center;
    position:relative;
    color:#222;
}
.progressbar_3 .text{
    width:152px;
    position:absolute;
    left:0;
    top:0;
    height:18px;
    line-height:18px;
    z-index:100;
}
.progressbar_3 .progress{
    width:152px;
    position:absolute;
    left:0;
    top:0;
    height:18px;
    z-index:10;
}
</style>

<script src="http://jqueryjs.googlecode.com/files/jquery-1.3.2.min.js" type="text/javascript" language="javascript" charset="gb2312"></script>
<script>
$(function(){
    var $txt = $(".progressbar_3 .text");
    var $progress = $(".progressbar_3 .progress");

    $("#addTo").click(function(){
        $progress.animate({"backgroundPosition":"-76px 50%"},500,function(){
            $(this).attr({"alt":"50%","title":"50%"});
            $txt.text("50%");
            $("<p>进度条加载完毕!</p>").appendTo(".wrap");
        });
    });
    $("#cutdown").click(function(){
        $progress.animate({"backgroundPosition":"-120px 50%"},500,function(){
            $(this).attr({"alt":"20%","title":"20%"});
            $txt.text("20%");
            $("<p>进度条加载完毕!</p>").appendTo(".wrap");
        });
    });
});
</script>
</head>
<body>
<div class="wrap">
    <h1>4,应用</h1>
          <div class="progressbar_3">
        <div class="text">0%</div>
        <img class="progress lazy"  src="/static/imghwm/default1.png"  data-src="img/bg.gif"      style="max-width:90%"  style="max-width:90%" title="0%" alt="0%"  style="background-position:-152px 50%;"/>
    </div>
      <button id="addTo" >增加至50%</button>
    <button id="cutdown" >减少至20%</button>
     我使用的是第二种方式来做控制,通过animate来控制图片的background-position来达到进度条效果。
     当然你也可以使用第一种方式做,第一种方式需要改变的是进度条的 width 属性。
        <p style="float:right;">Dev By <a href="http://www.jb51.net" >jb51.net</a></p>
    </div>
</body>
</html>
Verwenden Sie animate, um die Hintergrundposition des Bildes zu steuern und so den Fortschrittsbalkeneffekt zu erzielen .
Natürlich können Sie auch die erste Methode verwenden. Was bei der ersten Methode geändert werden muss, ist das Breitenattribut des Fortschrittsbalkens.
Zusammenfassung:
Durch das Studium dieses Artikels glaube ich, dass Freunde ein besseres Verständnis für die Methode zur Implementierung von Fortschrittsbalken erhalten werden Jede Methode ist unterschiedlich, Freunde können die geeignete Methode entsprechend ihren eigenen Bedürfnissen auswählen!
Verwandte Empfehlungen:
Das obige ist der detaillierte Inhalt vonEinführung in verschiedene Methoden zur Implementierung von Fortschrittsbalken in JavaScript. Für weitere Informationen folgen Sie bitte anderen verwandten Artikeln auf der PHP chinesischen Website!
In Verbindung stehende Artikel
Mehr sehen- Eine eingehende Analyse der Bootstrap-Listengruppenkomponente
- Detaillierte Erläuterung des JavaScript-Funktions-Curryings
- Vollständiges Beispiel für die Generierung von JS-Passwörtern und die Erkennung der Stärke (mit Download des Demo-Quellcodes)
- Angularjs integriert WeChat UI (weui)
- Wie man mit JavaScript schnell zwischen traditionellem Chinesisch und vereinfachtem Chinesisch wechselt und wie Websites den Wechsel zwischen vereinfachtem und traditionellem Chinesisch unterstützen – Javascript-Kenntnisse

