Heim >Backend-Entwicklung >PHP-Tutorial >So senden Sie E-Mails mit ThinkPHP5
So senden Sie E-Mails mit ThinkPHP5
- 一个新手Original
- 2017-09-14 09:40:532991Durchsuche
1. Composer installiert phpmailer
composer require phpmailer/phpmailer
2. Kapseln Sie die Mail-Service-Klasse in ThinkPHP
Ich kapsele sie im Erweiterungsverzeichnis extension/ Mail In der .php-Datei lautet der Inhalt wie folgt:
<?php
/**
* 邮件服务类
*/
class Mail extends \PHPMailer
{
function __construct()
{
date_default_timezone_set('PRC'); // 默认时区设置
$this->CharSet = config('mail.charset'); // 邮件编码设置
$this->isSMTP(); // 启用SMTP服务
$this->SMTPDebug = config('mail.smtp_debug'); // Debug模式级别
$this->Debugoutput = config('mail.debug_output'); // Debug输出类型
$this->Host = config('mail.host'); // SMTP服务器地址
$this->Port = config('mail.port'); // 端口号
$this->SMTPAuth = config('mail.smtp_auth'); // SMTP登录认证
$this->SMTPSecure = config('mail.smtp_secure'); // SMTP安全协议
$this->Username = config('mail.username'); // SMTP登录邮箱
$this->Password = config('mail.password'); // SMTP登录密码
$this->setFrom(config('mail.from'), config('mail.from_name')); // 发件人邮箱和名称
$this->addReplyTo(config('mail.reply_to'), config('mail.reply_to_name')); // 回复邮箱和名称
}
/**
* 发送邮件
* @param [type] $toMail 收件人地址
* @param [type] $toName 收件人名称
* @param [type] $subject 邮件主题
* @param [type] $content 邮件内容,支持html
* @param [type] $attachment 附件列表。文件路径或路径数组
* @return [type] 成功返回true,失败返回错误消息
*/
function sendMail($toMail, $toName, $subject, $content, $attachment = null)
{
$this->addAddress($toMail, $toName);
$this->Subject = $subject;
$this->msgHTML($content);
if($attachment) { // 添加附件
if(is_string($attachment)){
is_file($attachment) && $this->AddAttachment($attachment);
}
else if(is_array($attachment)){
foreach ($attachment as $file) {
is_file($file) && $this->AddAttachment($file);
}
}
}
if(!$this->send()){ // 发送
return $this->ErrorInfo;
}
else{
return true;
}
}
}Hinweis: Wenn Sie einen Anhang senden, wird empfohlen, den englischen Pfad zu verwenden . Chinesische Pfade können dazu führen, dass der Anhang nicht gesendet werden kann und die empfangene E-Mail keinen Anhang enthält.
Ich habe einige der oben erforderlichen Konfigurationsparameter in die Datei „application/extra/mail.php“ des Erweiterungskonfigurationsverzeichnisses eingefügt. Der Inhalt lautet wie folgt:
<?php /** * 邮件服务相关配置 */ return [ 'charset' => 'utf-8', // 邮件编码 'smtp_debug' => 0, // Debug模式。0: 关闭,1: 客户端消息,2: 客户端和服务器消息,3: 2和连接状态,4: 更详细 'debug_output' => 'html', // Debug输出类型。`echo`(默认),`html`,或`error_log` 'host' => 'smtp.126.com', // SMTP服务器地址 'port' => 465, // 端口号。默认25 'smtp_auth' => true, // 启用SMTP认证 'smtp_secure' => 'ssl', // 启用安全协议。''(默认),'ssl'或'tls',留空不启用 'username' => 'yourname@example.com', // SMTP登录邮箱 'password' => 'yourpassword', // SMTP登录密码。126邮箱使用客户端授权码,QQ邮箱用独立密码 'from' => 'from@example.com', // 发件人邮箱 'from_name' => 'name', // 发件人名称 'reply_to' => '', // 回复邮箱的地址。留空取发件人邮箱 'reply_to_name' => '', // 回复邮箱人名称。留空取发件人名称 ];
Hinweis: Der Standardport ist im Allgemeinen 25. Wenn das Sicherheitsprotokoll SSL verwendet wird, ist die Portnummer normalerweise 465 oder 587. Zum Beispiel 126 Postfach. Es wird empfohlen, ein sicheres Protokoll zu verwenden, da Alibaba Cloud-Server Port 25 nicht sicherer Protokolle verbieten.
3. Test
In der Methode im Controller den Testcode hinzufügen:
public function mail()
{
$mail = new \Mail;
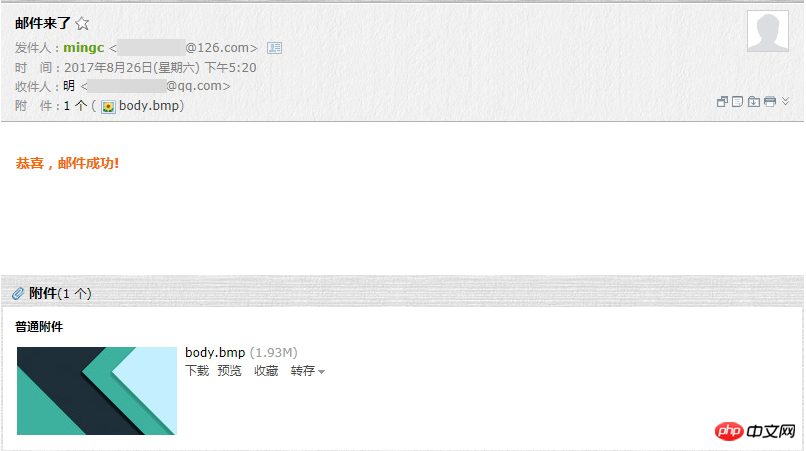
$ok = $mail->sendMail('xxxxxxxxx@qq.com', 'mingc', '邮件来了', '<p style="color: #f60; font-weight: 700;">恭喜,邮件成功!</p>', 'C:/Users/Administrator/Desktop/body.bmp');
var_dump($ok);
}Hier verwende ich die 126 Postfach, Sicherheitsprotokoll SSL, Portnummer 465, HTML-Inhalt senden, Test erfolgreich:

Das obige ist der detaillierte Inhalt vonSo senden Sie E-Mails mit ThinkPHP5. Für weitere Informationen folgen Sie bitte anderen verwandten Artikeln auf der PHP chinesischen Website!
In Verbindung stehende Artikel
Mehr sehen- So verwenden Sie cURL zum Implementieren von Get- und Post-Anfragen in PHP
- So verwenden Sie cURL zum Implementieren von Get- und Post-Anfragen in PHP
- So verwenden Sie cURL zum Implementieren von Get- und Post-Anfragen in PHP
- So verwenden Sie cURL zum Implementieren von Get- und Post-Anfragen in PHP
- Alle Ausdruckssymbole in regulären Ausdrücken (Zusammenfassung)

