Heim >Web-Frontend >HTML-Tutorial >Teilen Sie HTML-Beispielcode, um animierten Doraemon zu erstellen
Teilen Sie HTML-Beispielcode, um animierten Doraemon zu erstellen
- 黄舟Original
- 2017-07-18 14:33:129697Durchsuche
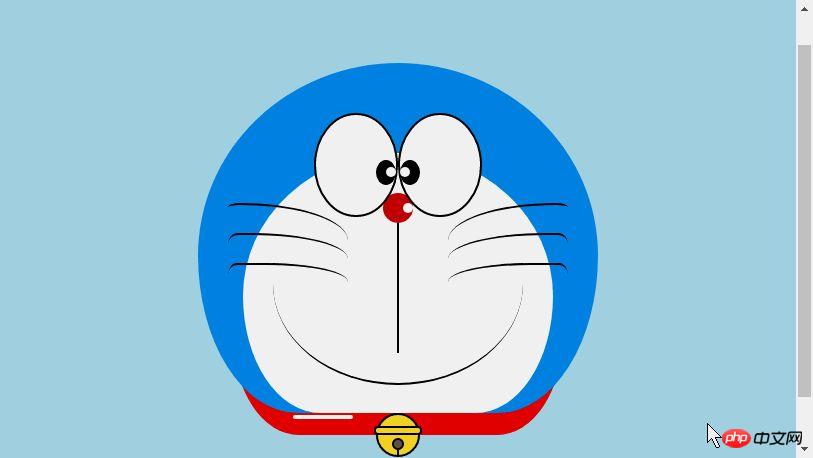
Ich glaube, dass jeder in seiner Kindheit einen Doraemon hat, einen kleinen Bauch voller unglaublicher Doraemon, einen Doraemon, der an deiner Seite bleibt, wenn du hilflos und traurig bist, einen Doraemon, der dich mit deinen zufälligen Gedanken begleitet und Dorayaki isst Heute werden wir einen Doraemon in unsere Herzen zeichnen~

Doraemons Behälter definieren
-
Der Dasselbe definiert zunächst einen großen Container für Doraemon und bestimmt dessen Größe und Position.
<!-- 哆啦A梦大容器 -->
<p class="doa"></p>
/*哆啦A梦*/
 .doa{position: relative;top: 100px;}
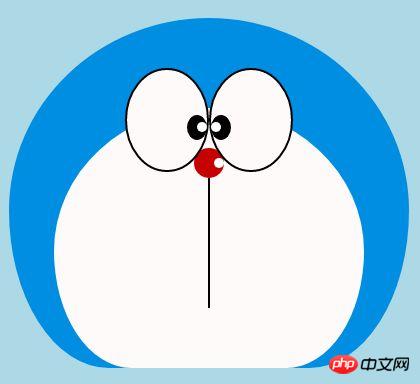
Zeichnen Sie Doraemons Kopf (einschließlich des Gesichts, das Gesicht umfasst Augen und Nase)
Der Kopf ist gut enthalten. Mehrere Teile: Das Gesicht und die Nase von Doraemon umfassen auch zwei Augen und Augenweiße, daher sind die Grundgrafiken alle aus p + border-radius zusammengesetzt .
Platzieren Sie einfach die verschiedenen Teile der gezeichneten Gegenstände an den entsprechenden Positionen.
-
Schauen Sie sich die wenigen Bilder an, die ich zuvor gezeichnet habe, und Sie werden wissen, dass der Randradius ein sehr häufig verwendetes Attribut ist. Tatsächlich ist es untrennbar damit verbunden Fläche des Randradius Es sollte Randradius sein: 300px 300px 300px 300px/300px 300px 300px 300px; für Jiangzi schreiben wir den Inhalt im Allgemeinen nicht nach dem Schrägstrich, und der Schrägstrich ist der Die vertikale Höhe wird standardmäßig nicht nach der vorderen Leiste geschrieben. Die horizontale und vertikale Größe ist gleich. Ich weiß, dass das, was ich gesagt habe, nicht detailliert genug ist. Sie können auf meinen Xinshen-Blog „Wann kommt der Herbstmond“ verweisen? Wie viel wissen Sie über den CSS3-Grenzradius? Ich garantiere Ihnen, dass Sie unter Anleitung eines erfahrenen Fahrers in wenigen Minuten den Grenzradius vollständig verstehen. Warum steigen Sie nicht schnell in den Bus?
<!-- 头 --> <p class="head"> <!-- 存放脸部的容器 --> <p class="face"> <!-- 左眼大圈儿 --> <p> <!-- 左眼眼珠(黑色部分) --> <p> <!-- 左眼眼白,黑色里面的白色部分 --> <p></p> </p> </p> <!-- 右眼大圈儿 --> <p> <!--右眼眼珠(黑色部分) --> <p> <!-- 右眼眼白,黑色里面的白色部分 --> <p></p> </p> </p> </p> <!-- 红鼻子部分 --> <p class="nose"> <!-- 红鼻子里面的白圈儿 --> <p></p> </p> <!-- 红鼻子下面的那根黑线,也属于鼻子部分 --> <p class="nose1"></p> </p> .head{ margin: 0 auto; /*头部定义大小并居中显示*/ width: 400px; height: 350px; background: #008ee3; /*头部定义背景颜色*/ position: relative; border-radius: 50% 50% 25% 25% / 55% 55% 45% 45%; /*头部定义四个方向圆角大小*/ } .face{ width: 310px; /*脸部定义大小*/ height: 260px; background: snow; /*脸部定义背景颜色*/ border-radius: 50% 50% 25% 25% / 55% 55% 45% 45%; /*脸部定义四个方向的圆角大小*/ position: relative; /*脸部定义位置,是相对于head的位置*/ top: 90px; left: 45px; } /*左眼眶*/ .face>p:first-child{ width: 80px; /*左眼框定义大小*/ height: 100px; border-radius: 50%; /*左眼框定义与圆角大小*/ border:2px #000 solid; /*定义外边框*/ background: snow; float: left; /*为了使左右两个眼睛能在一排显示*/ position: relative; /*位置是相对于face的位置*/ top:-40px; left: 71px; z-index: 50; } /*右眼眶,画法跟左眼一样*/ .face>p:last-child{ width: 80px; height: 100px; border-radius: 50%; border:2px #000 solid; background: snow; float: left; position: relative; top:-40px; left: 71px; z-index: 50; } /*左眼珠1*/ .face>p:first-child p{ width: 20px; /*定义眼珠的大小*/ height: 25px; background: #000; border-radius: 50%; position: absolute; /*定义眼珠的位置,相对于眼眶的位置*/ top: 45px; left: 60px; } /*左瞳孔*/ .face>p:first-child p p{ width: 10px; /*定义黑色瞳孔的大小*/ height: 10px; background: #ffffff; border-radius: 50%; position: absolute; /*定义黑色瞳孔的位置,相对于眼珠的位置*/ top: 7px; left: 10px; } /*右眼珠和左眼珠画法一样*/ .face>p:last-child p{ width: 20px; height: 25px; background: #000; border-radius: 50%; position: absolute; top: 45px; } /*右瞳孔和左瞳孔的画法一样*/ .face>p:last-child p p{ width: 10px; height: 10px; background: #ffffff; border-radius: 50%; position: absolute; top: 7px; } .nose{ width: 30px; /*定义红鼻子的大小*/ height: 30px; border-radius: 50%; background: #c70000; position: absolute; top: 130px; left: 50%; margin-left: -15px; z-index: 10; } .nose p{ width: 10px; /*定义红鼻子里面白色圈圈的大小*/ height: 10px; border-radius: 50%; position: absolute; background: #ffffff; top: 10px; margin-left: 20px; z-index: 10; } .nose1{ width: 2px; /*定义红鼻子下面的那一条黑线*/ height: 130px; background: #000; position: absolute; top: 160px; left: 50%; margin-left: -1px; z-index: 10; } -

Doraemons Kopf.png
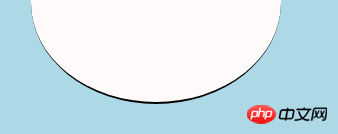
Doraemon zeichnen Der Mundteil von Laa Meng
-
Der Mund sollte sehr einfach sein. Auf den ersten Blick erkennt man, dass er mit Rand + Randradius realisiert ist.
<p class="mouth"></p>
.mouth{
 width: 250px; /*定义嘴巴的大小*/
 height: 200px;
 border-radius: 50%;
 background: snow;
 border-bottom: 2px #000 solid;
 margin: -230px auto;
 position: relative; /*定义嘴巴的位置*/
 }
Doraemons Mund.png
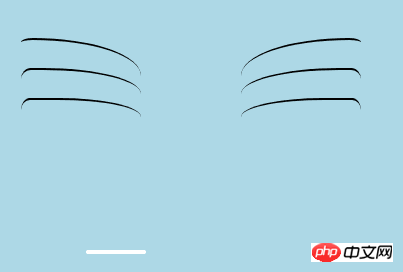
Doraemon zeichnen Der Bartteil eines Traum
-
Der Bartteil wurde tatsächlich im vorherigen Artikel beim Zeichnen von HTML zum Erstellen von Animationen eingeführt [Serie 3] - Kätzchen-Smiley-Animation beim Zeichnen von Bärten Die Methode wird hier nicht im Detail beschrieben. Die Grundidee ist dieselbe.
<!-- 胡须 -->
  <p class="beard">
 <!-- 左边胡须部分 -->
 <p class="left">
 <!-- 第一根胡须 -->
 <p></p>
 <!-- 第二根胡须 -->
 <p></p>
 <!-- 第三根胡须 -->
 <p></p>
 </p>
 <p class="right">
 <p></p>
 <p></p>
 <p></p>
 </p>
 <!-- 脖子部分的小白条部分 -->
 <span></span>
 </p>
/*胡须样式*/
.beard .left p:first-child{
 width: 120px;
 height: 40px;
 border-top: 2px #000 solid;
 border-radius: 10% 90% 10% 90% / 10% 90% 10% 90%;
 position: absolute;
 left: 50%;
 top: 140px;
 margin-left: -170px;
 z-index: 100;
 }
 .beard .left p:nth-child(2){
 width: 120px;
 height: 40px;
 border-top: 2px #000 solid;
 border-radius: 10% 90% 10% 90% / 30% 70% 40% 60%;
 position: absolute;
 left: 50%;
 top: 170px;
 margin-left: -170px;
 z-index: 100;
 }
 .beard .left p:last-child{
 width: 120px;
 height: 40px;
 border-top: 2px #000 solid;
 border-radius: 10% 90% 10% 90% / 40% 60% 10% 90%;
 position: absolute;
 left: 50%;
 top: 200px;
 margin-left: -170px;
 z-index: 100;
 }

 .beard .right p:first-child{
 width: 120px;
 height: 40px;
 border-top: 2px #000 solid;
 border-radius: 90% 10% 90% 10% / 90% 10% 90% 10%;
 position: absolute;
 left: 50%;
 top: 140px;
 margin-left: 50px;
 z-index: 100;
 }
 .beard .right p:nth-child(2){
 width: 120px;
 height: 40px;
 border-top: 2px #000 solid;
 border-radius: 90% 10% 90% 10% / 70% 30% 60% 40%;
 position: absolute;
 left: 50%;
 top: 170px;
 margin-left: 50px;
 z-index: 100;
 }
 .beard .right p:last-child{
 width: 120px;
 height: 40px;
 border-top: 2px #000 solid;
 border-radius: 90% 10% 90% 10% / 60% 40% 90% 10%;
 position: absolute;
 left: 50%;
 top: 200px;
 margin-left: 50px;
 z-index: 100;
 }
 .beard span{
 display: block;
 width: 60px;
 height: 3.5px;
 background: #ffffff;
 border-radius: 4px;
 position: absolute;
 top: 352px;
 left: 50%;
 margin-left: -105px;
 }
Doraemon’s beard.png
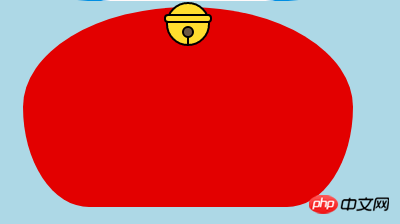
Doraemon zeichnen Der Halsteil eines Traum (der Halsteil enthält die Glocke)
Der Hals ist die Form nach der grundlegenden p-Verformung, und der überschüssige Teil kann unter dem Kopf versteckt werden.
-
Der Glockenteil besteht aus sehr einfachen Grundgrafiken.
<!-- 脖 -->
  <p class="neck">
 <!-- 铃铛的圆形 -->
 <p></p>
 <!-- 铃铛的小圆角矩形 -->
 <p></p>
 <!-- 铃铛的小圆形 -->
 <p></p>
 <!-- 铃铛的小竖线 -->
 <p></p>
 </p>
.neck{
 width: 330px;
 height: 200px;
 border-radius: 50% 50% 20% 20% / 50% 50% 50% 50%;
 background: #e30000;
 margin: 80px auto;
 z-index: 100;
 }
 .neck p:first-child{
 border: 2px #000 solid;
 border-radius: 50%;
 width: 40px;
 height: 40px;
 background: #ffdd2e;
 position: absolute;
 top: 350px;
 left: 50%;
 margin-left: -22px;
 transition: all 1s;
 }
 .neck p:nth-child(2){
 border: 2px #000 solid;
 width: 44px;
 height: 5px;
 background: #ffdd2e;
 position: absolute;
 left: 50%;
 margin-left: -24px;
 top: 363px;
 border-radius: 5px;
 transition: all 1s;
 }
 .neck p:nth-child(3){
 width: 8px;
 height: 8px;
 border: 2px #000 solid;
 position: absolute;
 background: #6c5844;
 border-radius: 50%;
 left: 50%;
 margin-left: -6px;
 top: 375px;
 transition: all 1s;
 }
 .neck p:nth-child(4){
 width: 2px;
 height: 8px;
 background: #000;
 position: absolute;
 left: 50%;
 margin-left: -1px;
 top: 385px;
 transition: all 1s;
 }
Doraemon's neck.png
Dolamon abgeschlossen Der dynamische Effekt von a Traum
Doraemon ist süßer, wenn es sich bewegt, oder? Dann lass es uns bewegen (Übergangsattribut).
Bewegen Sie die Maus auf die Augenpartie und bewegen Sie den linken Augapfel nach links.
Bewegen Sie die Maus zum Mund und der Gesichtsausdruck ändert sich.
-
Bewegen Sie die Maus zum Glockenteil und die Glocke wird größer.
/*眼睛动效*/
.head:hover .face>p:first-child p{
 left: 0px;
 transition: all 1s;
 }
 .head:hover .face>p:first-child p p{
 left: 0px;
 transition: all 1s;
 }
/*嘴巴动效,嘴巴的dom容器下面要加了个空的p容器*/
.mouth p:first-child{
 width: 82px;
 height: 2px;
 background: #000;
 position: absolute;
 z-index: 1000;
 top: -25px;
 left: 6px;
 display: none;
 }
 .mouth p:nth-child(2){
 width: 82px;
 height: 2px;
 background: #000;
 position: absolute;
 z-index: 1000;
 top: -25px;
 left: 90px;
 display: none;
 }
 .mouth:hover{
 border-radius: 0;
 width: 180px;
 height: 200px;
 }
 .mouth:hover p:first-child,.mouth:hover p:nth-child(2){
 display: block;
 }
/*铃铛动效*/
.neck:hover p:first-child{
 width: 60px;
 height: 60px;
 left: 50%;
 margin-left: -30px;
 }
 .neck:hover p:nth-child(2){
 width: 66px;
 height: 7.5px;
 left: 50%;
 margin-left: -33px;
 }
 .neck:hover p:nth-child(3){
 width: 12px;
 height: 12px;
 left: 50%;
 margin-left: -6px;
 top: 385px;
 }
 .neck:hover p:nth-child(4){
 width: 2px;
 height: 12px;
 left: 50%;
 margin-left: 1px;
 top: 400px;
 }
Das obige ist der detaillierte Inhalt vonTeilen Sie HTML-Beispielcode, um animierten Doraemon zu erstellen. Für weitere Informationen folgen Sie bitte anderen verwandten Artikeln auf der PHP chinesischen Website!


