Heim >Web-Frontend >H5-Tutorial >Zusammenfassung der Canvas-Probleme in HTML5
Zusammenfassung der Canvas-Probleme in HTML5
- 巴扎黑Original
- 2017-07-18 10:42:421497Durchsuche
Probleme beim Erlernen von HTML5-Canvas
1. Nicht-Null-Wrapping-Prinzip (nonzZero-Regel)
Das Nicht-Null-Wrapping-Prinzip ist Leinwand Die Grundlage für die Beurteilung, ob beim Füllen eine Füllung durchgeführt werden soll.
Zeichnen Sie eine Linie aus dem Bereich, in dem die Füllung bestimmt wird, und ziehen Sie sie aus der Grafik heraus. Diese gezeichnete Linie ist die Hilfslinie. Bestimmen Sie, ob die gezeichnete Linie von der linken Seite der Hilfslinie zur rechten Seite der Hilfslinie kreuzt. Zu diesem Zeitpunkt wird diese Kreuzungsmethode als +1 aufgezeichnet, wenn sie von der rechten Seite der Hilfslinie nach links kreuzt Seite der Hilfslinie wird es als - 1 aufgezeichnet. Wenn das Summenergebnis 0 ist, bedeutet dies, dass dieser Bereich nicht ausgefüllt werden sollte.
-
muss ausgefüllt werden. Das obige Prinzip ist schwer zu verstehen, wenn ein kleines Rechteck in ein großes Rechteck gezeichnet wird und die Zeichenrichtung des großen Rechtecks mit der des kleinen Rechtecks übereinstimmt die Farbe, das große und das kleine Rechteck werden mit der gleichen Farbe gefüllt; die Zeichenrichtung des großen Rechtecks ist der des kleinen Rechtecks entgegengesetzt. Wenn nach dem Füllen mit Farbe das kleine Rechteck nicht mit Farbe gefüllt wird Der Bereich zwischen dem großen Rechteck und dem kleinen Rechteck wird mit Farbe gefüllt.
Code, wenn die Zeichenrichtung des großen Rechtecks mit der Zeichenrichtung des kleinen Rechtecks übereinstimmt
-

 Code anzeigen
1 <!DOCTYPE html> 2 <html lang="en"> 3 4 <head> 5 <meta charset="UTF-8"> 6 <title>非零环绕原则</title> 7 </head> 8 9 <body>10 <canvas id="canvas" style="margin:0 auto;border:1px #666 solid" width="800" height="600">11 </canvas>12 <script>13 var canvas = document.getElementById('canvas');14 var ctx = canvas.getContext('2d');15 ctx.moveTo(100, 100);16 ctx.lineTo(100, 400);17 ctx.lineTo(400, 400);18 ctx.lineTo(400, 100);19 ctx.lineTo(100, 100);20 21 ctx.moveTo(200, 200);22 ctx.lineTo(300, 300);23 ctx.lineTo(300, 300);24 ctx.lineTo(300, 200);25 ctx.lineTo(200, 200);26 ctx.fill();27 </script>28 </body>29 30 </html> Das Rendering, wenn die Zeichenrichtung des großen Rechtecks mit der des großen Rechtecks übereinstimmt Zeichenrichtung des kleinen Rechtecks
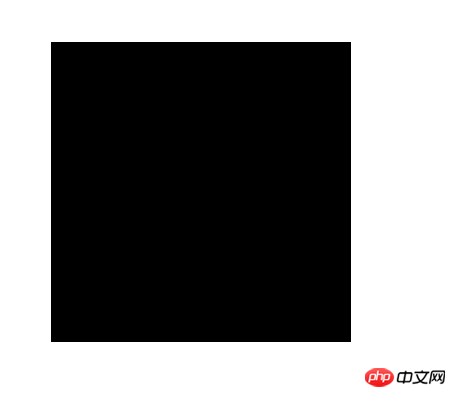
Code, wenn die Zeichenrichtung des großen Rechtecks der Zeichenrichtung des entgegengesetzt ist kleines Rechteck
-

 Code anzeigen
1 <!DOCTYPE html> 2 <html lang="en"> 3 4 <head> 5 <meta charset="UTF-8"> 6 <title>非零环绕原则</title> 7 </head> 8 9 <body>10 <canvas id="canvas" style="margin:0 auto;border:1px #666 solid" width="800" height="600">11 </canvas>12 <script>13 var canvas = document.getElementById('canvas');14 var ctx = canvas.getContext('2d');15 ctx.moveTo(100, 100);16 ctx.lineTo(100, 400);17 ctx.lineTo(400, 400);18 ctx.lineTo(400, 100);19 ctx.lineTo(100, 100);20 21 ctx.moveTo(200, 200);22 ctx.lineTo(300, 200);23 ctx.lineTo(300, 300);24 ctx.lineTo(200, 300);25 ctx.lineTo(200, 200);26 ctx.fill();27 </script>28 </body>29 30 </html> Die Zeichenrichtung des großen Rechtecks ist die gleiche wie die des kleinen Rechtecks. Das Wirkungsdiagramm beim Zeichnen in die entgegengesetzte Richtung
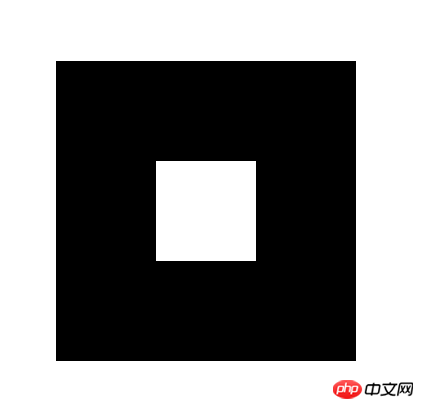 2. Der Unterschied zwischen closePath() und lineTo()
- Es gibt einen Unterschied zwischen closePath und lineTo schließen, closePath
ist natürlich geschlossen, lineTo ist geschlossenEs wird gezackt sein,Es wird nur Unterschiede bei den geschlossenen Verbindungen geben
- Rendering

-

 Code anzeigen
1 <!DOCTYPE html> 2 <html lang="en"> 3 4 <head> 5 <meta charset="UTF-8"> 6 <title>Document</title> 7 <style> 8 canvas { 9 display: block;10 margin: 100px auto;11 border: 1px solid #000;12 }13 </style>14 </head>15 16 <body>17 <canvas id="myCanvas" width="600px" height="400px"></canvas>18 <script>19 var myCanvas = document.getElementById("myCanvas");20 var ctx = myCanvas.getContext('2d');21 ctx.lineWidth = 20;22 ctx.moveTo(100, 100);23 ctx.lineTo(100, 100 + 100);24 ctx.lineTo(100 + 100, 100 + 100);25 ctx.lineTo(100, 100);26 27 ctx.moveTo(300, 100);28 ctx.lineTo(300, 100 + 100);29 ctx.lineTo(300 + 100, 100 + 100);30 ctx.closePath();31 ctx.stroke();32 </script>33 </body>34 </html>
- Wenn „moveTo“ nicht festgelegt ist, wird der Bogen vom Anfangspunkt aus gezeichnet. Verbinden Sie die Linie mit dem Startpunkt des Bogens
Wenn Sie die Strichmethode verwenden, wird die Linie mit der Startposition des Bogens verbunden. Wenn Sie die Füllmethode verwenden, wird der Pfad automatisch geschlossen und gefüllt.

 Code anzeigen
1 <!DOCTYPE html> 2 <html lang="en"> 3 <head> 4 <meta charset="UTF-8"> 5 <title>Document</title> 6 <style> 7 canvas{ 8 display: block; 9 margin: 0 auto;10 border: 1px solid #666;11 }12 </style>13 </head>14 <body>15 <canvas id="myCanvas" width="800" height="300"></canvas>16 <script>17 var myCanvas = document.getElementById("myCanvas");18 var ctx = myCanvas.getContext('2d');19 ctx.moveTo(50,100);20 ctx.lineTo(100,100);21 ctx.arc(150,150,50,0,Math.PI);22 ctx.stroke();23 24 ctx.moveTo(200,100);25 ctx.lineTo(300,100);26 ctx.arc(300,150,50,0,Math.PI*1.2);27 ctx.stroke();28 29 ctx.beginPath();30 ctx.moveTo(400,100);31 ctx.lineTo(500,100);32 ctx.arc(500,150,50,0,Math.PI*1.2);33 ctx.fill();34 35 ctx.beginPath();36 ctx.moveTo(600,50);37 ctx.lineTo(700,100);38 ctx.arc(700,150,50,0,Math.PI*1.2);39 ctx.fill();40 </script>41 </body>42 </html>效果图
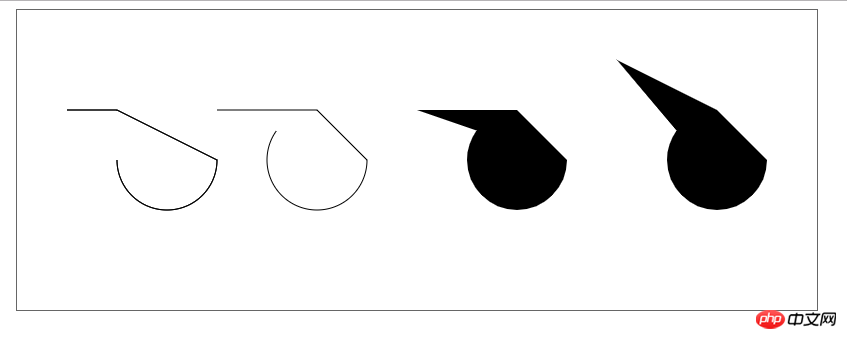
3.1 解决方法一:使用beginPath(),开启新的路径,两次绘制的图形就不会相互产生影响

 View Code
1 <!DOCTYPE html> 2 <html lang="en"> 3 <head> 4 <meta charset="UTF-8"> 5 <title>Document</title> 6 <style> 7 canvas{ 8 display: block; 9 margin: 0 auto;10 border: 1px solid #666;11 }12 </style>13 </head>14 <body>15 <canvas id="myCanvas" width="800" height="300"></canvas>16 <script>17 var myCanvas = document.getElementById("myCanvas");18 var ctx = myCanvas.getContext('2d');19 ctx.moveTo(50,100);20 ctx.lineTo(100,100);21 //使用beginPath(),多添加的两句代码22 ctx.stroke();23 ctx.beginPath();24 ctx.arc(150,150,50,0,Math.PI);25 ctx.stroke();26 </script>27 </body>28 </html>效果图
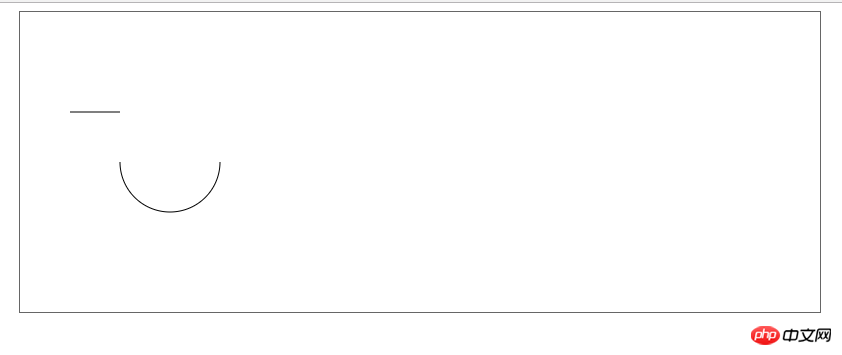
3.2 解决方法一:使用moveTo(),将上一个图形的终点移动到下一个即将绘制的图形上,就可以解决问题,效果与上面的解决方法相同。但是,该方法只需要使用一次stroke().

 View Code
1 <!DOCTYPE html> 2 <html lang="en"> 3 <head> 4 <meta charset="UTF-8"> 5 <title>Document</title> 6 <style> 7 canvas{ 8 display: block; 9 margin: 0 auto;10 border: 1px solid #666;11 }12 </style>13 </head>14 <body>15 <canvas id="myCanvas" width="800" height="300"></canvas>16 <script>17 var myCanvas = document.getElementById("myCanvas");18 var ctx = myCanvas.getContext('2d');19 ctx.moveTo(50,100);20 ctx.lineTo(100,100);21 //添加moveTO()这一句代码即可22 ctx.moveTo(200,150);23 ctx.arc(150,150,50,0,Math.PI);24 ctx.stroke();25 </script>26 </body>27 </html>3.3 arc的一个小应用,绘制圆环进度条,使用了lineWidth

 View Code
1 <!DOCTYPE html> 2 <html lang="en"> 3 4 <head> 5 <meta charset="UTF-8"> 6 <title>Document</title> 7 <style> 8 canvas { 9 display: block;10 margin: 0 auto;11 border: 1px solid #666;12 }13 </style>14 </head>15 16 <body>17 <canvas id="myCanvas" width="400" height="400"></canvas>18 <script>19 var myCanvas = document.getElementById("myCanvas");20 var ctx = myCanvas.getContext('2d');21 22 function toRad(d) {23 return d * Math.PI / 180;24 }25 var x = 200,26 y = 200,27 angle = 0,28 percent = 0;29 var timeId = setInterval(function() {30 ctx.clearRect(0,0,myCanvas.width,myCanvas.height);31 ctx.beginPath();32 ctx.arc(x, y, 120, 0, toRad(angle));33 ctx.strokeStyle = '#00f';34 ctx.lineWidth = 40;35 ctx.stroke();36 37 ctx.fillStyle = '#f00';38 ctx.font = '700 30px Arial';39 ctx.textAlign = 'center';40 ctx.textBaseline = 'middle';41 percent = Math.floor(angle /360*100);42 ctx.fillText(percent + '%', x, y);43 if (percent >= 100) {44 clearInterval(timeId)45 }46 else{47 angle++;48 }49 }, 20);50 </script>51 </body>52 53 </html>效果图
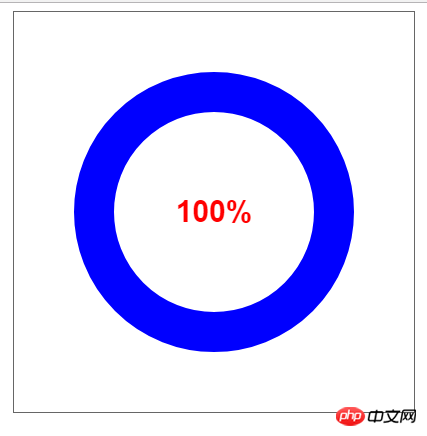
绘图方法
canvas画布提供了一个用来作图的平面空间,该空间的每个点都有自己的坐标,x表示横坐标,y表示竖坐标。原点(0, 0)位于图像左上角,x轴的正向是原点向右,y轴的正向是原点向下。
(1)绘制路径
beginPath方法表示开始绘制路径,moveTo(x, y)方法设置线段的起点,lineTo(x, y)方法设置线段的终点,stroke方法用来给透明的线段着色。
ctx.beginPath(); // 开始路径绘制
ctx.moveTo(20, 20); // 设置路径起点,坐标为(20,20)
ctx.lineTo(200, 20); // 绘制一条到(200,20)的直线
ctx.lineWidth = 1.0; // 设置线宽
ctx.strokeStyle = '#CC0000'; // 设置线的颜色
ctx.stroke(); // 进行线的着色,这时整条线才变得可见
moveto和lineto方法可以多次使用。最后,还可以使用closePath方法,自动绘制一条当前点到起点的直线,形成一个封闭图形,省却使用一次lineto方法。
(2)绘制矩形
fillRect(x, y, width, height)方法用来绘制矩形,它的四个参数分别为矩形左上角顶点的x坐标、y坐标,以及矩形的宽和高。fillStyle属性用来设置矩形的填充色。
ctx.fillStyle = 'yellow';
ctx.fillRect(50, 50, 200, 100);
strokeRect方法与fillRect类似,用来绘制空心矩形。
ctx.strokeRect(10,10,200,100);
clearRect方法用来清除某个矩形区域的内容。
ctx.clearRect(100,50,50,50);
4. arcTo()的使用
arcTo绘制圆角,需要线端点,矩形顶点以及另一线段的端点三个参考点
-

 View Code
1 <!DOCTYPE html> 2 <html lang="en"> 3 4 <head> 5 <meta charset="UTF-8"> 6 <title>Document</title> 7 <style> 8 canvas { 9 display: block;10 margin: 0 auto;11 border: 1px solid #666;12 }13 </style>14 </head>15 16 <body>17 <canvas id="myCanvas" width="600" height="460"></canvas>18 <script>19 var myCanvas = document.getElementById("myCanvas");20 var ctx = myCanvas.getContext('2d');21 22 function toRad(d) {23 return d * Math.PI / 180;24 }25 26 function circleRect(x, y, width, height, r, color) {27 //保存之前的绘图状态28 ctx.save();29 ctx.beginPath();30 //绘制四条边31 ctx.moveTo(x + r, y);32 ctx.lineTo(x + width - r, y);33 34 ctx.moveTo(x + r, y + height);35 ctx.lineTo(x + width - r, y + height);36 37 ctx.moveTo(x, y + r);38 ctx.lineTo(x, y + height - r);39 40 ctx.moveTo(x + width, y + r);41 ctx.lineTo(x + width, y + height - r);42 43 ctx.moveTo(x + r, y);44 ctx.arcTo(x, y, x, y + r, r);45 46 ctx.moveTo(x + width - r, y);47 ctx.arcTo(x + width, y, x + width, y + r, r);48 49 ctx.moveTo(x, y + height - r);50 ctx.arcTo(x, y + height, x + r, y + height, r);51 52 ctx.moveTo(x + width - r, y + height);53 ctx.arcTo(x + width, y + height, x + width, y + height - r, r);54 //传入颜色,则使用传入的颜色;否则使用默认黑色55 ctx.strokeStyle = color || '#000';56 ctx.stroke();57 //恢复之前的绘图状态58 ctx.restore();59 }60 61 circleRect(100, 100, 200, 200, 50, 'red');62 circleRect(300, 300, 100, 100, 25);63 </script>64 </body>65 66 </html> 效果图
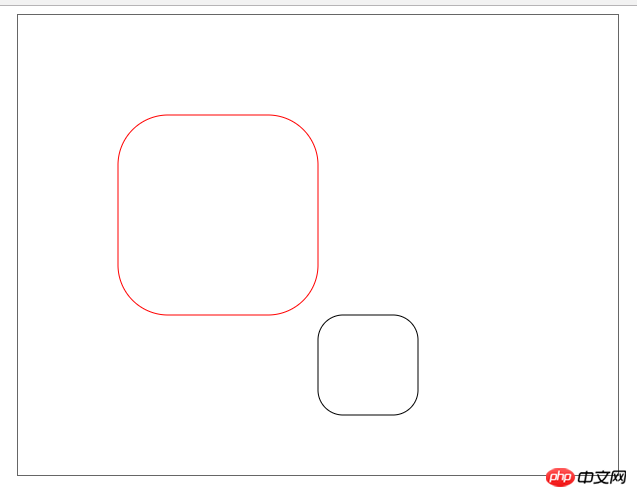
Das obige ist der detaillierte Inhalt vonZusammenfassung der Canvas-Probleme in HTML5. Für weitere Informationen folgen Sie bitte anderen verwandten Artikeln auf der PHP chinesischen Website!
In Verbindung stehende Artikel
Mehr sehen- Das Vollbild-Bildlauf-Plug-in AlloyTouch erstellt in 30 Sekunden eine flüssige H5-Seite
- Tatsächlicher HTML5-Kampf und Analyse von Touch-Ereignissen (Touchstart, Touchmove und Touchend)
- Ausführliche Erläuterung der Beispiele für Bildzeichnungen in HTML5 Canvas 9
- Reguläre Ausdrücke und neue HTML5-Elemente
- So kombinieren Sie NodeJS und HTML5, um mehrere Dateien per Drag-and-Drop auf den Server hochzuladen

