
Heim >Web-Frontend >js-Tutorial >Implementierung der Bootstrap-Bildkarussellfunktion
Implementierung der Bootstrap-Bildkarussellfunktion
- 巴扎黑Original
- 2017-07-21 17:11:041658Durchsuche
前面的话
图片轮播效果在Web中常常能看到,很多人也称之为幻灯片。其主要显示的效果就是多幅图片轮流播放。鼠标悬停在图片时会暂停播放,如果鼠标悬停或单击右下角圆点时,会显示对应的图片。这种图片轮播效果,在Bootstrap框架中是通过Carousel插件来实现的。本文将详细介绍Bootstrap图片轮播
结构
一个轮播图片主要包括三个部分:
☑ 轮播的图片
☑ 轮播图片的计数器
☑ 轮播图片的控制器
复杂一点的轮播图片,每个轮播区会带有对应的标题和描述内容。那么在 Bootstrap 框架中,轮播图是如何设计的呢?
第一步:设计轮播图片的容器。在 Bootstrap 框架中采用 carousel 样式,并且给这个容器定义一个 ID 值,方便后面采用 data 属性来声明触发
<div id="slidershow" class="carousel"></div>
第二步:设计轮播图片计数器。在容器 div.carousel 的内部添加轮播图片计算器,采用 carousel-indicators 样式,其主要功能是显示当前图片的播放顺序(有几张图片就放置几个li),一般采用有序列表来制作:
<div id="slidershow" class="carousel"><!-- 设置图片轮播的顺序 --><ol class="carousel-indicators"><li class="active">1</li><li>2</li><li>3</li><li>4</li><li>5</li>...</ol></div>
在 Bootstrap 框架中,轮播图片计数器,都是以圆点呈现
.carousel-indicators {position: absolute; /*整个计数区域绝对定位*/bottom: 10px; /*距容器carousel底部10px*/z-index: 15; /*设置其在Z轴的层级*//*让整个计数区水平居中*/left: 50%;width: 60%;padding-left: 0;margin-left: -30%;text-align: center;list-style: none;
}.carousel-indicators li {display: inline-block;width: 10px;height: 10px;margin: 1px;text-indent: -999px;cursor: pointer;background-color: #000 \9;background-color: rgba(0, 0, 0, 0);border: 1px solid #fff;border-radius: 10px;
}/*设置当前状态样式*/.carousel-indicators .active {width: 12px;height: 12px;margin: 0;background-color: #fff;
}
第三步:设计轮播图片播放区。轮播图整个效果中,播放区是最关键的一个区域,这个区域主要用来放置需要轮播的图片。这个区域使用 carousel-inner 样式来控制,而且其同样放置在 carousel 容器内,并且通过 item 容器来放置每张轮播的图片
<div id="slidershow" class="carousel"><!-- 设置图片轮播的顺序 --><ol class="carousel-indicators"><li class="active">1</li>…</ol><!-- 设置轮播图片 --><div class="carousel-inner"><div class="item active"><a href="##"><img src="#" alt=""></a></div><div class="item"><a href="##"><img src="#" alt=""></a></div>…<div class="item"><a href="##"><img src="#" alt=""></a></div></div></div>
在很多轮播图片效果中,在每个图片上还对应有自己的标题和描述内容。其实 Bootstrap 框架中的 Carousel 也提供类似的效果。只需要在 item 中图片底部添加对应的代码:
<div id="slidershow" class="carousel"><!-- 设置图片轮播的顺序 --><ol class="carousel-indicators"><li class="active">1</li>…</ol><!-- 设置轮播图片 --><div class="carousel-inner"><div class="item active"><a href="##"><img src="#" alt=""></a><!-- 图片对应标题和描述内容 --><div class="carousel-caption"><h3>图片标题</h3><p>描述内容...</p></div></div>…</div></div>
第四步:设计轮播图片控制器。很多时候轮播图片还具有一个向前播放和向后播放的控制器。在 Carousel 中通过 carousel-control 样式配合 left 和 right 来实现。其中left表示向前播放,right表示向后播放。其同样放在carousel容器内
<div id="slidershow" class="carousel"><!-- 设置图片轮播的顺序 --><ol class="carousel-indicators">   …</ol><!-- 设置轮播图片 --><div class="carousel-inner">…</div><!-- 设置轮播图片控制器 --><a class="left carousel-control" href="" ><span class="glyphicon glyphicon-chevron-left"></span></a><a class="right carousel-control" href=""><span class="glyphicon glyphicon-chevron-right"></span></a>
   </div>
通过两个 a 链接在内部定义要显示的小图标,一个是向前,一个是向后。这两个图标都显示在图片容器的上面(z-index的值大于carousel-inner的)
声明式触发
声明式方法是通过定义 data 属性来实现,data 属性可以很容易地控制轮播的位置。其主要包括以下几种:
1、data-ride 属性:取值 carousel,并且将其定义在 carousel 上
2、data-target 属性:取值 carousel 定义的 ID 名或者其他样式识别符,如前面示例所示,取值为“#slidershow”,并且将其定义在轮播图计数器的每个 li 上
3、data-slide 属性:取值包括 prev,next。prev表示向后滚动,next 表示向前滚动。该属性值同样定义在轮播图控制器的 a 链接上,同时设置控制器 href 值为容器 carousel 的 ID 名或其他样式识别符
4、data-slide-to 属性:用来传递某个帧的下标,比如 data-slide-to="2",可以直接跳转到这个指定的帧(下标从0开始计),同样定义在轮播图计数器的每个 li 上
[注意]可以为 #slidershow 层添加 slide 样式,使用图片与图片切换效果有平滑感
除了data-ride="carousel"、data-slide、data-slide-to 以外,轮播组件还支持其他三个自定义属性
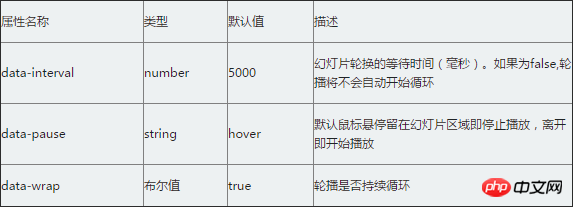
  <div id="slidershow" class="carousel slide" data-ride="carousel" style="width:300px"><!-- 设置图片轮播的顺序 --><ol class="carousel-indicators"><li class="active" data-target="#slidershow" data-slide-to="0">1</li><li data-target="#slidershow" data-slide-to="1">2</li><li data-target="#slidershow" data-slide-to="2">3</li></ol><!-- 设置轮播图片 --><div class="carousel-inner"><div class="item active"><a href="##"><img src="http://sandbox.runjs.cn/uploads/rs/26/ddzmgynp/img1.jpg" width=300 height=200  alt=""></a><div class="carousel-caption"><h3>图片标题1</h3><p>描述内容1...</p></div></div><div class="item"><a href="##"><img src="http://sandbox.runjs.cn/uploads/rs/26/ddzmgynp/img2.jpg" width=300 height=200 alt=""></a><div class="carousel-caption"><h3>图片标题2</h3><p>描述内容2...</p></div></div><div class="item"><a href="##"><img src="http://sandbox.runjs.cn/uploads/rs/26/ddzmgynp/img3.jpg" width=300 height=200  alt=""></a><div class="carousel-caption"><h3>图片标题3</h3><p>描述内容3...</p></div></div></div><a class="left carousel-control " href="#slidershow" role="button" data-slide="prev"><span class="glyphicon glyphicon-chevron-left"></span></a><a class="right carousel-control" href="#slidershow" role="button" data-slide="next"><span class="glyphicon glyphicon-chevron-right"></span></a>
  </div>
JS触发
默认情况下,如果 carousel 容器上定义了 data-ride="carousel" 属性,页面加载之后就会自动加载轮播图片切换效果。如果没有定义 data-ride 属性,可以通过 JavaScript 方法来触发轮播图片切换。具体使用方法如下
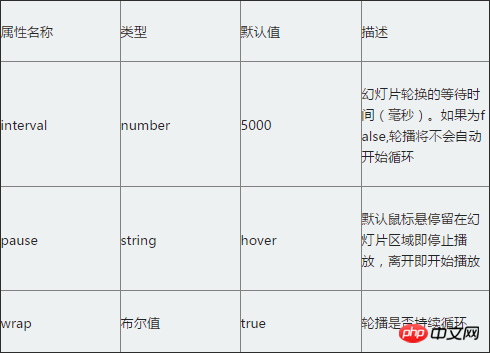
$(".carousel").carousel();在 carousel() 方法中可以设置具体的参数,如
  <div id="slidershow" class="carousel slide" style="width:300px"><!-- 设置图片轮播的顺序 --><ol class="carousel-indicators"><li class="active" data-target="#slidershow" data-slide-to="0">1</li><li data-target="#slidershow" data-slide-to="1">2</li><li data-target="#slidershow" data-slide-to="2">3</li></ol><!-- 设置轮播图片 --><div class="carousel-inner"><div class="item active"><a href="##"><img src="http://sandbox.runjs.cn/uploads/rs/26/ddzmgynp/img1.jpg" width=300 height=200  alt=""></a><div class="carousel-caption"><h3>图片标题1</h3><p>描述内容1...</p></div></div><div class="item"><a href="##"><img src="http://sandbox.runjs.cn/uploads/rs/26/ddzmgynp/img2.jpg" width=300 height=200 alt=""></a><div class="carousel-caption"><h3>图片标题2</h3><p>描述内容2...</p></div></div><div class="item"><a href="##"><img src="http://sandbox.runjs.cn/uploads/rs/26/ddzmgynp/img3.jpg" width=300 height=200  alt=""></a><div class="carousel-caption"><h3>图片标题3</h3><p>描述内容3...</p></div></div></div><a class="left carousel-control " href="#slidershow" role="button" data-slide="prev"><span class="glyphicon glyphicon-chevron-left"></span></a><a class="right carousel-control" href="#slidershow" role="button" data-slide="next"><span class="glyphicon glyphicon-chevron-right"></span></a>
  </div><script>$("#slidershow").carousel({
       interval: 1000});
</script>
【关键字】
实际上,给carousel()方法配置参数之后,轮播效果就能自动切换。但 Bootstrap 框架中的 carousel 插件还提供了几种特殊的调用方法,简单说明如下:
.carousel("cycle"):从左向右循环播放;
.carousel("pause"):停止循环播放;
.carousel("number"):循环到指定的帧,下标从0开始,类似数组;
.carousel("prev"):返回到上一帧;
.carousel("next"):下一帧
【事件】
该插件只提供两种事件类型
slide.bs.carousel    此事件在slide方法被调用之后 ,但还没开始处理下一张图片之前触发
slid.bs.carousel      此事件在一张图片轮播之后触发
<div id="slidershow" class="carousel slide" data-ride="carousel" style="width:300px"><!-- 设置图片轮播的顺序 --><ol class="carousel-indicators"><li class="active" data-target="#slidershow" data-slide-to="0">1</li><li data-target="#slidershow" data-slide-to="1">2</li><li data-target="#slidershow" data-slide-to="2">3</li></ol><!-- 设置轮播图片 --><div class="carousel-inner"><div class="item active"><a href="##"><img src="http://sandbox.runjs.cn/uploads/rs/26/ddzmgynp/img1.jpg" width=300 height=200 alt=""></a><div class="carousel-caption"><h3>图片标题1</h3><p>描述内容1...</p></div></div><div class="item"><a href="##"><img src="http://sandbox.runjs.cn/uploads/rs/26/ddzmgynp/img2.jpg" width=300 height=200 alt=""></a><div class="carousel-caption"><h3>图片标题2</h3><p>描述内容2...</p></div></div><div class="item"><a href="##"><img src="http://sandbox.runjs.cn/uploads/rs/26/ddzmgynp/img3.jpg" width=300 height=200 alt=""></a><div class="carousel-caption"><h3>图片标题3</h3><p>描述内容3...</p></div></div></div><a class="left carousel-control " href="#slidershow" role="button" data-slide="prev"><span class="glyphicon glyphicon-chevron-left"></span></a><a class="right carousel-control" href="#slidershow" role="button" data-slide="next"><span class="glyphicon glyphicon-chevron-right"></span></a>
</div> <script>$(function(){
$('#btn1').click(function(){
$("#slidershow").carousel('cycle');
});
$('#btn2').click(function(){
$("#slidershow").carousel('pause');
});
$('#btn3').click(function(){
$("#slidershow").carousel('prev');
});
$('#btn4').click(function(){
$("#slidershow").carousel('next');
});
$("#slidershow").on("slid.bs.carousel",function(e){
$('#result').html('当前正在显示第' + ($(e.relatedTarget).index()+1) + '张图片');
})
})</script>
Das obige ist der detaillierte Inhalt vonImplementierung der Bootstrap-Bildkarussellfunktion. Für weitere Informationen folgen Sie bitte anderen verwandten Artikeln auf der PHP chinesischen Website!
In Verbindung stehende Artikel
Mehr sehen- Eine eingehende Analyse der Bootstrap-Listengruppenkomponente
- Detaillierte Erläuterung des JavaScript-Funktions-Curryings
- Vollständiges Beispiel für die Generierung von JS-Passwörtern und die Erkennung der Stärke (mit Download des Demo-Quellcodes)
- Angularjs integriert WeChat UI (weui)
- Wie man mit JavaScript schnell zwischen traditionellem Chinesisch und vereinfachtem Chinesisch wechselt und wie Websites den Wechsel zwischen vereinfachtem und traditionellem Chinesisch unterstützen – Javascript-Kenntnisse