Heim >Java >javaLernprogramm >Detaillierte Erläuterung der Integration der drei großen Frameworks in SSH
Detaillierte Erläuterung der Integration der drei großen Frameworks in SSH
- 零下一度Original
- 2017-07-18 10:07:002827Durchsuche
SSH bezieht sich auf das klassische Framework von Javaweb. Man kann nicht sagen, dass 100 % der Leute das SSH-Framework kennen müssen, aber die meisten Unternehmen verwenden es Mal werde ich ein sehr einfaches Beispiel verwenden, um das SSH-Framework zu integrieren. Bei der Integration von Frameworks sollten Sie darauf achten, jedes Framework vor der Integration einzeln zu testen, da es sonst schwierig wird, Probleme nach der Integration zu beheben.
Umgebung: Windows + MyEclipse + JDK1.7 + Tomcat7 + MySQL
Wenn ein Fehler auftritt, kann dies daran liegen, dass ich ihn an einigen Stellen nicht klar beschrieben habe.
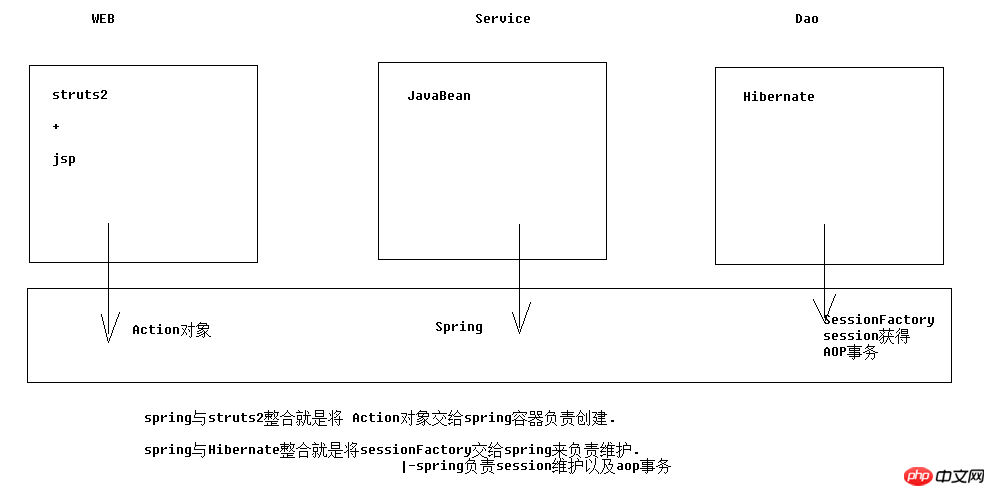
1. Integrationsprinzip

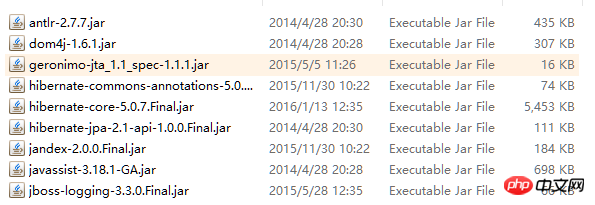
2. Leitfadenpakete (41)
1. Ruhezustand
(1)hibernate/lib/required

(2) hibernate/lib/jpa |. Java Persist API Java Persistence Specification (Schnittstelle)

(3) Datenbanktreiber

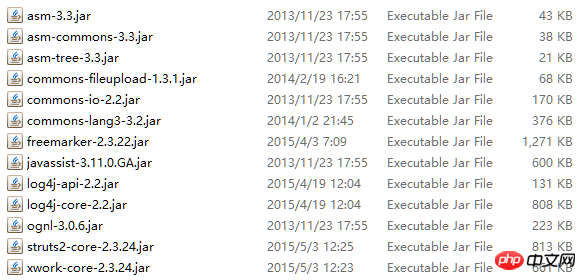
2.struts2
(1) struts-blank.war/WEB-INF /lib/ *
Hinweis: Duplizierung zwischen javassist-3.18.1-GA.jar-Paket und Hibernate (behalten Sie nur die höhere Version)

(2) Struts integriert Feder-Plug-in-Paket
Hinweis: Sobald dieses Paket importiert ist, sucht struts2 beim Start nach dem Federbehälter. Wenn er nicht gefunden wird, wird eine Ausnahme ausgelöst

3.Spring
Kernkontext |. Web-Paket
spring-web
(3) Integrieren Sie aop: 4
spring-aop | ) Hibernate und Transaktionen integrieren: 4
spring-jdbc |
4. Tag-Bibliothek
standard.jar |. jstl-1.2.jar
3. Konfigurieren Sie den Spring-Container separat
1. Erstellen Sie applicationContext .xml , und Importbeschränkungen (4) Beans |. aop |. tx
2. Konfigurieren Sie Spring, um mit dem Projekt zu beginnen (web . xml)

<?xml version="1.0" encoding="UTF-8"?><beans xmlns:xsi="http://www.w3.org/2001/XMLSchema-instance"xmlns="http://www.springframework.org/schema/beans"
        xmlns:context="http://www.springframework.org/schema/context"xmlns:aop="http://www.springframework.org/schema/aop"
        xmlns:tx="http://www.springframework.org/schema/tx"xsi:schemaLocation="http://www.springframework.org/schema/beans
                             http://www.springframework.org/schema/context/spring-context-4.2.xsd
                             http://www.springframework.org/schema/aop/spring-aop-4.2.xsd
                             http://www.springframework.org/schema/tx/spring-tx-4.2.xsd "><bean name="userAction" class="cn.xyp.web.action.UserAction"></bean></beans>
  <!-- 让spring随web启动而创建的监听器 -->
  <listener>  <listener-class>org.springframework.web.context.ContextLoaderListener</listener-class>
  </listener>
  <!-- 配置spring配置文件位置参数 -->
  <context-param>  <param-name>contextConfigLocation</param-name>  <param-value>classpath:applicationContext.xml</param-value>
  </context-param>
<?xml version="1.0" encoding="UTF-8"?>
  <!DOCTYPE struts PUBLIC
    "-//Apache Software Foundation//DTD Struts Configuration 2.3//EN"
    "http://struts.apache.org/dtds/struts-2.3.dtd"><struts><package name="crm" namespace="/" extends="struts-default"><action name="UserAction_*" class="cn.xyp.web.action.UserAction" method="{1}"><result name="success">/success.jsp</result></action></package></struts>
  <!-- struts2核心过滤器 -->
  <filter>  <filter-name>struts2</filter-name>  <filter-class>org.apache.struts2.dispatcher.ng.filter.StrutsPrepareAndExecuteFilter</filter-class>
  </filter>

  <filter-mapping>  <filter-name>struts2</filter-name>  <url-pattern>/*</url-pattern>
  </filter-mapping>
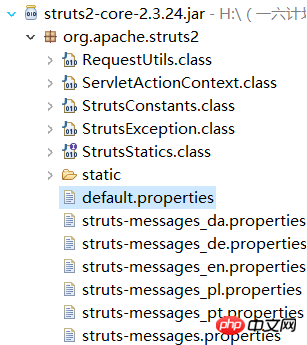
2. Konfigurationskonstanten
Standardkonfiguration anzeigen Die Datei beginnt in Zeile 31, um die zu konfigurierenden Variablen zu finden.
:Struts2 erstellt die Aktion selbst, und Spring ist für die Zusammenstellung der Abhängigkeitsattribute verantwortlich (Verständnis)
Grund für die Nichtempfehlung: Es ist am besten für spring, um den Lebenszyklus der Aktion vollständig zu verwalten.4. Integrationslösung 2: Spring ist für die Erstellung von Aktion und Montage verantwortlich

### if specified, the default object factory can be overridden here
### Note: short-hand notation is supported in some cases, such as "spring"
###       Alternatively, you can provide a com.opensymphony.xwork2.ObjectFactory subclass name here
# struts.objectFactory = spring

### specifies the autoWiring logic when using the SpringObjectFactory.
### valid values are: name, type, auto, and constructor (name is the default)
struts.objectFactory.spring.autoWire = name
    <!-- #  struts.objectFactory = spring    将action的创建交给spring容器
struts.objectFactory.spring.autoWire = name spring负责装配Action依赖属性--><constant name="struts.objectFactory" value="spring"></constant> <!-- 整合方案1:class属性上仍然配置action的完整类名
struts2仍然创建action,由spring负责组装Action中的依赖属性 --><action name="UserAction_*" class="cn.xyp.web.action.UserAction" method="{1}" ><result name="toHome" type="redirect" >/index.htm</result><result name="error" >/login.jsp</result></action>
6. Ruhezustand separat konfigurieren 1. Entitätsklassen und Orm-Metadaten importieren
<!-- action --><!-- 注意:Action对象作用范围一定是多例的.这样才符合struts2架构 --><bean name="userAction" class="cn.itcast.web.action.UserAction" scope="prototype" ><property name="userService" ref="userService" ></property></bean>
Beispiel: User.java
User.hbm.xml:
         <!--
             整合方案2:class属性上填写spring中action对象的BeanName
                 完全由spring管理action生命周期,包括Action的创建
                 注意:需要手动组装依赖属性          --><action name="UserAction_*" class="userAction" method="{1}" ><result name="toHome" type="redirect" >/index.htm</result><result name="error" >/login.jsp</result></action>
2. Konfigurieren Sie die Hauptkonfigurationsdatei (hibernate.xml)
七、spring整合hibernate
1.整合原理
将sessionFactory对象交给spring容器管理
2.在spring中配置sessionFactory
(1)配置方案一:(了解)
<!-- 加载配置方案1:仍然使用外部的hibernate.cfg.xml配置信息 --><bean name="sessionFactory" class="org.springframework.orm.hibernate5.LocalSessionFactoryBean" ><property name="configLocation" value="classpath:hibernate.cfg.xml" ></property></bean>
(2)配置方案二:(推荐)
<!-- 加载配置方案2:在spring配置中放置hibernate配置信息 --><bean name="sessionFactory" class="org.springframework.orm.hibernate5.LocalSessionFactoryBean" ><!-- 将连接池注入到sessionFactory, hibernate会通过连接池获得连接 --><property name="dataSource" ref="dataSource" ></property><!-- 配置hibernate基本信息 --><property name="hibernateProperties"><props><!-- 必选配置 --><prop key="hibernate.connection.driver_class" >com.mysql.jdbc.Driver</prop><prop key="hibernate.connection.url" >jdbc:mysql:///crm_32</prop><prop key="hibernate.connection.username" >root</prop><prop key="hibernate.connection.password" >1234</prop> <prop key="hibernate.dialect" >org.hibernate.dialect.MySQLDialect</prop><!-- 可选配置 --><prop key="hibernate.show_sql" >true</prop><prop key="hibernate.format_sql" >true</prop><prop key="hibernate.hbm2ddl.auto" >update</prop></props></property><!-- 引入orm元数据,指定orm元数据所在的包路径,spring会自动读取包中的所有配置 --><property name="mappingDirectoryLocations" value="classpath:cn/itcast/domain" ></property></bean>
八、spring整合c3p0连接池
1.配置db.properties
jdbc.jdbcUrl=jdbc:mysql:///xyp_crm
jdbc.driverClass=com.mysql.jdbc.Driver
jdbc.user=root
jdbc.password=123456
2.引入连接池到spring中
<!-- 读取db.properties文件 --><context:property-placeholder location="classpath:db.properties" /><!-- 配置c3p0连接池 --><bean name="dataSource" class="com.mchange.v2.c3p0.ComboPooledDataSource" ><property name="jdbcUrl" value="${jdbc.jdbcUrl}" ></property><property name="driverClass" value="${jdbc.driverClass}" ></property><property name="user" value="${jdbc.user}" ></property><property name="password" value="${jdbc.password}" ></property></bean>3.将连接池注入给SessionFactory
<bean name="sessionFactory" class="org.springframework.orm.hibernate5.LocalSessionFactoryBean" ><!-- 将连接池注入到sessionFactory, hibernate会通过连接池获得连接 --><property name="dataSource" ref="dataSource" ></property>
九、spring整合hibernate环境操作数据库
1.Dao类创建:继承HibernateDaoSupport
注意:项目中要确保使用统一版本。

//HibernateDaoSupport 为dao注入sessionFactorypublic class UserDaoImpl extends HibernateDaoSupport implements UserDao {2.hibernate模板的操作
(1)execute
    @Overridepublic User getByUserCode(final String usercode) {//HQLreturn getHibernateTemplate().execute(new HibernateCallback<User>() {
            @Overridepublic User doInHibernate(Session session) throws HibernateException {
                    String hql = "from User where user_code = ? ";
                    Query query = session.createQuery(hql);
                    query.setParameter(0, usercode);
                    User user = (User) query.uniqueResult();return user;
            }
        });
(2)findByCriteria
        //CriteriaDetachedCriteria dc = DetachedCriteria.forClass(User.class);

        dc.add(Restrictions.eq("user_code", usercode));

        List<User> list = (List<User>) getHibernateTemplate().findByCriteria(dc);            if(list != null && list.size()>0){return list.get(0);
        }else{return null;
        }
3.spring中配置dao
<!-- Dao --><bean name="userDao" class="cn.xyp.dao.impl.UserDaoImpl" ><!-- 注入sessionFactory --><property name="sessionFactory" ref="sessionFactory"></property></bean>
十、spring的aop事务
1.准备工作
<!-- 核心事务管理器 --><bean name="transactionManager" class="org.springframework.orm.hibernate5.HibernateTransactionManager" ><property name="sessionFactory" ref="sessionFactory" ></property></bean>
2.xml配置aop事务
(1)配置通知
    <!-- 配置通知 --><tx:advice id="txAdvice" transaction-manager="transactionManager" >
    <tx:attributes><tx:method name="save*" isolation="REPEATABLE_READ" propagation="REQUIRED" read-only="false" />
    <tx:method name="persist*" isolation="REPEATABLE_READ" propagation="REQUIRED" read-only="false" />
    <tx:method name="update*" isolation="REPEATABLE_READ" propagation="REQUIRED" read-only="false" />
    <tx:method name="modify*" isolation="REPEATABLE_READ" propagation="REQUIRED" read-only="false" />
    <tx:method name="delete*" isolation="REPEATABLE_READ" propagation="REQUIRED" read-only="false" />
    <tx:method name="remove*" isolation="REPEATABLE_READ" propagation="REQUIRED" read-only="false" />
    <tx:method name="get*" isolation="REPEATABLE_READ" propagation="REQUIRED" read-only="true" />
    <tx:method name="find*" isolation="REPEATABLE_READ" propagation="REQUIRED" read-only="true" />
    </tx:attributes>
    </tx:advice>
(2)配置织入
    <!-- 配置将通知织入目标对象
    配置切点
    配置切面 --><aop:config>
    <aop:pointcut expression="execution(* cn.itcast.service.impl.*ServiceImpl.*(..))" id="txPc"/>
    <aop:advisor advice-ref="txAdvice" pointcut-ref="txPc" />
    </aop:config>
3.注解配置aop事务
(1)开启注解事务
<!-- 开启注解事务 --><tx:annotation-driven transaction-manager="transactionManager" />
(2)Service类中使用注解
@Transactional(isolation=Isolation.REPEATABLE_READ,propagation=Propagation.REQUIRED,readOnly=true)public class UserServiceImpl implements UserService{ @Override
@Transactional(isolation=Isolation.REPEATABLE_READ,propagation=Propagation.REQUIRED,readOnly=false)public void saveUser(User u) {
ud.save(u);
}
十一、扩大session作用范围
1.配置filter
为了避免使用懒加载时出现no-session问题.需要扩大session的作用范围。
  <!-- 扩大session作用范围
      注意: 任何filter一定要在struts的filter之前调用
      因为struts是不会放行的   -->
   <filter>  <filter-name>openSessionInView</filter-name>  <filter-class>org.springframework.orm.hibernate5.support.OpenSessionInViewFilter</filter-class>
  </filter>

  <filter-mapping>  <filter-name>openSessionInView</filter-name>  <url-pattern>/*</url-pattern>
  </filter-mapping>
十二、练习:用户登录
1.struts.xml核心配置
<struts><!-- #  struts.objectFactory = spring    将action的创建交给spring容器
            struts.objectFactory.spring.autoWire = name spring负责装配Action依赖属性--><constant name="struts.objectFactory" value="spring"></constant><package name="crm" namespace="/" extends="struts-default" ><global-exception-mappings><exception-mapping result="error" exception="java.lang.RuntimeException"></exception-mapping></global-exception-mappings> <!--
             整合方案:class属性上填写spring中action对象的BeanName
                 完全由spring管理action生命周期,包括Action的创建
                 注意:需要手动组装依赖属性          --><action name="UserAction_*" class="userAction" method="{1}" ><result name="toHome" type="redirect" >/index.htm</result><result name="error" >/login.jsp</result></action></package></struts>
2.Action代码
public class UserAction extends ActionSupport implements ModelDriven<User> {private User user = new User();    private UserService userService ;    public void setUserService(UserService userService) {this.userService = userService;
    }
    public String login() throws Exception {
    //
    1 调用Service执行登陆逻辑User u = userService.getUserByCodePassword(user);
    //
    2 将返回的User对象放入session域ActionContext.getContext().getSession().put("user", u);//
    3 重定向到项目首页return "toHome";
    }

    @Overridepublic User getModel() {return user;
    }

}
2.Service核心代码
    public User getUserByCodePassword(User u) {
    // 1 根据登陆名称查询登陆用户User existU = ud.getByUserCode(u.getUser_code());// 2 判断用户是否存在.不存在=>抛出异常,提示用户名不存在if (existU == null) {throw new RuntimeException("用户名不存在!");
        }
        // 3 判断用户密码是否正确=>不正确=>抛出异常,提示密码错误if (!existU.getUser_password().equals(u.getUser_password())) {throw new RuntimeException("密码错误!");
        }
        // 4 返回查询到的用户对象return existU;
    }
3.Dao核心代码
    public User getByUserCode(final String usercode) {
    //CriteriaDetachedCriteria dc = DetachedCriteria.forClass(User.class);
        dc.add(Restrictions.eq("user_code", usercode));
        List<User> list = (List<User>) getHibernateTemplate().findByCriteria(dc);        if(list != null && list.size()>0){return list.get(0);
        }else{return null;
        }
    }
Das obige ist der detaillierte Inhalt vonDetaillierte Erläuterung der Integration der drei großen Frameworks in SSH. Für weitere Informationen folgen Sie bitte anderen verwandten Artikeln auf der PHP chinesischen Website!

