Heim >Java >javaLernprogramm >hibernate01: Einführung, Aufbau, Konfigurationsdateidetails, API-Details und CRM-Übungen: Kunden retten
hibernate01: Einführung, Aufbau, Konfigurationsdateidetails, API-Details und CRM-Übungen: Kunden retten
- 巴扎黑Original
- 2017-06-23 16:34:501649Durchsuche
Heutiges Lernen: Was ist Winterschlaf?
Was ist Winterschlaf? Framework:
1. Das Framework wird zur Verbesserung der Entwicklungseffizienz verwendet.2. Es kapselt einige Funktionen, die wir nicht benötigen zur manuellen Implementierung.
Das Framework kann also als halbfertiges Projekt verstanden werden. Solange Sie wissen, wie Sie diese Funktionen steuern können.Was ist das Hibernate-Framework? :
Vorteile des Ruhezustands: 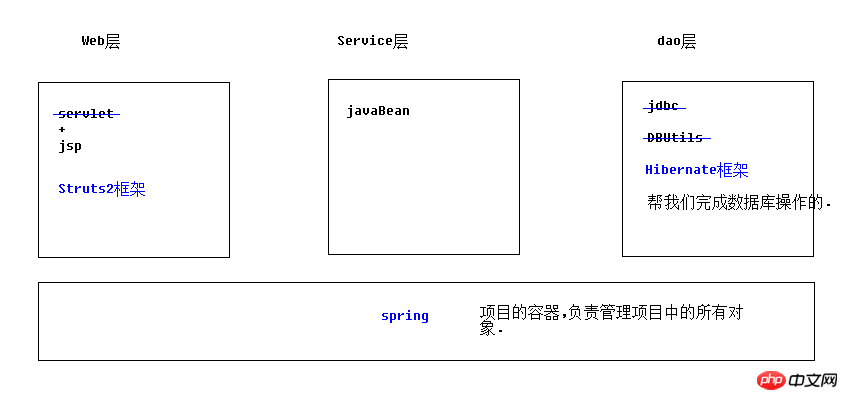
hibernate ist ein ORM-Framework:
orm: Objektrelationale Zuordnung
ORM ist in 4 Ebenen unterteilt:
Hibernate gehört zur Ebene 4: vollständig objektorientierte Betriebsdatenbank 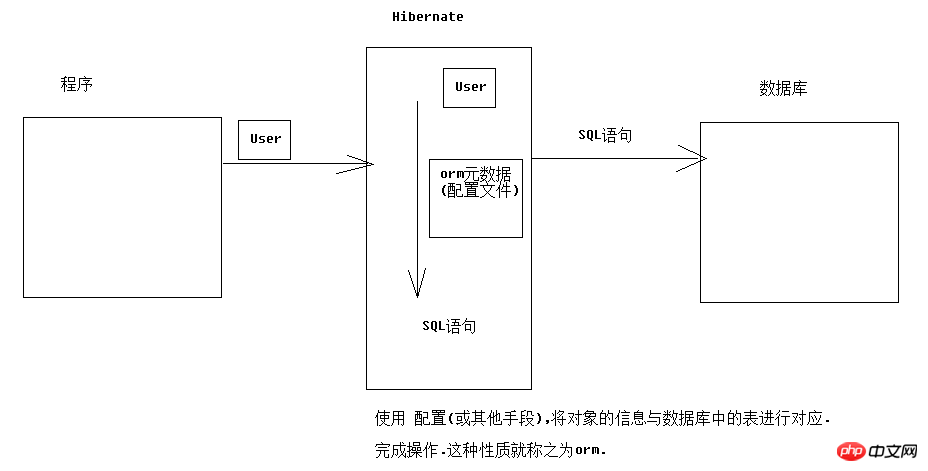
2. Aufbau des Ruhezustands-Frameworks
1
Treiberpaket
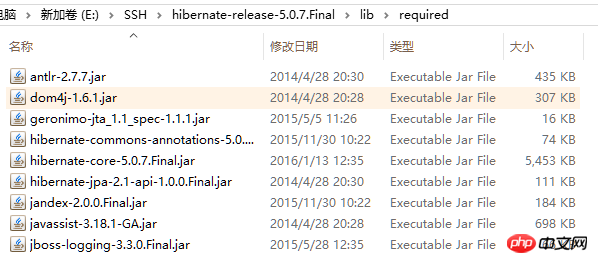

3. Schreiben Sie ORM-Metadaten (Objekt- und Tabellenzuordnungskonfigurationsdatei)
 4 (hibernate.cfg.xml)
5. Codetests schreiben
<?xml version="1.0" encoding="UTF-8"?><!DOCTYPE hibernate-configuration PUBLIC
    "-//Hibernate/Hibernate Configuration DTD 3.0//EN"
    "http://www.hibernate.org/dtd/hibernate-configuration-3.0.dtd"><hibernate-configuration><session-factory><!--
        #hibernate.dialect org.hibernate.dialect.MySQLDialect
        #hibernate.dialect org.hibernate.dialect.MySQLInnoDBDialect
        #hibernate.dialect org.hibernate.dialect.MySQLMyISAMDialect
        #hibernate.connection.driver_class com.mysql.jdbc.Driver
        #hibernate.connection.url jdbc:mysql:///test
        #hibernate.connection.username gavin
        #hibernate.connection.password         --> <!-- 数据库驱动 --><property name="hibernate.connection.driver_class">com.mysql.jdbc.Driver</property> <!-- 数据库url --><property name="hibernate.connection.url">jdbc:mysql:///hibernate_32</property> <!-- 数据库连接用户名 --><property name="hibernate.connection.username">root</property> <!-- 数据库连接密码 --><property name="hibernate.connection.password">1234</property><!-- 数据库方言
            不同的数据库中,sql语法略有区别. 指定方言可以让hibernate框架在生成sql语句时.针对数据库的方言生成.
            sql99标准: DDL 定义语言  库表的增删改查
                      DCL 控制语言  事务 权限
                      DML 操纵语言  增删改查
            注意: MYSQL在选择方言时,请选择最短的方言.         --><property name="hibernate.dialect">org.hibernate.dialect.MySQLDialect</property>
        <!-- #hibernate.show_sql true
             #hibernate.format_sql true--><!-- 将hibernate生成的sql语句打印到控制台 --><property name="hibernate.show_sql">true</property><!-- 将hibernate生成的sql语句格式化(语法缩进) --><property name="hibernate.format_sql">true</property><!--
        ## auto schema export  自动导出表结构. 自动建表
        #hibernate.hbm2ddl.auto create        自动建表.每次框架运行都会创建新的表.以前表将会被覆盖,表数据会丢失.(开发环境中测试使用)
        #hibernate.hbm2ddl.auto create-drop 自动建表.每次框架运行结束都会将所有表删除.(开发环境中测试使用)
        #hibernate.hbm2ddl.auto update(推荐使用) 自动生成表.如果已经存在不会再生成.如果表有变动.自动更新表(不会删除任何数据).
        #hibernate.hbm2ddl.auto validate    校验.不自动生成表.每次启动会校验数据库中表是否正确.校验失败.         --><property name="hibernate.hbm2ddl.auto">update</property><!-- 引入orm元数据
            路径书写: 填写src下的路径         --><mapping resource="cn/itheima/domain/Customer.hbm.xml" /></session-factory></hibernate-configuration>
//测试Hibernate框架public class Demo {


    @Test//保存客户public void fun1(){
        Configuration conf = new Configuration().configure();

        SessionFactory sessionFactory = conf.buildSessionFactory();

        Session session = sessionFactory.openSession();

        Transaction tx = session.beginTransaction();//----------------------------------------------Customer c = new Customer();
        c.setCust_name("google公司");

        session.save(c);//执行保存        //----------------------------------------------        tx.commit();
        session.close();
        sessionFactory.close();
    }
}
Orm-Metadaten
Hauptkonfiguration für den Ruhezustand:
<?xml version="1.0" encoding="UTF-8"?><!DOCTYPE hibernate-mapping PUBLIC
    "-//Hibernate/Hibernate Mapping DTD 3.0//EN"
    "http://www.hibernate.org/dtd/hibernate-mapping-3.0.dtd">
   <!-- 配置表与实体对象的关系 -->
   <!-- package属性:填写一个包名.在元素内部凡是需要书写完整类名的属性,可以直接写简答类名了. --><hibernate-mapping package="cn.itheima.domain" ><!--
        class元素: 配置实体与表的对应关系的
            name: 完整类名
            table:数据库表名     --><class name="Customer" table="cst_customer" ><!-- id元素:配置主键映射的属性
                name: 填写主键对应属性名
                column(可选): 填写表中的主键列名.默认值:列名会默认使用属性名
                type(可选):填写列(属性)的类型.hibernate会自动检测实体的属性类型.
                        每个类型有三种填法: java类型|hibernate类型|数据库类型
                not-null(可选):配置该属性(列)是否不能为空. 默认值:false
                length(可选):配置数据库中列的长度. 默认值:使用数据库类型的最大长度         --><id name="cust_id"  ><!-- generator:主键生成策略(明天讲) --><generator class="native"></generator></id><!-- property元素:除id之外的普通属性映射
                name: 填写属性名
                column(可选): 填写列名
                type(可选):填写列(属性)的类型.hibernate会自动检测实体的属性类型.
                        每个类型有三种填法: java类型|hibernate类型|数据库类型
                not-null(可选):配置该属性(列)是否不能为空. 默认值:false
                length(可选):配置数据库中列的长度. 默认值:使用数据库类型的最大长度         --><property name="cust_name" column="cust_name" ><!--  <column name="cust_name" sql-type="varchar" ></column> --></property><property name="cust_source" column="cust_source" ></property><property name="cust_industry" column="cust_industry" ></property><property name="cust_level" column="cust_level" ></property><property name="cust_linkman" column="cust_linkman" ></property><property name="cust_phone" column="cust_phone" ></property><property name="cust_mobile" column="cust_mobile" ></property></class></hibernate-mapping>
Optionale Attributkonfiguration (3)
 <!-- 数据库驱动 --><property name="hibernate.connection.driver_class">com.mysql.jdbc.Driver</property> <!-- 数据库url --><property name="hibernate.connection.url">jdbc:mysql:///hibernate_32</property> <!-- 数据库连接用户名 --><property name="hibernate.connection.username">root</property> <!-- 数据库连接密码 --><property name="hibernate.connection.password">1234</property><!-- 数据库方言
            不同的数据库中,sql语法略有区别. 指定方言可以让hibernate框架在生成sql语句时.针对数据库的方言生成.
            sql99标准: DDL 定义语言  库表的增删改查
                      DCL 控制语言  事务 权限
                      DML 操纵语言  增删改查
            注意: MYSQL在选择方言时,请选择最短的方言.         --><property name="hibernate.dialect">org.hibernate.dialect.MySQLDialect</property>
Metadatenimportkonfiguration
<!-- #hibernate.show_sql true
             #hibernate.format_sql true--><!-- 将hibernate生成的sql语句打印到控制台 --><property name="hibernate.show_sql">true</property><!-- 将hibernate生成的sql语句格式化(语法缩进) --><property name="hibernate.format_sql">true</property><!--
        ## auto schema export  自动导出表结构. 自动建表
        #hibernate.hbm2ddl.auto create        自动建表.每次框架运行都会创建新的表.以前表将会被覆盖,表数据会丢失.(开发环境中测试使用)
        #hibernate.hbm2ddl.auto create-drop 自动建表.每次框架运行结束都会将所有表删除.(开发环境中测试使用)
        #hibernate.hbm2ddl.auto update(推荐使用) 自动生成表.如果已经存在不会再生成.如果表有变动.自动更新表(不会删除任何数据).
#hibernate.hbm2ddl.auto validate 校验.不自动生成表.每次启动会校验数据库中表是否正确.校验失败. --><property name="hibernate.hbm2ddl.auto">update</property> <!-- 引入orm元数据
路径书写: 填写src下的路径 --><mapping resource="cn/itheima/domain/Customer.hbm.xml" />
SessionFactory-Objekt lernen
//学习Configuration对象// Configuration功能: 配置加载类.用于加载主配置,orm元数据加载public class Demo {

    @Testpublic void fun1(){//1 创建,调用空参构造Configuration conf = new Configuration();//2 读取指定主配置文件 => 空参加载方法,加载src下的hibernate.cfg.xml文件        conf.configure();//3 读取指定orm元数据(扩展),如果主配置中已经引入映射配置.不需要手动加载//conf.addResource(resourceName);//conf.addClass(persistentClass);        //4 根据配置信息,创建 SessionFactory对象SessionFactory sf = conf.buildSessionFactory();

    }
}
Sitzungsobjekt lernen: hinzufügen, löschen, prüfen und ändern//学习SessionFactory对象// SessionFactory功能: 用于创建操作数据库核心对象session对象的工厂.// 简单说功能就一个---创建session对象//注意:1.sessionfactory 负责保存和使用所有配置信息.消耗内存资源非常大.// 2.sessionFactory属于线程安全的对象设计.//结论: 保证在web项目中,只创建一个sessionFactory.public class Demo2 {
@Testpublic void fun1(){//1 创建,调用空参构造Configuration conf = new Configuration();//2 读取指定主配置文件 => 空参加载方法,加载src下的hibernate.cfg.xml文件 conf.configure();//3 读取指定orm元数据(扩展),如果主配置中已经引入映射配置.不需要手动加载//conf.addResource(resourceName);//conf.addClass(persistentClass); //4 根据配置信息,创建 SessionFactory对象SessionFactory sf = conf.buildSessionFactory();//--------------------------------------------------//5 获得session//打开一个新的session对象 sf.openSession();//获得一个与线程绑定的session对象(明天讲解) sf.getCurrentSession();
}
}
//学习Session对象//session对象功能: 表达hibernate框架与数据库之间的连接(会话).session类似于//                JDBC年代的connection对象. 还可以完成对数据库中数据的增删改查操作.//                session是hibernate操作数据库的核心对象public class Demo3 {

    @Test//事务操作public void fun1(){//1 创建,调用空参构造Configuration conf = new Configuration().configure();//2 根据配置信息,创建 SessionFactory对象SessionFactory sf = conf.buildSessionFactory();//3 获得sessionSession session = sf.openSession();//4 session获得操作事务的Transaction对象//获得操作事务的tx对象//Transaction tx = session.getTransaction();//开启事务并获得操作事务的tx对象(建议使用)Transaction tx2 = session.beginTransaction();//----------------------------------------------
        //----------------------------------------------tx2.commit();//提交事务tx2.rollback();//回滚事务session.close();//释放资源sf.close();//释放资源    }

    @Test//session的新增public void fun2(){//1 创建,调用空参构造Configuration conf = new Configuration().configure();//2 根据配置信息,创建 SessionFactory对象SessionFactory sf = conf.buildSessionFactory();//3 获得sessionSession session = sf.openSession();//4 session获得操作事务的Transaction对象//获得操作事务的tx对象//Transaction tx = session.getTransaction();//开启事务并获得操作事务的tx对象(建议使用)Transaction tx2 = session.beginTransaction();//----------------------------------------------Customer c = new Customer();
        c.setCust_name("传智播客");

        session.save(c);//----------------------------------------------tx2.commit();//提交事务session.close();//释放资源sf.close();//释放资源    }
    @Test//session的查询//查询id为1的customer对象public void fun3(){//1 创建,调用空参构造Configuration conf = new Configuration().configure();//2 根据配置信息,创建 SessionFactory对象SessionFactory sf = conf.buildSessionFactory();//3 获得sessionSession session = sf.openSession();//4 session获得操作事务的Transaction对象//获得操作事务的tx对象//Transaction tx = session.getTransaction();//开启事务并获得操作事务的tx对象(建议使用)Transaction tx2 = session.beginTransaction();//----------------------------------------------
        Customer customer = session.get(Customer.class, 1l);

        System.out.println(customer);//----------------------------------------------tx2.commit();//提交事务session.close();//释放资源sf.close();//释放资源    }
    @Test//session的修改//修改id为1的customer对象的name属性为黑马程序员public void fun4(){//1 创建,调用空参构造Configuration conf = new Configuration().configure();//2 根据配置信息,创建 SessionFactory对象SessionFactory sf = conf.buildSessionFactory();//3 获得sessionSession session = sf.openSession();//4 session获得操作事务的Transaction对象//获得操作事务的tx对象//Transaction tx = session.getTransaction();//开启事务并获得操作事务的tx对象(建议使用)Transaction tx2 = session.beginTransaction();//----------------------------------------------//1 获得要修改的对象Customer c = session.get(Customer.class, 1l);//2 修改c.setCust_name("黑马程序员");//3 执行update        session.update(c);//----------------------------------------------tx2.commit();//提交事务session.close();//释放资源sf.close();//释放资源    }
    @Test//session的删除//删除id为1的customer对象public void fun5(){//1 创建,调用空参构造Configuration conf = new Configuration().configure();//2 根据配置信息,创建 SessionFactory对象SessionFactory sf = conf.buildSessionFactory();//3 获得sessionSession session = sf.openSession();//4 session获得操作事务的Transaction对象//获得操作事务的tx对象Transaction tx = session.getTransaction();
        tx.begin();//开启事务并获得操作事务的tx对象(建议使用)Transaction tx2 = session.beginTransaction();//----------------------------------------------//1 获得要修改的对象Customer c = session.get(Customer.class, 1l);//2 调用delete删除对象        session.delete(c);//----------------------------------------------tx2.commit();//提交事务session.close();//释放资源sf.close();//释放资源    }
}
5. CRM Übung: Kunden retten
Beziehen Sie sich für die vorherigen Schritte auf die vorherigen Hinweise.
5. Ideenanalyse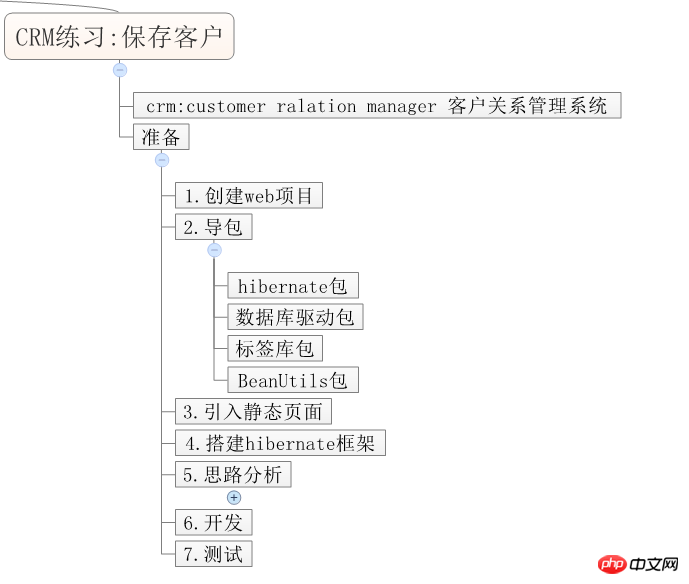
Bevor Sie die Hausaufgaben erledigen, können Sie eine praktische Toolklasse schreiben, um wiederholten Code zu vermeiden:
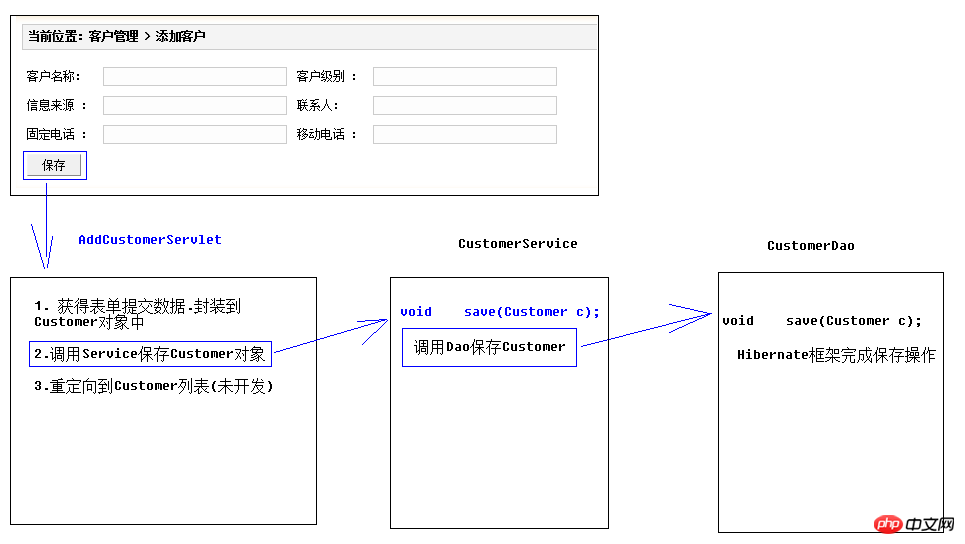 Kernbetriebscode:
Webschicht:
public class HibernateUtils {private static SessionFactory sf;    static{//1 创建,调用空参构造Configuration conf = new Configuration().configure();//2 根据配置信息,创建 SessionFactory对象 sf = conf.buildSessionFactory();
    }    //获得session => 获得全新sessionpublic static Session openSession(){//3 获得sessionSession session = sf.openSession();                return session;

    }//获得session => 获得与线程绑定的sessionpublic static Session getCurrentSession(){//3 获得sessionSession session = sf.getCurrentSession();        return session;
    }public static void main(String[] args) {
        System.out.println(HibernateUtils.openSession());
    }

}
Serviceschicht:
/**
 * Servlet implementation class AddCustomerServlet */public class AddCustomerServlet extends HttpServlet {private static final long serialVersionUID = 1L;    private CustomerService customerService  = new CustomerServiceImpl();protected void doGet(HttpServletRequest request, HttpServletResponse response) throws ServletException, IOException {//1 获得参数并封装到Customer对象Customer c = new Customer();try {
            BeanUtils.populate(c, request.getParameterMap());
        } catch (IllegalAccessException e) {
            e.printStackTrace();
        } catch (InvocationTargetException e) {
            e.printStackTrace();
        }//2 调用Service保存客户        customerService.save(c);//3 重定向到客户列表response.sendRedirect(request.getContextPath()+"/ListCustomerServlet");
    }protected void doPost(HttpServletRequest request, HttpServletResponse response) throws ServletException, IOException {
        doGet(request, response);
    }

}
Dao-Schicht: public class CustomerServiceImpl implements CustomerService {private CustomerDao customerDao = new CustomerDaoImpl();public void save(Customer c) {//调用Dao保存客户 customerDao .save(c);
}
} public class CustomerDaoImpl implements CustomerDao {public void save(Customer c) {//1 获得sessionSession session = HibernateUtils.openSession();//2 打开事务Transaction tx = session.beginTransaction();//3 执行保存 session.save(c);//4 提交事务 tx.commit();//5 关闭资源 session.close();
}
}
Das obige ist der detaillierte Inhalt vonhibernate01: Einführung, Aufbau, Konfigurationsdateidetails, API-Details und CRM-Übungen: Kunden retten. Für weitere Informationen folgen Sie bitte anderen verwandten Artikeln auf der PHP chinesischen Website!
In Verbindung stehende Artikel
Mehr sehen- Beeinflusst die Deklaration von Strings als „final' in Java „=='-Vergleiche?
- String-Manipulation in Java
- Wie aktualisiere ich JLabel kontinuierlich mit den Ergebnissen einer lang andauernden Aufgabe?
- Wie konvertiere ich int[] in Integer[] zur Verwendung als Map-Schlüssel in Java?
- Wie greife ich über die Aktivität auf ViewPager-Fragmentmethoden zu?

