Heim >Java >javaLernprogramm >Ausführliche Erläuterung der Einstiegsbeispiele für Spring Boot 1.5.4
Ausführliche Erläuterung der Einstiegsbeispiele für Spring Boot 1.5.4
- 巴扎黑Original
- 2017-06-26 11:41:371398Durchsuche
1. Konfigurieren Sie die Maven-Datei pom.xml
<?xml version="1.0" encoding="UTF-8"?>
<project xmlns="http://maven.apache.org/POM/4.0.0"
         xmlns:xsi="http://www.w3.org/2001/XMLSchema-instance"
         xsi:schemaLocation="http://maven.apache.org/POM/4.0.0 http://maven.apache.org/xsd/maven-4.0.0.xsd">
    <modelVersion>4.0.0</modelVersion>

    <groupId>com.hdwang</groupId>
    <artifactId>spring-boot-test</artifactId>
    <version>1.0-SNAPSHOT</version>

    <name>spring-boot-test</name>
    <description>project for test Spring Boot</description>

    <properties>
        <project.build.sourceEncoding>UTF-8</project.build.sourceEncoding>
        <java.version>1.8</java.version>
    </properties>

    <!-- Inherit defaults from Spring Boot -->
    <parent>
        <groupId>org.springframework.boot</groupId>
        <artifactId>spring-boot-starter-parent</artifactId>
        <version>1.5.4.RELEASE</version>
        <relativePath/>
    </parent>

    <dependencies>
        <!-- Add typical dependencies for a web application -->
        <dependency>
            <groupId>org.springframework.boot</groupId>
            <artifactId>spring-boot-starter-web</artifactId>
        </dependency>

        <dependency>
            <groupId>org.springframework.boot</groupId>
            <artifactId>spring-boot-starter-freemarker</artifactId>
        </dependency>


        <!-- auto redeploy -->
        <dependency>
            <groupId>org.springframework.boot</groupId>
            <artifactId>spring-boot-devtools</artifactId>
            <optional>true</optional>
        </dependency>

    <!-- Package as an executable jar -->
    <build>
        <plugins>
            <plugin>
                <groupId>org.springframework.boot</groupId>
                <artifactId>spring-boot-maven-plugin</artifactId>
            </plugin>
        </plugins>
    </build>

</project>
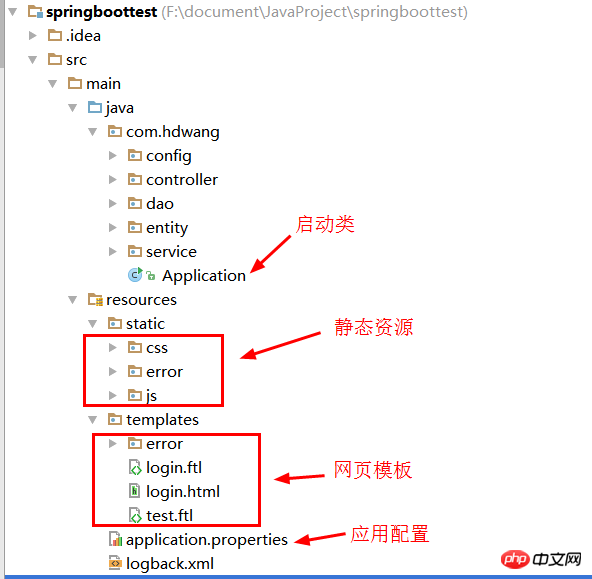
2. Die Namen von static/templates/application.properties/logback.xml sind alle vereinbart Weitere Informationen finden Sie in der offiziellen Spring Boot-Dokumentation. Der folgende Name ist eine der Konfigurationsmethoden.

3. Erstellen Sie eine Startup-Klasse (Platzieren Sie es auf der obersten Ebene. Nur Klassen in der Unterebene (Ordner auf niedrigerer Ebene) können gescannt und eingefügt werden.)
@SpringBootApplication
public class Application {

    /**
     * main function
     * @param args params
     */
    public static void main(String[] args){
       SpringApplication.run(Application.class,args);
    }
}
4. Erstellen Sie einen Controller (im Unterverzeichnis der Anwendungsklasse)
@Controller
@RequestMapping("/common")public class Common {

    @Value("${msg:Welcome!}")private String msg;/** * get a page
     * @return a page with name called return value     */@RequestMapping("login")public String getLoginPage(ModelMap map){
        map.put("welcomeMsg",this.msg);return "login";
    }


}
5. Erstellen Sie eine Webseitenvorlage login.ftl (Freemarker muss das Suffix ftl verwenden, und das hat mich getäuscht eine lange Zeit! Legen Sie js/css in den entsprechenden Ordner, achten Sie darauf, / nicht in den Zugriffspfad aufzunehmen, ich bin schon lange dabei geblieben)
<!DOCTYPE html>
<html>
<head>
    <meta charset="UTF-8" />
    <title>login</title>

    <link href="/css/home.css?1.1.11" rel="stylesheet" type="text/css" />
    <script type="text/javascript" src="/js/jquery-2.0.3.min.js?1.1.11"></script>
    <script type="text/javascript" src="/js/home.js?1.1.11"></script>
</head>
<body>
<h1>login page</h1>
<h2>${welcomeMsg}</h2>
<form>
    <div>
     <label>用户名:<input type="text" id="username"/></label>
    </div>
    <div>
     <label>密码:<input type="password"/></label>
    </div>
    <div>
        <input type="submit" value="提交"/>
        <input type="reset" value="重置" />
    </div>
</form>
</body>
</html>
6. Anwendungskonfigurationsdatei schreiben
Erstellen Sie eine neue application.properties-Datei und fügen Sie den folgenden Inhalt hinzu
msg=Meine Damen und Herren, willkommen!
7. Starten und ausführen
Besuchen Sie im Browser: http://localhost:8080 /common/login

8. Bereitstellung
mvn-Paket Erstellen Sie ein Paket
java -jar xxx.jar und führen Sie dieses Paket aus
Das obige ist der detaillierte Inhalt vonAusführliche Erläuterung der Einstiegsbeispiele für Spring Boot 1.5.4. Für weitere Informationen folgen Sie bitte anderen verwandten Artikeln auf der PHP chinesischen Website!

