Heim >Backend-Entwicklung >C#.Net-Tutorial >ASP.NET Core 1.0-Routing, statische Dateien, Einführung in die Authentifizierung, benutzerdefinierte Middleware
ASP.NET Core 1.0-Routing, statische Dateien, Einführung in die Authentifizierung, benutzerdefinierte Middleware
- 巴扎黑Original
- 2017-03-19 17:17:312280Durchsuche
Übersicht
ASP.NET Core 1.0 ist eine umfassende Neugestaltung von ASP.NET. Verwenden Sie beispielsweise in ASP.NET Core Middleware, um die Anforderungspipeline zu schreiben. Die ASP.NET Core-Middleware führt asynchrone Logik für den HttpContext aus und ruft dann optional die nächste Middleware in der Sequenz auf oder beendet die Anforderung direkt. Normalerweise verwenden Sie Middleware, indem Sie die entsprechende Erweiterungsmethode für IApplicationBuilder in der Methode „Configure“ aufrufen. Beispiele für Middleware-Komponenten könnten Routing und Sicherheitsauthentifizierung (Identität) sein.
In diesem Artikel untersuchen wir einige Funktionen von ASP.NET Core 1.0, einschließlich der Verwendung von Middleware-Komponenten und sogar der Erstellung benutzerdefinierter Komponenten.
Inhaltsverzeichnis
Verwenden Sie statische Dateien
Verwenden Sie das Routing
Benutzerdefinierte Middleware schreiben
Authentifizierung zu Webanwendungen hinzufügen
Voraussetzungen
Für den Abschluss dieses Moduls ist Folgendes erforderlich:
Visual Studio Community 2015 oder höher
ASP.NET Core 1.0
Übe
Dieses Modul beinhaltet folgende Übungen:
Verwenden Sie statische Dateien
Einführung in Routing und MVC
Erstellen Sie eine Middleware-Klasse
Authentifizierung zu Webanwendungen hinzufügen
Geschätzte Zeit für die Fertigstellung dieses Moduls: 60 Minuten
Hinweis: Wenn Sie Visual Studio zum ersten Mal starten, müssen Sie einen vordefinierten Satz an Einstellungen auswählen. Jede vordefinierte Sammlung ist so konzipiert, dass sie einem bestimmten Entwicklungsstil entspricht und das Fensterlayout, das Editorverhalten, IntelliSense-Snippets und Dialogoptionen bestimmt. Die Verfahren in diesem Modul beschreiben, was zum Abschließen einer bestimmten Aufgabe in Visual Studio erforderlich ist, wenn die Sammlung „Allgemeine Entwicklungseinstellungen“ verwendet wird. Wenn Sie andere Einstellungen für Ihre Entwicklungsumgebung wählen, können die Schritte, die Sie berücksichtigen sollten, unterschiedlich sein.
Übung 1: Statische Dateien verwenden
Statische Dateien (einschließlich HTML-Dateien, CSS-Dateien, Bilddateien und JavaScript-Dateien) sind Assets, die die Anwendung direkt dem Client bereitstellt.
In dieser Übung konfigurieren Sie Ihr Projekt für die Bereitstellung statischer Dateien.
Aufgabe 1 – Statische Dateien bereitstellen
Um statische Dateien bereitzustellen, müssen Sie die Middleware so konfigurieren, dass sie der Pipeline statische Dateien hinzufügt. Dies wird durch Aufrufen der UseStaticFiles-Erweiterungsmethode über die Startup.Configure-Methode erreicht.
In dieser Aufgabe erstellen Sie ein leeres ASP.NET Core 1.0-Projekt und konfigurieren es für die Bereitstellung statischer Dateien.
1. Öffnen Sie Visual Studio 2015 und wählen Sie Datei | Neues Projekt…, um eine neue Lösung zu starten.
2. Wählen Sie im Dialogfeld „Neues Projekt“ die Registerkarte ASP.NET-Webanwendung unter Visual C# | aus und stellen Sie sicher, dass .NET Framework 4.6 ausgewählt ist 🎜>. Benennen Sie das Projekt MyWebApp, wählen Sie einen Speicherort aus und klicken Sie auf OK.

Neues ASP.NET-Projekt“ die Option „Leere Vorlage unter ASP.NET 5-Vorlage“. Klicken Sie auf OK.
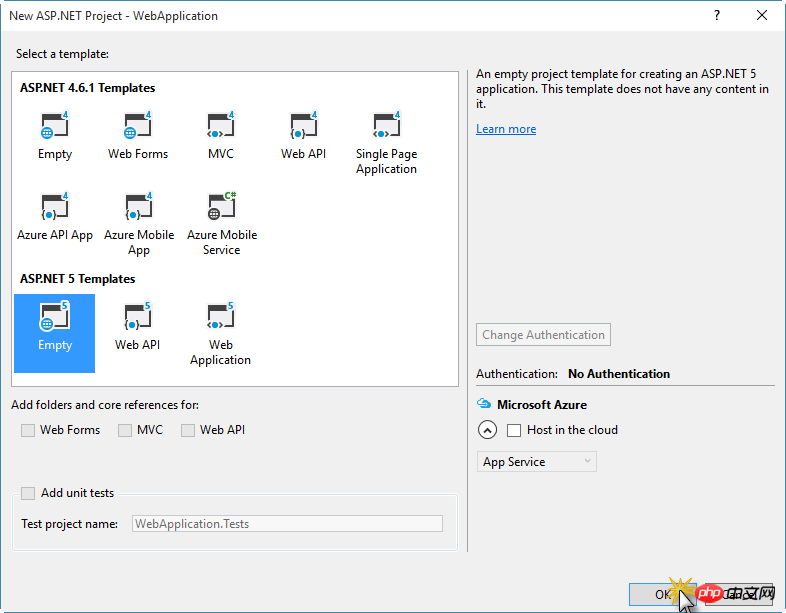
Microsoft.AspNet.StaticFiles als Abhängigkeit von project.json hinzu.
"dependencies": {
  "Microsoft.AspNet.IISPlatformHandler": "1.0.0-rc1-final",
  "Microsoft.AspNet.Server.Kestrel": "1.0.0-rc1-final",
  "Microsoft.AspNet.StaticFiles": "1.0.0-rc1-final"
},
5. Öffnen Sie die Datei Startup.cs und fügen Sie den Methodenaufruf UseStaticFiles in der Methode Configure vor der Hello-Middleware hinzu.
public void Configure(IApplicationBuilder app)
{
    app.UseIISPlatformHandler();

    app.UseStaticFiles();

    app.Run(async (context) =>
    {
        await context.Response.WriteAsync("Hello World!");
    });
}
6. Erstellen Sie eine Datei mit dem Namen index.html im Ordner wwwroot mit folgendem Inhalt.
<!DOCTYPE html>
<html>
<head>
     <meta charset="utf-8" />
     <title>Hello static world!</title>
</head>
<body>
     <h1>Hello from ASP.NET Core!</h1>
</body>
</html>
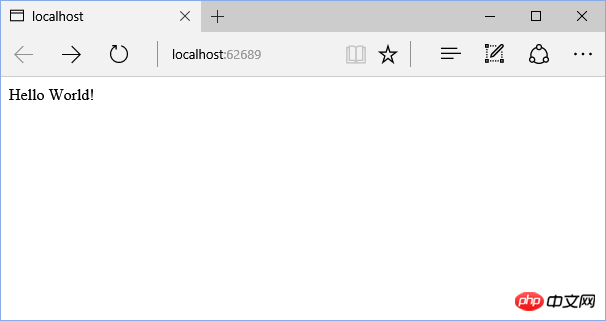
7. Führen Sie die Anwendung aus und navigieren Sie zum Root. Es sollte die Hello World-Middleware anzeigen.
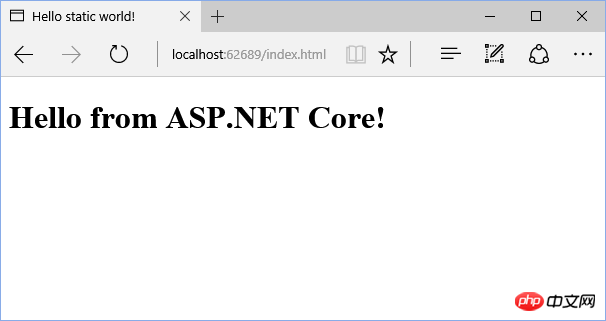
index.html, wo die statische Seite in wwwroot angezeigt werden sollte.
UseDefaultFiles. Bei dieser Methode handelt es sich um einen URL-Rewriter, der eigentlich keine Dateien bereitstellt.
除了UseStaticFiles和UseDefaultFiles扩展方法之外,还有一个方法 - UseFileServer - 组合这两种方法的功能以及UseDirectoryBrowser扩展方法。
在此任务中,您将使用UseFileServer启用服务静态和默认文件。
1. 打开Startup.cs文件,将Configure方法中的静态文件中间件从app.UseStaticFiles()更改为app.UseFileServer()。
public void Configure(IApplicationBuilder app)
{
    app.UseIISPlatformHandler();

    app.UseFileServer();

    app.Run(async (context) =>
    {
        await context.Response.WriteAsync("Hello World!");
    });
}
2. 再次运行应用程序。 导航到网站根目录时,应显示默认页面index.html。
练习2:路由和MVC简介
路由是映射到处理程序的URL模式。 处理程序可以是物理文件,例如Web Forms应用程序中的.aspx文件。 处理程序也可以是处理请求的类,例如MVC应用程序中的控制器。
ASP.NET路由使您能够使用不必映射到网站中特定文件的URL。 由于网址不必映射到文件,因此您可以使用描述用户操作的网址,因此用户更容易理解。
在本练习中,您将了解如何在应用程序中配置路由。
任务1 – 添加MVC
ASP.NET MVC为您提供了一个强大的,基于模式的方式来构建动态网站,使清晰分离的问题,并让您完全控制标记的愉快,敏捷开发。 ASP.NET MVC包括许多功能,创建使用最新的Web标准的复杂应用程序。
在此任务中,您将配置项目以使用ASP.NET MVC并配置示例路由。
1. 打开project.json文件并将Microsoft.AspNet.Mvc添加到依赖关系部分。
"dependencies": {
    "Microsoft.AspNet.IISPlatformHandler": "1.0.0-rc1-final",
    "Microsoft.AspNet.Server.Kestrel": "1.0.0-rc1-final",
    "Microsoft.AspNet.StaticFiles": "1.0.0-rc1-final",
    "Microsoft.AspNet.Mvc": "6.0.0-rc1-final"
},
2. 在解决方案资源管理器中,右键单击MyWebApp项目,然后选择添加| 新文件夹,并将文件夹命名为控制器。
3. 右键单击新文件夹,然后选择添加| 新项目…,选择MVC控制器类,命名文件HomeController.cs并单击添加。
4. 使用以下代码段替换文件的内容。
namespace MyWebApp.Controllers
{
     using Microsoft.AspNet.Mvc;

     public class HomeController : Controller
     {
          [HttpGet()]
          public string Index() => "Hello from MVC!";
     }
}
5. 现在,打开Startup.cs文件,将MVC服务和中间件添加到配置中,添加services.AddMvc()并使用UseMvc方法替换Configure方法中的app.Run方法调用,如下面的代码片段所示。
public void ConfigureServices(IServiceCollection services)
{
    services.AddMvc();
}

// This method gets called by the runtime. Use this method to configure the HTTP request pipeline.
public void Configure(IApplicationBuilder app)
{
    app.UseIISPlatformHandler();

    app.UseFileServer();

    app.UseMvc(routes =>
        {
            routes.MapRoute(
                name: "default",
                template: "{controller=Home}/{action=Index}/{id?}");
        });
}
6. 运行网站并通过导航到/ home端点验证从MVC控制器返回的消息。
注意:ASP.NET Core MVC还包括一个方便的新实用程序方法,app.UseMvcWithDefaultRoute,因此您不必记住模板字符串。
练习3:编写自定义中间件
可以合并到HTTP请求管道中的小应用程序组件统称为中间件。 ASP.NET Core 1.0具有对中间件的集成支持,它们在应用程序启动期间在应用程序的Configure方法中连接。
在本练习中,您将创建一个基于查询字符串值设置当前文化的中间件类。
注意:我们在本练习中使用本地化相关中间件作为示例场景,但在大多数应用程序中,您将使用ASP.NET Core的内置支持本地化支持。
任务1 – 编写一个基于查询字符串值设置当前文化的中间件类
中间件是组装到应用程序管道中以处理请求和响应的组件。 每个组件可以选择是否将请求传递到管道中的下一个组件,并且可以在管道中的下一个组件之前和之后执行某些操作。 请求代理用于构建此请求管道,然后用于处理对应用程序的每个HTTP请求。
请求代理使用传递到启动类中的配置方法的IApplicationBuilder类型上的Run(运行),Map(映射)和Use(使用)扩展方法进行配置。 单个请求委托可以作为匿名方法在线指定,也可以在可重用类中定义。 这些可重用的类是中间件或中间件组件。 请求管道中的每个中间件组件负责调用链中的下一个组件,或者如果适当,选择将链短路。
在此任务中,您将创建内联中间件。
1. 打开Visual Studio 2015并选择文件| 新项目…使用ASP.NET Web应用程序模板启动一个新的解决方案,将其命名为MiddlewareApp,单击确定,然后在ASP.NET 5模板下选择空模板。
2. 打开Startup.cs文件,并使用以下代码片段替换Configure方法的内容,该代码片段创建在hello world代理之前运行的内联中间件,hello world代理为查询字符串中的当前请求设置文化。
public void Configure(IApplicationBuilder app)
{
    app.UseIISPlatformHandler();

    app.Use((context, next) =>
    {
        var cultureQuery = context.Request.Query["culture"];
        if (!string.IsNullOrWhiteSpace(cultureQuery))
        {
            var culture = new CultureInfo(cultureQuery);
#if !DNXCORE50
            Thread.CurrentThread.CurrentCulture = culture;
            Thread.CurrentThread.CurrentUICulture = culture;
#else
            CultureInfo.CurrentCulture = culture;
            CultureInfo.CurrentUICulture = culture;
#endif
        }

        // Call the next delegate/middleware in the pipeline
        return next();
    });

    app.Run(async (context) =>
    {
        await context.Response.WriteAsync($"Hello {CultureInfo.CurrentCulture.DisplayName}");
    });
}
3. 解决丢失的using语句。
4. 运行应用程序。 要在操作中查看中间件,请通过添加文化查询字符串来设置文化,例如 http://localhost:64165/?culture=no
任务2 – 将中间件移动到自己的类型
在此任务中,您将中间件移动到一个单独的文件。
1. 右键单击MiddlewareApp项目,然后选择添加| 类…,将文件命名为RequestCultureMiddleware.cs,然后单击添加。
2. 添加一个构造函数,它接受一个RequestDelegate参数并使用以下代码段将其分配给一个私有字段。 在需要时继续解析丢失的using语句。
RequestCultureMiddleware.cs
public class RequestCultureMiddleware
{
    private readonly RequestDelegate next;

    public RequestCultureMiddleware(RequestDelegate next)
    {
        this.next = next;
    }
}
3. 添加以下方法与先前添加到Startup.cs文件的内联中间件委派的内容。
RequestCultureMiddleware.cs
public Task Invoke(HttpContext context)
{
    var cultureQuery = context.Request.Query["culture"];
    if (!string.IsNullOrWhiteSpace(cultureQuery))
    {
        var culture = new CultureInfo(cultureQuery);
#if !DNXCORE50
        Thread.CurrentThread.CurrentCulture = culture;
        Thread.CurrentThread.CurrentUICulture = culture;
#else
        CultureInfo.CurrentCulture = culture;
        CultureInfo.CurrentUICulture = culture;
#endif
    }

    // 调用管道中的下一个代理/中间件
    return this.next(context);
}
4. 在文件的底部(也可单独出来),添加一个类,通过IApplicationBuilder上的扩展方法公开中间件。
RequestCultureMiddleware.cs的文件底部
public static class RequestCultureMiddlewareExtensions
{
    public static IApplicationBuilder UseRequestCulture(this IApplicationBuilder builder)
    {
        return builder.UseMiddleware<RequestCultureMiddleware>();
    }
}
5. 回到应用程序的Startup.cs文件中,使用对app.UseRequestCulture()方法的调用替换内联中间件委托,以将新的中间件类添加到HTTP管道。 完成后,您的Configure方法应如下所示:
public void Configure(IApplicationBuilder app)
{
    app.UseIISPlatformHandler();

    app.UseRequestCulture();

    app.Run(async (context) =>
    {
        await context.Response.WriteAsync($"Hello {CultureInfo.CurrentCulture.DisplayName}");
    });

}
6. 运行应用程序,并验证中间件现在作为类运行。
任务3 – 向中间件添加选项
在此任务中,您将更新RequestCultureMiddleware实现以支持将默认文化设置为配置值。
1. 右键单击MiddlewareApp项目并选择添加| 类...,将文件命名为RequestCultureOptions.cs,然后单击添加。
2. 在新类中,将具有CultureInfo的名为DefaultCulture的属性添加为类型,解析丢失的依赖关系。
public class RequestCultureOptions
{
    public CultureInfo DefaultCulture { get; set; }
}
3. 打开RequestCultureMiddleware.cs文件,并更新RequestCultureMiddleware构造函数以接受RequestCultureOptions参数,如以下代码段所示。
public class RequestCultureMiddleware
{
    private readonly RequestDelegate next;
    private readonly RequestCultureOptions options;

    public RequestCultureMiddleware(RequestDelegate next, RequestCultureOptions options)
    {
        this.next = next;
        this.options = options;
    }

    //...
}
4. 如果在查询字符串中未指定任何内容,请更新中间件的Invoke方法以使用选项中的DefaultCulture属性,如以下代码段所示。
public Task Invoke(HttpContext context)
{
    CultureInfo requestCulture = null;

    var cultureQuery = context.Request.Query["culture"];
    if (!string.IsNullOrWhiteSpace(cultureQuery))
    {
        requestCulture = new CultureInfo(cultureQuery);
    }
    else
    {
        requestCulture = this.options.DefaultCulture;
    }

    if (requestCulture != null)
    {
#if !DNXCORE50
        Thread.CurrentThread.CurrentCulture = requestCulture;
        Thread.CurrentThread.CurrentUICulture = requestCulture;
#else
        CultureInfo.CurrentCulture = requestCulture;
        CultureInfo.CurrentUICulture = requestCulture;
#endif
    }

    return this.next(context);
}
5. 在同一文件中,使用以下代码片段替换RequestCultureMiddlewareExtensions类实现,该代码片段向使用RequestCultureOptions的UseRequestCulture方法添加了一个重载,并将它们传递到UseMiddleware
public static IApplicationBuilder UseRequestCulture(this IApplicationBuilder builder)
{
    return builder.UseRequestCulture(new RequestCultureOptions());
}

public static IApplicationBuilder UseRequestCulture(this IApplicationBuilder builder, RequestCultureOptions options)
{
    return builder.UseMiddleware<RequestCultureMiddleware>(options);
}
6. 打开Startup.cs文件,并将配置方法中的后备文化设置为某些默认值,例如。 “zh-cn”。
app.UseRequestCulture(new RequestCultureOptions
{
     DefaultCulture = new CultureInfo("zh-cn")
});
7. 运行应用程序,并验证当没有指定查询字符串时,默认文化与配置的匹配。
任务4 – 从文件读取请求文化配置
ASP.NET Core的配置系统已经从早期版本的ASP.NET重新构建,后者依赖于System.Configuration和XML配置文件,如web.config。 新的配置模型提供了可以从各种提供程序检索的基于键/值的设置的简化访问。 然后,应用程序和框架可以使用新的选项模式访问已配置的设置。
在此任务中,您将使用从JSON文件加载RequestCultureOptions的默认文化值的新配置系统。
1. 打开Startup.cs文件并添加一个名为配置类型IConfiguration的新的私有类字段,解析IConfiguration的丢失依赖关系。
public class Startup
{
    private readonly IConfiguration configuration;

    // ...
}
2. 添加一个新的构造函数,使用ConfigurationBuilder在构造函数中创建一个新的Configuration对象,并将其分配给您在上一步中创建的配置类字段。
public Startup()
{
    var configuration = new ConfigurationBuilder()
        .Build();

    this.configuration = configuration;
}
3. 打开project.json文件,并在依赖关系节点中添加对Microsoft.Extensions.Configuration.Json包的引用。
"dependencies": {
  "Microsoft.AspNet.IISPlatformHandler": "1.0.0-rc1-final",
  "Microsoft.AspNet.Server.Kestrel": "1.0.0-rc1-final",
  "Microsoft.Extensions.Configuration.Json": "1.0.0-rc1-final"
},
4. 回到Startup.cs文件中,在作为链接方法创建ConfigurationBuilder对象之后立即添加对.AddJsonFile(“config.json”)的调用。
public class Startup
{
    private readonly IConfiguration configuration;

    public Startup()
    {
        var configuration = new ConfigurationBuilder()
            .AddJsonFile("config.json")
            .Build();

        this.configuration = configuration;
    }

    // ...
}
5. 右键单击MiddlewareApp项目并选择添加| 新建项目…,选择JSON文件作为模板,将文件命名为config.json,然后单击添加。
6. 在新的config.json文件中,添加一个新的键/值对“culture”:“zh-cn”。
{
  "culture": "zh-cn"
}
7. 打开Startup.cs文件并更新代码以使用新的配置系统设置默认文化。
app.UseRequestCulture(new RequestCultureOptions
{
     DefaultCulture = new CultureInfo(this.configuration["culture"] ?? "zh-cn")
});
8. 运行应用程序并验证默认文化是配置文件中配置的文件。
9. 在config.json文件中将文化值更新为“zh”,并刷新页面(不更改任何其他代码)。 请注意,消息未更改,因为仅在应用程序启动时读取配置。
10. 回到Visual Studio并按Ctrl + Shift + F5重新启动Web服务器。
11. 返回浏览器并刷新页面; 它应该显示更新的消息。
任务5 – 从依赖注入系统到中间件的流程选项
ASP.NET Core是从根本上设计的,支持和利用依赖注入。 ASP.NET Core应用程序可以通过将它们注入到Startup类中的方法中来利用内置框架服务,并且应用程序服务也可以配置为注入。 ASP.NET Core提供的默认服务容器提供了一个最小的功能集,并不用于替换其他容器。
在此任务中,您将使用依赖注入系统配置RequestCultureMiddleware选项。
1. 打开project.json文件,并在依赖关系节点中添加对Microsoft.Extensions.OptionsModel包的引用。
"dependencies": {
  "Microsoft.AspNet.IISPlatformHandler": "1.0.0-rc1-final",
  "Microsoft.AspNet.Server.Kestrel": "1.0.0-rc1-final",
  "Microsoft.Extensions.Configuration.Json": "1.0.0-rc1-final",
  "Microsoft.Extensions.OptionsModel": "1.0.0-rc1-final"
},
2. 更改RequestCultureMiddleware构造函数以使用IOptions
public RequestCultureMiddleware(RequestDelegate next, IOptions<RequestCultureOptions> options)
{
    this.next = next;
    options = options.Value;
}
3. 更新RequestCultureMiddlewareExtensions类,删除带有options参数的方法,并在另一个方法中调用UseMiddleware
public static class RequestCultureMiddlewareExtensions
{
    public static IApplicationBuilder UseRequestCulture(this IApplicationBuilder builder)
    {
         return builder.UseMiddleware<RequestCultureMiddleware>();
    }
}
4. 在Startup.cs中,将UseRequestCulture中间件更改为不接受任何参数。
app.UseRequestCulture();
5. 在位于同一文件中的ConfigureServices方法中,使用services.Configure
public void ConfigureServices(IServiceCollection services)
{
    // DI的设置选项
    services.AddOptions();

    services.Configure<RequestCultureOptions>(options =>
    {
        options.DefaultCulture = new CultureInfo(this.configuration["culture"] ?? "zh-cn");
    });
}
6. 运行应用程序并验证是否正在从依赖注入系统中配置选项。
练习4:向Web应用程序添加身份验证
ASP.NET Identity是一个成员资格系统,它允许您向应用程序添加登录功能。 用户可以使用用户名和密码创建帐户和登录,也可以使用Facebook,Google,Microsoft帐户,Twitter等外部登录提供程序。
在本练习中,您将了解使用ASP.NET Identity的ASP.NET Core项目模板的默认配置,以及将Facebook配置为应用程序中的外部登录提供程序。
任务1 – ASP.NET Identity简介
在此任务中,您将了解ASP.NET Core项目模板如何使用ASP.NET Identity添加注册,登录和注销用户的功能。
1. 打开Visual Studio 2015并选择文件| 新| 项目…创建一个新的解决方案。
2. 在“新建项目”对话框中,选择Visual C#|下的ASP.NET Web应用程序 Web选项卡,并确保选择.NET Framework 4.6。 将项目命名为MyWebApp,选择一个位置,然后单击确定。
创建新的ASP.NET Web应用程序项目
3. 在“新建ASP.NET项目”对话框中,选择ASP.NET 5模板下的Web应用程序模板。 此外,请确保“身份验证”选项设置为“个人用户帐户”。 单击“确定”继续。
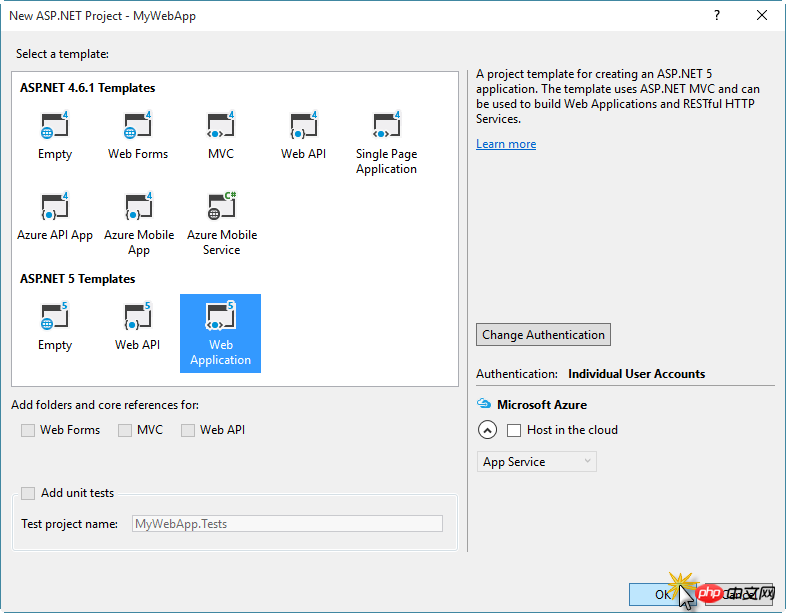
使用Web应用程序模板创建新项目
4. 项目创建后,打开project.json文件并找到Microsoft.AspNet.Identity.EntityFramework软件包。 此包具有实体框架实现的ASP.NET Identity,将持久化ASP.NET身份数据和模式到SQL Server。
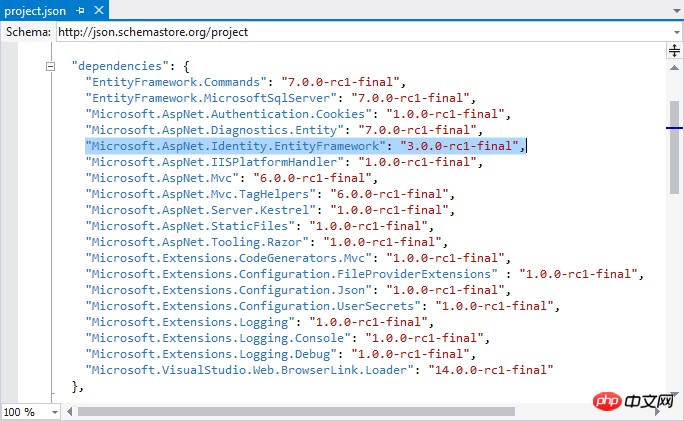
Microsoft.AspNet.Identity.EntityFramework包
5. 展开解决方案资源管理器中的References节点,然后展开DNX 4.5.1中的Microsoft.AspNet.Identity.EntityFramework包。 注意,它取决于Microsoft.AspNet.Identity,它是ASP.NET Identity系统的主要参考汇编。 此程序集包含ASP.NET Identity的核心接口集。
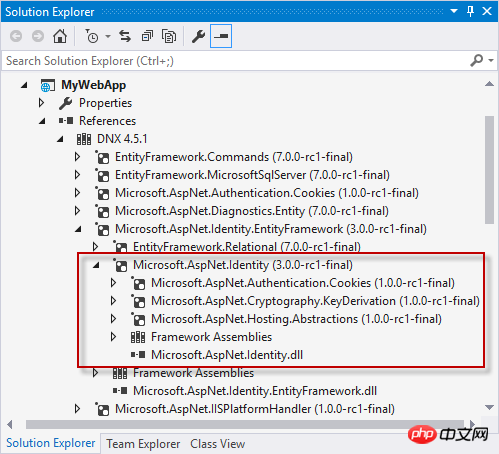
Microsoft.AspNet.Identity.EntityFramework包依赖项
6. 打开Startup.cs文件并找到ConfigureServices方法。 在此方法中,身份服务由以下代码配置。
public void ConfigureServices(IServiceCollection services)
{
     // ...

     services.AddIdentity<ApplicationUser, IdentityRole>()
          .AddEntityFrameworkStores<ApplicationDbContext>()
          .AddDefaultTokenProviders();

     // ...
}
7. 在同一文件中,找到在启动执行流程中调用ConfigureServices方法后调用的Configure方法。 在此方法中,当调用UseIdentity方法时,将为应用程序启用ASP.NET Identity。 这会向请求管道添加基于Cookie的身份验证。
public void Configure(IApplicationBuilder app, IHostingEnvironment env, ILoggerFactory loggerFactory)
{
     // ...

     app.UseIdentity();

     // ...
}
8. 打开位于Controllers文件夹的AccountController.cs文件,并找到具有HttpPost属性的Register操作。 此操作调用UserManager服务根据RegisterViewModel信息创建和登录用户。
[HttpPost]
[AllowAnonymous]
[ValidateAntiForgeryToken]
public async Task<IActionResult> Register(RegisterViewModel model)
{
    if (ModelState.IsValid)
    {
        var user = new ApplicationUser { UserName = model.Email, Email = model.Email };
        var result = await _userManager.CreateAsync(user, model.Password);
        if (result.Succeeded)
        {
            // ...

            await _signInManager.SignInAsync(user, isPersistent: false);

            // ...
9. 使用HttpPost属性找到Login操作。 此操作使用SignInManager服务的PasswordSignInAsync方法对用户进行签名。
[HttpPost]
[AllowAnonymous]
[ValidateAntiForgeryToken]
public async Task<IActionResult> Login(LoginViewModel model, string returnUrl = null)
{
    ViewData["ReturnUrl"] = returnUrl;
    if (ModelState.IsValid)
    {
        var result = await _signInManager.PasswordSignInAsync(model.Email, model.Password, model.RememberMe, lockoutOnFailure: false);
        if (result.Succeeded)
        {
            // ...
10. 现在,找到LogOff操作。 此操作调用SignInManager服务的SignOutAsync方法,清除存储在Cookie中的用户声明。
[HttpPost]
[ValidateAntiForgeryToken]
public async Task<IActionResult> LogOff()
{
    await _signInManager.SignOutAsync();
    _logger.LogInformation(4, "User logged out.");
    return RedirectToAction(nameof(HomeController.Index), "Home");
}
11. 运行解决方案并通过单击注册以查看ASP.NET Identity系统的操作来创建新用户。 您可以调试AccountController中的不同操作。
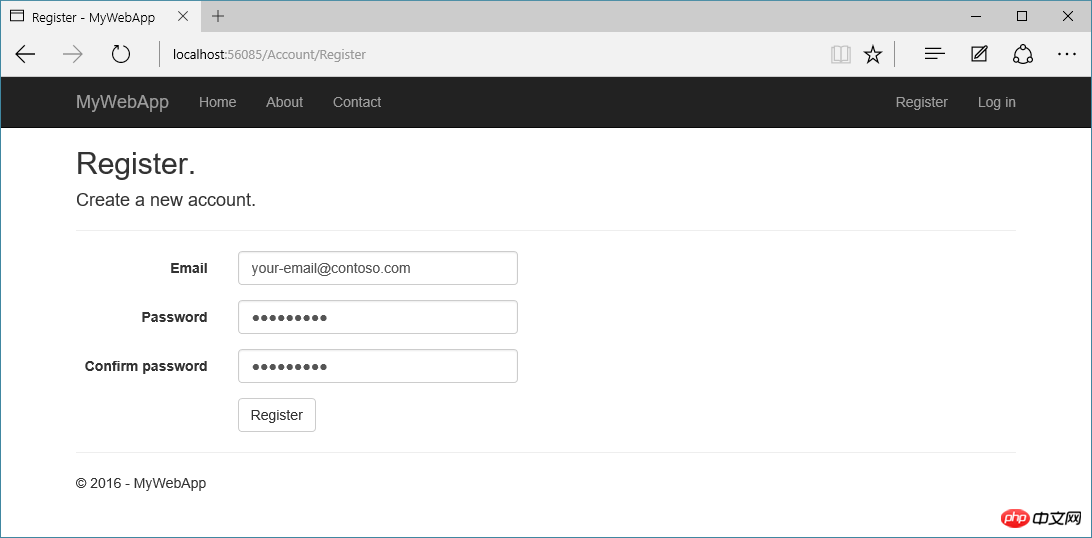
帐户注册视图
12. 注册第一个用户后,您会看到一条错误消息,提示您应用现有迁移。 单击应用迁移。 您现在将看到您以新用户身份登录。
13. 停止应用程序并浏览数据库,方法是导航到SQL Server对象资源管理器视图中的(localdb)MSSQLLocalDB / Databases / aspnet5-MyWebApp- / Tables。 右键单击dbo.AspNetUsers表并选择“查看数据”以查看创建的用户的属性。
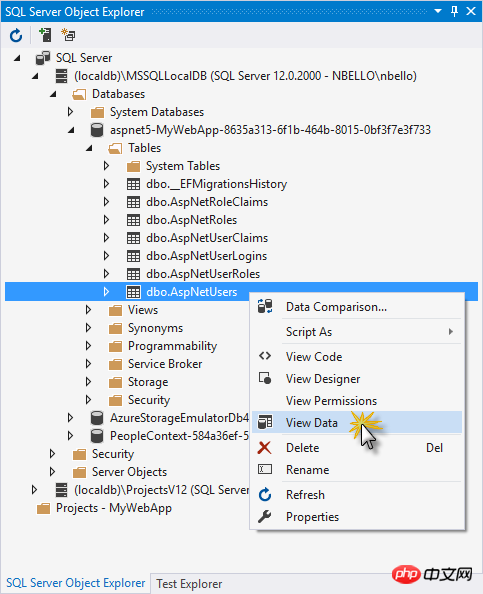
在SQL Server对象资源管理器中查看用户数据
任务2 – 使用外部提供程序启用身份验证
ASP.NET Core支持使用OAuth 2.0使用来自外部认证提供程序(如Facebook,Twitter,LinkedIn,Microsoft或Google)的凭据登录。 在您的网站中启用社交登录凭据提供了显着的优势,因为数百万用户已经拥有这些外部提供商的帐户。 如果他们不必创建和记住一组新的凭据,这些用户可能更倾向于注册您的网站。
在此任务中,您将创建一个Facebook应用程序并配置您的Web应用程序项目(需要翻个墙),以使用户能够使用其Facebook帐户作为外部提供商登录。
1. 在浏览器中,导航到https://developers.facebook.com/apps,然后通过输入您的Facebook凭据登录。如果您尚未注册为Facebook开发人员,请单击注册为开发人员,并按照说明注册。
2. 在Facebook的开发人员主页上,通过单击添加新应用程序并从平台选择中选择网站添加新的应用程序。
3. 在“网站快速入门”页面上,选择“跳过并创建应用程序ID”。
4. 设置显示名称,例如ASP.NET社交登录,并选择类别,例如业务,然后按创建应用程序ID。
5. 在设置页面的基本部分中,单击添加平台以指定要添加网站应用程序。
6. 从平台选项中选择网站,添加您的网站网址(例如https:// localhost:44300 /),然后点击下面的保存更改。
7. 记下您的应用程序ID和应用程序密钥,以便您以后可以将它们添加到您的ASP.NET核心网站。
8. 切换回Visual Studio,右键单击MyWebApp项目并选择管理用户秘密。
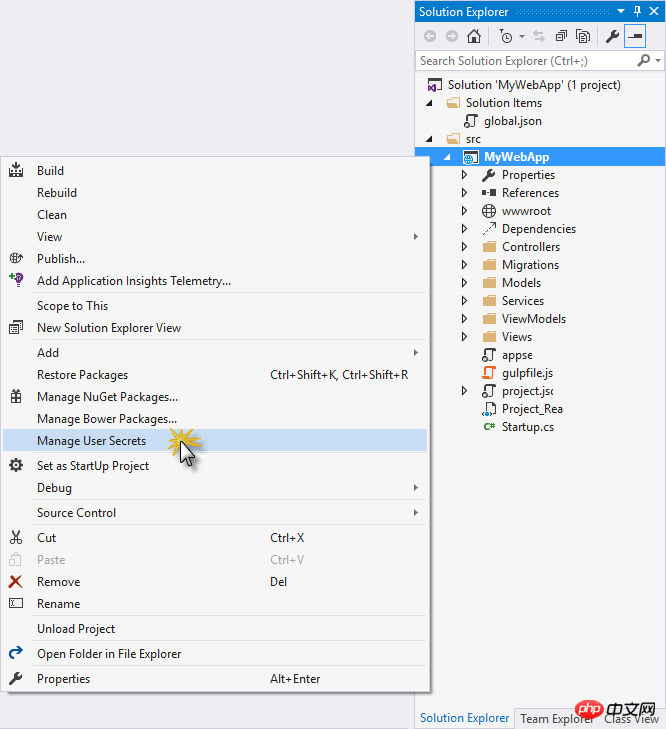
选择管理用户秘密
9. 在secrets.json文件中添加以下代码,将占位符替换为从Facebook获取的值。
{
  "Authentication": {
     "Facebook": {
        "AppId": "<your-app-id>",
        "AppSecret": "<your-app-secret>"
     }
  }
}
10. 打开project.json文件并添加Microsoft.AspNet.Authentication.Facebook包作为依赖关系
"dependencies": {
      ...
      "Microsoft.AspNet.Authentication.Facebook":  "1.0.0-rc1-final"
},
11. 打开startup.cs文件,并在Configure方法中添加Facebook中间件,如以下代码段所示。
public void Configure(IApplicationBuilder app, IHostingEnvironment env, ILoggerFactory loggerFactory)
{
    // ...

    app.UseIdentity();

    app.UseFacebookAuthentication(options =>
    {
        options.AppId = Configuration["Authentication:Facebook:AppId"];
        options.AppSecret = Configuration["Authentication:Facebook:AppSecret"];
    });

    // ...
}
12. 运行应用程序并导航到登录页面,您将看到Facebook按钮。
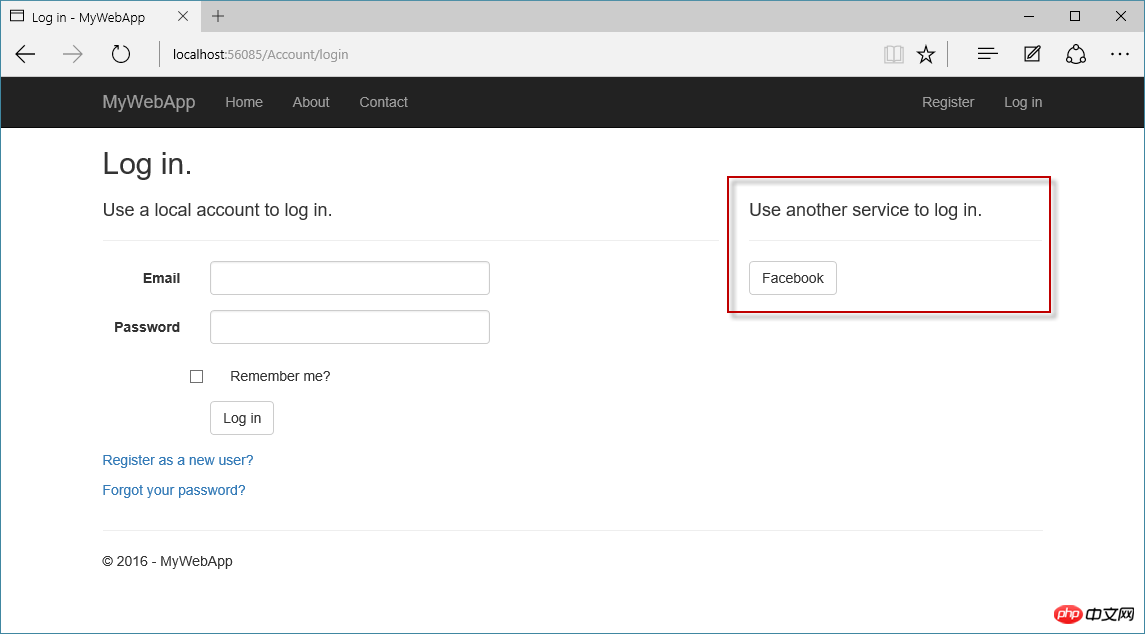
Anmeldeseite mit Facebook-Button
Download-Adresse des Quellcodes: https://github.com/smallprogram/CodeLabs-WebDev
Bemerkungen
Der in diesem Artikel erwähnte Asp.NET Core RC1 ist möglicherweise niedriger als die aktuelle Version, hat jedoch keinen Einfluss auf die im Artikel beschriebene Struktur und die Wissenspunkte. Ich hoffe, dieser Artikel ist hilfreich für Sie.
Das obige ist der detaillierte Inhalt vonASP.NET Core 1.0-Routing, statische Dateien, Einführung in die Authentifizierung, benutzerdefinierte Middleware. Für weitere Informationen folgen Sie bitte anderen verwandten Artikeln auf der PHP chinesischen Website!
In Verbindung stehende Artikel
Mehr sehen- .Net Core-Grafikverifizierungscode
- Laden der .NET Core-Konfigurationsdatei und DI-Injektion von Konfigurationsdaten
- Dokumentation zum .NET Core CLI-Tool dotnet-publish
- asp.net verwendet .net-Steuerelemente, um Dropdown-Navigationsmenüs zu erstellen
- So erhalten Sie den Namen des Controllers in Asp.net MVC

