Heim >Web-Frontend >HTML-Tutorial >HTML-Fotoalbum erstellen
HTML-Fotoalbum erstellen
- 高洛峰Original
- 2017-02-20 13:54:224961Durchsuche
In diesem Artikel geht es hauptsächlich um eine kleine Aufzeichnung der Verwendung von HTML5 + jQuery + CSS zum Erstellen eines Fotoalbums.
Hauptfunktionspunkte:
Html5 für Layout
Aufruf von jQuery (Ausleihe eines Satzes von der offiziellen Website: The Write Weniger, mehr tun) vereinfacht die JavaScript-Programmierung erheblich
CSS-Stil trennt Leistung vom Inhalt
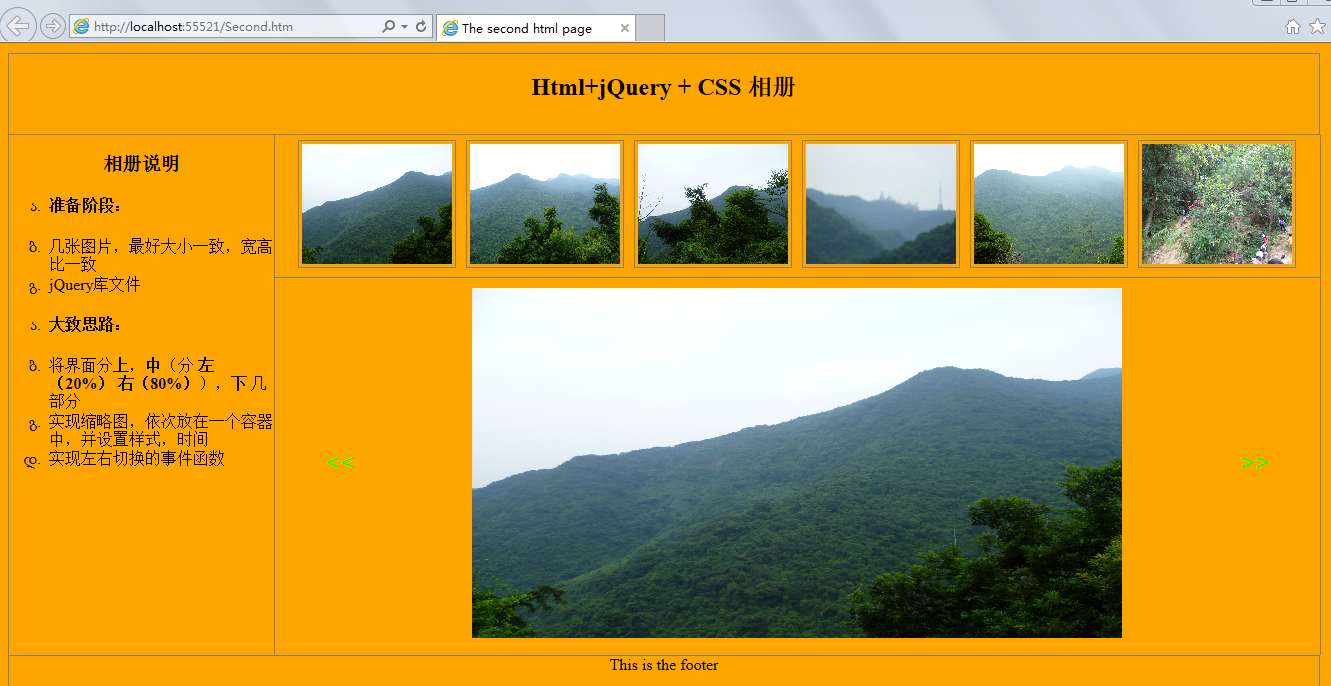
Ohne weitere Umschweife, hier zunächst die Darstellungen:

Der Code lautet wie folgt:
<!DOCTYPE html>
<html>
<head>
    <title>The second html page</title>
    <style type="text/css">
         ul li
        {
            list-style-type:georgian;
            text-align:left;
         }
         body
         {
           margin:10px;
           text-align:center;
           background-color:Orange;
          }
           header
        {
            height:80px;
            border:1px solid gray;
            width:99%
        }
         .left
        {
            border:1px solid gray;
            float:left;
            width:20%;
            height:520px;
            margin:0px;
            border-top-style:none;
            border-bottom-style:none;
            /*设置边框样式*/
        }
        .main
        {
            width:79%;
            float:left;
            height:520px;
            /*border:1px solid gray;*/
            border-right:1px solid gray;
            margin:0px;
            position:relative;/*设置成相对*/
        }
         footer
        {
            clear:left;
            height:60px;
            border:1px solid gray;
            width:99%
        }
        #container
        {
            display:block;
            padding:5px;
           /* border:1px solid gray;*/
            margin:5px;
            position:relative;
         }
         .small
         {
             display:block;
             border-bottom:1px solid gray;/*将缩略图,和大图隔开*/
         }
         .small img
         {
             width:150px;
             height:120px;
             margin:5px;
             border:1px solid gray;
             padding:3px;
         }
         .mm
         {
             cursor:pointer;
             border-radius:5px;/*鼠标移入样式*/

          }
         input[type="button"]
         {
             cursor:pointer;
             background-color:Orange;
             color:Lime;
             font-family:Arial;
             font-size:25px;
             height:50px;
             border:0px;
             width:50px;
             position:relative;
             top:150px;
          }
          #btnLeft
          {
           left:30px;
           float:left;
          }
           #btnRight
          {
           right:30px;
           float:right;
          }
    </style>
    <script type="text/javascript" src="js/jquery-3.1.1.min.js"></script>
    <script type="text/javascript">
        $(document).ready(function () {
            //初始加载六张图片作为缩略图
            for (var i = 0; i < 6; i++) {
                var src = "img/" + "0" + (i + 1).toString() + ".jpg";
                var img = $("<img />").attr("id", (i + 1).toString()).attr("alt", (i + 1).toString()).attr("src", src);
                $("#small").append(img);
            }
            //设置缩略图的点击事件,以及鼠标移入,移出事件
            $("#small img").click(function () {
                $("#img").css("display", "none");
                var src = $(this).attr("src");
                var alt = $(this).attr("alt");
                var nAlt = parseInt(alt);
                $("#img").attr("alt", nAlt).attr("src", src).fadeIn(delay);
            }).mouseover(function () {
                $(this).addClass("mm");
            }).mouseleave(function () {
                $(this).removeClass("mm");
            });
            var delay = 1000;
            //向左切换事件
            $("#btnLeft").click(function () {
                $("#img").css("display", "none");
                var alt = $("#img").attr("alt");
                if (alt == "1") {
                    alt = 7;
                }
                var nAlt = parseInt(alt) - 1;
                var src = "img/" + "0" + nAlt.toString() + ".jpg";
                $("#img").attr("alt", nAlt).attr("src", src).fadeIn(delay);
            });
            //向右切换事件
            $("#btnRight").click(function () {
                $("#img").css("display", "none");
                var alt = $("#img").attr("alt");
                if (alt == "6") {
                    alt = 0;
                }
                var nAlt = parseInt(alt) + 1;
                var src = "img/" + "0" + nAlt.toString() + ".jpg";
                $("#img").attr("alt", nAlt).attr("src", src).fadeIn(delay);
            });
        });
    </script>
</head>
<body>
<header>
<h2>Html+jQuery + CSS 相册</h2>
</header>
<aside class="left">
<h3>相册说明</h3>
   <ul>
        <li><h4>准备阶段:</h4></li>
        <li>几张图片,最好大小一致,宽高比一致</li>
        <li>jQuery库文件</li>
    </ul>
    <ul>
        <li><h4>大致思路:</h4></li>
        <li>将界面分<b>上</b>,<b>中</b>(分 <b>左(20%)</b> <b>右(80%)</b>),<b>下</b> 几部分</li>
        <li>实现缩略图,依次放在一个容器中,并设置样式,时间</li>
        <li>实现左右切换的事件函数</li>
    </ul>
</aside>
<section class="main">
    <div class="small" id="small">

    </div>
    <div id="container">
        <input type="button" id="btnLeft" value="<<" />
        <img id="img" alt="1" src="img/01.jpg" width="650" height="350" />
        <input type="button" id="btnRight" value=">>" />
    </div>
</section>
<footer>
    <div>This is the footer</div>
</footer>
</body>
</html>
Weitere Artikel zur Erstellung von HTML-Fotoalben finden Sie auf der chinesischen PHP-Website!
Stellungnahme:
Der Inhalt dieses Artikels wird freiwillig von Internetnutzern beigesteuert und das Urheberrecht liegt beim ursprünglichen Autor. Diese Website übernimmt keine entsprechende rechtliche Verantwortung. Wenn Sie Inhalte finden, bei denen der Verdacht eines Plagiats oder einer Rechtsverletzung besteht, wenden Sie sich bitte an admin@php.cn
Vorheriger Artikel:Was bewirkt das Formularattribut Role="form" im Bootstrap?Nächster Artikel:Was bewirkt das Formularattribut Role="form" im Bootstrap?

