Heim >Backend-Entwicklung >PHP-Tutorial >Android-UI-Steuerelementreihe: LinearLayout (lineares Layout)
Android-UI-Steuerelementreihe: LinearLayout (lineares Layout)
- 黄舟Original
- 2017-01-19 09:47:231359Durchsuche
LinearLayout ist eine ViewGroup, die Ansichtselemente in linearer Richtung anzeigt, entweder horizontal oder vertikal
Sie können LinearLayout wiederverwenden. Wenn Sie ein verschachteltes mehrschichtiges LinearLayout verwenden möchten, können Sie stattdessen die Verwendung von RelativeLayout in Betracht ziehen .
1. Beginnen Sie mit der Erstellung eines Projekts mit dem Namen HelloLinearLayout
2. Öffnen Sie die Datei res/layout/main.xml und fügen Sie den folgenden Inhalt ein
<?xml version="1.0" encoding="utf-8"?>
<LinearLayout xmlns:android="http://schemas.android.com/apk/res/android"
    android:orientation="vertical"
    android:layout_width="fill_parent"
    android:layout_height="fill_parent"
    >
        <LinearLayout
                android:orientation="horizontal"
                android:layout_width="fill_parent"
                android:layout_height="fill_parent"
                android:layout_weight="1">
                <TextView
                        android:text="red"
                        android:gravity="center_horizontal"
                        android:background="#aa0000"
                        android:layout_width="wrap_content"
                        android:layout_height="fill_parent"
                        android:layout_weight="1"
                />
                <TextView
                        android:text="green"
                        android:gravity="center_horizontal"
                        android:background="#00aa00"
                        android:layout_width="wrap_content"
                        android:layout_height="fill_parent"
                        android:layout_weight="1"
                />
                <TextView
                        android:text="blue"
                        android:gravity="center_horizontal"
                        android:background="#0000aa"
                        android:layout_width="wrap_content"
                        android:layout_height="fill_parent"
                        android:layout_weight="1"
                />
                <TextView
                        android:text="yellow"
                        android:gravity="center_horizontal"
                        android:background="#aaaa00"
                        android:layout_width="wrap_content"
                        android:layout_height="fill_parent"
                        android:layout_weight="1"
                />
        </LinearLayout>
        <LinearLayout
                android:orientation="vertical"
                android:layout_width="fill_parent"
                android:layout_height="fill_parent"
                android:layout_weight="1">
                <TextView
                        android:text="row one"
                        android:textSize="15pt"
                        android:layout_width="fill_parent"
                        android:layout_height="wrap_content"
                        android:layout_weight="1"
                />
                <TextView
                        android:text="row two"
                        android:textSize="15pt"
                        android:layout_width="fill_parent"
                        android:layout_height="wrap_content"
                        android:layout_weight="1"
                />
                <TextView
                        android:text="row three"
                        android:textSize="15pt"
                        android:layout_width="fill_parent"
                        android:layout_height="wrap_content"
                        android:layout_weight="1"
                />
                <TextView
                        android:text="row four"
                        android:textSize="15pt"
                        android:layout_width="fill_parent"
                        android:layout_height="wrap_content"
                        android:layout_weight="1"
                />
        </LinearLayout>
</LinearLayout>
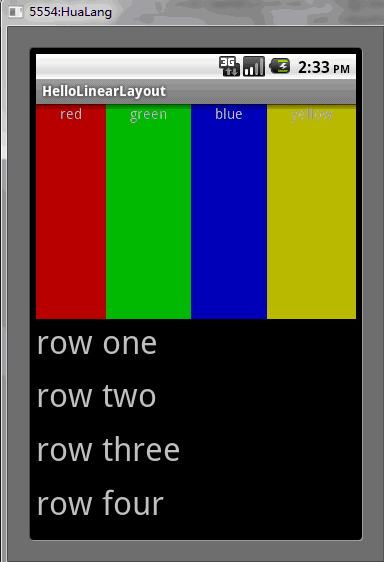
Überprüfen Sie dieses XML sorgfältig abheften. Es gibt ein Stammelement LinearLayout, das seine Richtung als vertikal definiert. Alle untergeordneten Ansichten (insgesamt 2) sind vertikal gestapelt. Das erste untergeordnete Element ist ein weiteres lineares Layout, das in horizontaler Richtung angeordnet ist ein LinearLayout mit einem vertikalen Layout. Jedes dieser verschachtelten LinearLayouts enthält mehrere TextView-Elemente und ihre Richtungen werden durch das übergeordnete LinearLayout-Tag definiert.
3. Öffnen Sie nun HelloLinearLayout.java und stellen Sie sicher, dass die Layoutdatei res/layout/main.xml in die Methode onCreate()
public void onCreate(Bundle savedInstanceState) {
        super.onCreate(savedInstanceState);
        setContentView(R.layout.main);
setContentView(int) geladen wurde Aktivität Die Layoutdatei wird geladen, angegeben durch die Ressourcen-ID – R.layout.main verweist auf die Layoutdatei res/layout/main.xml
4. Führen Sie das Programm aus, Sie können die folgende Situation sehen

Das Obige ist der Inhalt der Android-UI-Steuerelementserie: LinearLayout (lineares Layout). Weitere verwandte Inhalte finden Sie auf der chinesischen PHP-Website (www.php.cn). )!
In Verbindung stehende Artikel
Mehr sehen- So verwenden Sie cURL zum Implementieren von Get- und Post-Anfragen in PHP
- So verwenden Sie cURL zum Implementieren von Get- und Post-Anfragen in PHP
- So verwenden Sie cURL zum Implementieren von Get- und Post-Anfragen in PHP
- So verwenden Sie cURL zum Implementieren von Get- und Post-Anfragen in PHP
- Alle Ausdruckssymbole in regulären Ausdrücken (Zusammenfassung)

