Heim >Web-Frontend >H5-Tutorial >Nodejs+express+html5 implementiert Drag-and-Drop-Upload
Nodejs+express+html5 implementiert Drag-and-Drop-Upload
- 高洛峰Original
- 2017-01-12 17:02:381632Durchsuche
1. Vorwort
Das Hochladen von Dateien ist eine relativ häufige Funktion. Sie müssen zuerst auf die Schaltfläche zum Hochladen klicken und dann den Pfad hochladen Es. Es bringt große Probleme für die Benutzererfahrung mit sich. HTML5 beginnt mit der Unterstützung der erforderlichen API für den Drag-and-Drop-Upload. NodeJS ist in letzter Zeit auch eine immer beliebter werdende Technologie. Dies ist auch mein erster Kontakt mit NodeJS. In der NodeJS-Entwicklung ist Expess ein Framework, das dem MVC-Modell ähnelt. In Kombination mit HTML5 und NodeJS Express ist die Drag-and-Drop-Upload-Funktion implementiert.
2. Popularisierung von Grundkenntnissen
1. Grundkenntnisse von NodeJs
Nodejs ist einfach eine Entwicklungsplattform, die die Ausführung von js auf dem Server ermöglicht Bald begannen auch viele inländische Unternehmen, Taobao usw. zu nutzen. Herkömmliche Entwicklungsplattformen für Webanwendungen basieren auf Multithreading, um auf Anfragen mit hoher Parallelität zu reagieren. Nodejs verwendet ein Single-Threaded-, asynchrones IO- und ereignisgesteuertes Designmodell, das enorme Leistungsverbesserungen für Nodejs mit sich bringt. Dies ist auch die größte Funktion von NodeJS. Alle E/A-Vorgänge werden über Rückrufe ausgeführt. Wenn NodeJS E/A-Vorgänge ausführt, wird die E/A-Anforderung in eine Ereigniswarteschlange verschoben und darauf gewartet, dass das Programm sie verarbeitet verarbeitet werden und dann anrufen Die Rückruffunktion gibt das Ergebnis zurück.
Beim Abfragen der Datenbank lautet der Vorgang beispielsweise wie folgt:
mysql.query("SELECT * FROM myTable",function(res){
       callback(res);
});
Im obigen Code wartet nodejs nicht für die Datenbank, wenn Sie die obige Anweisung ausführen. Geben Sie das Ergebnis zurück, führen Sie jedoch weiterhin die folgenden Anweisungen aus. Nachdem die Datenbank die Daten erhalten hat, werden sie an die Ereignisschleifenwarteschlange gesendet. Der Rückruf wird erst ausgeführt, wenn der Thread in die Ereignisschleifenwarteschlange eintritt.
Für mehr Wissen über NodeJS habe ich es zwei Tage lang gelesen und weiß nicht viel. Um mehr zu erfahren, können Sie im Internet suchen.
2. Grundkenntnisse von Express
Nodejs ist eine relativ aktive Open-Source-Community. Sie verfügt über eine große Anzahl von Entwicklungsbibliotheken von Drittanbietern, darunter Express Verwendete Frameworks. Es ist auch das offiziell empfohlene Framework von NodeJS. Neben der Kapselung allgemeiner HTTP-Vorgänge werden auch Routing-Steuerung, Unterstützung für das Parsen von Vorlagen, dynamische Ansichten, Benutzerreaktionen usw. implementiert. Es handelt sich jedoch nicht um ein universelles Framework. Die meisten seiner Funktionen sind HTTP-Kapselung. Viele Funktionen müssen zur Implementierung auch in Bibliotheken von Drittanbietern integriert werden.
Express bietet eine sehr praktische Unterstützung für die Upload-Funktion. Nach der Datei-Upload-Anfrage empfängt Express die Datei und speichert sie in einem temporären Verzeichnis. Bei der Routing-Methode müssen wir die Datei dann nur noch aus dem temporären Verzeichnis übertragen Verzeichnis in Kopieren Sie einfach das Verzeichnis in den Ordner, in dem wir Benutzer-Uploads speichern möchten. Im Datei-Upload-Teil basiert die serverseitige Implementierung auf der Express-Funktion.
3. HTML5-Drag-and-Drop-Upload-API
HTML5 bietet viele neue Funktionen, Drag-Events und Datei-Upload sind eine der neuen Funktionen. Aufgrund des begrenzten Platzes werden wir uns später auf die Code-Implementierung des Drag-and-Drop-Uploads konzentrieren. Ich werde die von HTML5 bereitgestellte Drag-and-Drop-Upload-API nicht einzeln auflisten
3. Drag-and-Drop-Upload-Implementierung
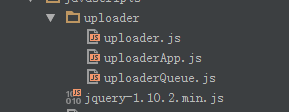
1 das Dateiverzeichnis des Front-End-JS:
 Unter ihnen:
uploader.js implementiert hauptsächlich die Kapselung der von HTML5 unterstützten Upload-Funktion.
uploaderQueue.js implementiert hauptsächlich die Verwaltung der Upload-Dateiwarteschlange sowie der Datei-Upload-Objekte und lädt Dateien in der Dateiwarteschlange auf den Server hoch.
uploaderApp.js ist der Haupteinstiegspunkt für das Hochladen von Dateien. Es implementiert hauptsächlich die Überwachung von Drag-Ereignissen im Upload-Fenster, schiebt die gezogenen Dateien in die Upload-Dateiwarteschlange und startet das Datei-Upload-Programm.
Im Folgenden finden Sie eine kurze Erläuterung des Kerncodes (erforderlich). Alle Codes können hier heruntergeladen werden: FileUploader
Kapseln Sie zunächst einfach den von html5 uploader.js bereitgestellten Datei-Upload.
Das Uploader-Objekt ist hauptsächlich eine einfache Kapselung der nativen API, die von HTML5 bereitgestellt wird. uploaderFactory bietet eine einfache Schnittstelle, die zum Ausführen von Datei-Upload-Aufrufen wie der Ajax-Methode von jquery verwendet werden kann. Die in HTML5 bereitgestellte Datei-Upload-Unterstützung erweitert einige Attribute und Methoden basierend auf dem ursprünglichen XMLHttpRequest und stellt ein FormData-Objekt zur Unterstützung von Datei-Upload-Vorgängen bereit.function uploader(url, data, files) {
this._files = files;
this._data = data;
this._url = url;
this._xhr = null;
this.onloadstart = {};
this.onload = {};
this.onloadend = {};
this.onprogress = {};
this.onerror = {};
this.ontimeout = {};
this.callback = {};//请求完成后回调
_self = this;
}
uploader.prototype = {
init: function () {
if (!isValid()) {
throw e;
}
this._xhr = new XMLHttpRequest();
this._bindEvents();
},
send: function () {
if (this._xhr == null) {
this.init();
}
var formData = this._createFormData();
this._xhr.open('post', this._url, true);
this._xhr.send(formData);
},
_bindEvents: function () {
_self = this;
this._xhr.upload.loadstart = function (e) {
evalFunction(_self.onloadstart, e);
}
this._xhr.upload.onload = function (e) {
evalFunction(_self.onload, e);
};
this._xhr.upload.onloadend = function (e) {
evalFunction(_self.onloadend, e);
}
this._xhr.upload.onprogress = function (e) {
evalFunction(_self.onprogress, e)
};
this._xhr.upload.onerror = function (e) {
evalFunction(_self.onerror, e);
};
this._xhr.upload.ontimeout = function (e) {
evalFunction(_self.ontimeout, e);
}
this._xhr.onreadystatechange = function () {
if (_self._xhr.readyState == 4) {
if (typeof _self.callback === 'function') {
var status = _self._xhr.status;
var data = _self._xhr.responseText;
_self.callback(status, data);
}
}
}
},
_createFormData: function () {
var formData = new FormData();
this._addDataToFormData(formData);
this._addFileToFormData(formData);
return formData;
},
_addDataToFormData: function (formData) {
if (this._data) {
for (var item in this._data) {
formData.append(item, this._data[item]);
}
}
},
_addFileToFormData: function (formData) {
if (this._files) {
for (var i = 0; i < this._files.length; i++) {
var file = this._files[i];
formData.append('file[' + i + ']', this._files[i]);
}
}
}
};
View Code
var uploaderFactory = {
send: function (url, data, files, callback) {
var insUploader = new uploader(url, data, files);
insUploader.callback = function (status, resData) {
if (typeof callback === 'function') {
callback(status, resData);
}
}
insUploader.send();
return insUploader;
}
};Die Datei-Upload-Warteschlange (uploaderQueue.js) ist ebenfalls ein relativ wichtiges Objekt. Es umfasst zwei Objekte: Queue, das Datei-Warteschlangenobjekt, das hauptsächlich für die Verwaltung des Hinzufügens, Löschens, Änderns und Abfragens verantwortlich ist Andere Vorgänge der Dateiwarteschlange sind UploadEngine, die Datei-Upload-Engine. Ihre Funktion ist hauptsächlich dafür verantwortlich, das Dateiobjekt aus der Dateiwarteschlange zu entfernen, das Uploader-Objekt aufzurufen, um die Datei hochzuladen, und dann den Dateistatus in der Datei zu aktualisieren Dateiwarteschlange. Queue und UploadEngine sind beide Singleton-Objekte.
Werfen wir zunächst einen Blick auf das Dateiwarteschlangenobjekt:
Die Upload-Dateiwarteschlange verwendet ein Array, um die Informationen jedes Dateiobjekts zu verwalten. Jedes Dateiobjekt verfügt über drei Attribute: Schlüssel, Daten und Status Dieses Objekt ist hauptsächlich für die Funktionen zum Hinzufügen, Löschen, Aktualisieren und Durchsuchen von Dateiobjekten verantwortlich.(function (upladerQueue) {
var Status = {
Ready: 0,
Uploading: 1,
Complete: 2
}
var _self = null;
var instance = null;
function Queue() {
this._datas = [];
this._curSize = 0;//当前长度
_self = this;
}
Queue.prototype = {
add: function (data) {
var key = new Date().getTime();
this._datas.push({key: key, data: data, status: Status.Ready});
this._curSize = this._datas.length;
return key;
},
remove: function (key) {
var index = this._getIndexByKey(key);
this._datas.splice(index, 1);
this._curSize = this._datas.length;
},
get: function (key) {
var index = this._getIndexByKey(key);
return index != -1 ? this._datas[index].data : null;
},
clear: function () {
this._datas = [];
this._curSize = this._datas.length;
},
size: function () {
return this._curSize;
},
setItemStatus: function (key, status) {
var index = this._getIndexByKey(key);
if (index != -1) {
this._datas[index].status = status;
}
},
nextReadyingIndex: function () {
for (var i = 0; i < this._datas.length; i++) {
if (this._datas[i].status == Status.Ready) {
return i;
}
}
return -1;
},
getDataByIndex: function (index) {
if (index < 0) {
return null;
}
return this._datas[index];
},
_getIndexByKey: function (key) {
for (var i = 0; i < this._datas.length; i++) {
if (this._datas[i].key == key) {
return i;
}
}
return -1;
}
};
function getInstace() {
if (instance === null) {
instance = new Queue();
return instance;
} else {
return instance;
}
}
upladerQueue.Queue = getInstace();
upladerQueue.UploadStatus = Status;
})(window.uploaderQueue);Ein weiteres wichtiges Objekt in der Upload-Dateiwarteschlange ist das Upload-Engine-Objekt (uploadEngine.js)
(function (upladerQueue) {

 var instance = null;
 var _self;

 function uploadEngine() {
  this._url = null;
  this._curUploadingKey = -1;//标志
  this.uploadStatusChanged = {};
  this.uploadItemProgress={};
  _self = this;
 }

 uploadEngine.prototype = {
  setUrl: function (url) {
   this._url = url;
  },
  run: function () {
   if (this._curUploadingKey === -1 && this._url) {
    this._startUpload();
   }
  },
  _startUpload: function () {
   _self = this;
   var index = upladerQueue.Queue.nextReadyingIndex();
   if (index != -1) {
    this._uploadItem(index);
   } else {
    this._curUploadingKey = -1;
    return null;
   }
  },
  _uploadItem: function (index) {
   var data = upladerQueue.Queue.getDataByIndex(index).data;
   _self = this;
   this._readyUploadItem(index);
   var upload = uploaderFactory.send(this._url, null, data.files, function (status, data) {
    _self._completedUploadItem.call(_self, status, data);
   });

   this._uploadItemProgress(upload);
  },
  _uploadItemProgress: function (upload) {
   upload.onprogress = function (e) {
     _self.uploadItemProgress(_self._curUploadingKey,e);
   }
  },
  _readyUploadItem: function (index) {
   this._curUploadingKey = upladerQueue.Queue.getDataByIndex(index).key;
   if (typeof this.uploadStatusChanged === 'function') {
    this.uploadStatusChanged(this._curUploadingKey, upladerQueue.UploadStatus.Uploading);
   }
   upladerQueue.Queue.setItemStatus(this._curUploadingKey, upladerQueue.UploadStatus.Uploading);
  },
  _completedUploadItem: function (status, data) {
   if (typeof this.uploadStatusChanged === 'function') {
    this.uploadStatusChanged(this._curUploadingKey, upladerQueue.UploadStatus.Complete);
   }
   upladerQueue.Queue.setItemStatus(this._curUploadingKey, upladerQueue.UploadStatus.Complete);
   this._startUpload();
  }
 };

 function getInstace() {
  if (instance === null) {
   instance = new uploadEngine();
  }
  return instance;
 }

 upladerQueue.Engine = getInstace();
})(window.uploaderQueue);
该对象比较简单主要提供一个run以及setUrl方法,用于启动上传引擎,以及设置上传路径的功能。内部使用递归的方法把文件队列中的方法全部上传到服务端。使用uploadItemProgress通知外部上传的进度,使用uploadStatusChanged通知文件上传状态,以便更新UI.
uploaderApp.js中主要包括三个对象,一个是类似jquery的一个简单的jquery对象(App$)。主要用于绑定事件。一个是uploaderArea对象,是拖曳上传的窗口区域,另一个是入口对象uploaderMain对象。主要用于初始化对象,对外部提供一个init方法,来初始化整个对象。
了解关于App$以及uploaderArea对象的代码请下载 源代码 ,下面仅对uploaderMain对象做简单的说明。
(function (app) {
 var _self;

 function uploaderMain(id) {
  this._id = id;
  this._area = null;
  this.uploaders = [];

  this._URL = 'file/uploader';
 }

 uploaderMain.prototype = {
  init: function () {
   _self = this;
   this._initArea();
   this._initQueueEng();
  },
  _initQueueEng: function () {
   uploaderQueue.Engine.setUrl(this._URL);
   uploaderQueue.Engine.uploadStatusChanged = function (key, status) {
    if (status === uploaderQueue.UploadStatus.Uploading) {
     _self._area.hideItemCancel(key);
    } else if (status === uploaderQueue.UploadStatus.Complete) {
     _self._area.completeItem(key);
     _self._area.showItemCancel(key);
    }
   }
   uploaderQueue.Engine.uploadItemProgress = function (key, e) {
    var progress = e.position / e.total;
    _self._area.changeItemProgress(key, Math.round(progress * 100));
   }
  },
  _initArea: function () {
   this._area = new app.area(this._id);
   this._area.init();
   this._area.drop = function (e) {
    var key = uploaderQueue.Queue.add({files: e.dataTransfer.files});
    uploaderQueue.Engine.run();
    return key;
   }
   this._area.cancelItem = function (key) {
    uploaderQueue.Queue.remove(key);
   }
  }
 };


 app.main = uploaderMain;
})(window.uploaderApp);
在uploaderMain对象,相当于各个对象之间的中介,主要就是做对象的初始化功能、以及对象之间相互调用。使各个对象之间相互协作完成整个模块的功能。对外提供一个init方法来初始化整个程序,在html页面中只需如下代码:
<script type="text/javascript"> var main=new uploaderApp.main('container'); main.init(); </script>
以上代码就是创建一个入口对象,然后使用init方法来启动整个程序。
以上是对前端js的主要方法做的简单解释,如果想详细了解请下载源代码。下面简单看下后端js(nodejs)端实现的主要代码。
在express基础知识时,已经讲过在express已经对文件上传功能做了完整的封装,当路由到action时,文件已经完成上传只是文件上传到了一个临时目录,这个临时目录我们可以在app.js中配置的,配置方式如下:
app.use(express.bodyParser({
  uploadDir:__dirname+'/public/temp'
}));
这样在文件上传后文件就存放在/public/temp目录下,文件名也是express通过一定的算法随机获取的。在我们写的action中只需要把存在临时目录中的文件移动到服务端存放文件的目录下,然后删除临时目录下的文件即可。具体代码如下:
function uploader(req, res) {
 if (req.files != 'undifined') {
  console.dir(req.files);
  utils.mkDir().then(function (path) {
   uploadFile(req, res, path, 0);
  });

 }
}

function uploadFile(req, res, path, index) {
 var tempPath = req.files.file[index].path;
 var name = req.files.file[index].name;
 if (tempPath) {
  var rename = promise.denodeify(fs.rename);
  rename(tempPath, path + name).then(function () {
   var unlink = promise.denodeify(fs.unlink);
   unlink(tempPath);
  }).then(function () {
    if (index == req.files.file.length - 1) {
     var res = {
      code: 1,
      des: '上传成功'
     };
     res.send(res);
    } else {
     uploadFile(req, res, path, index + 1);
    }
   });
 }
}
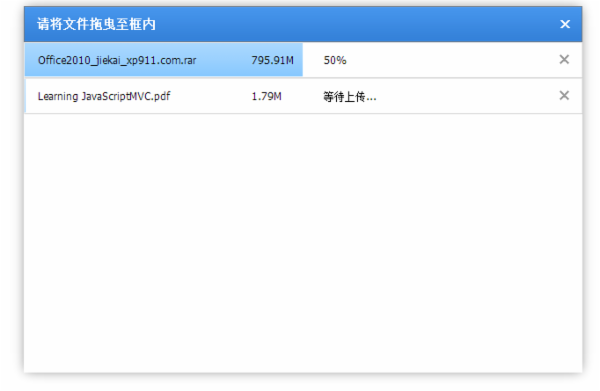
2、实现效果

更多Nodejs+express+html5 实现拖拽上传相关文章请关注PHP中文网!
In Verbindung stehende Artikel
Mehr sehen- Das Vollbild-Bildlauf-Plug-in AlloyTouch erstellt in 30 Sekunden eine flüssige H5-Seite
- Tatsächlicher HTML5-Kampf und Analyse von Touch-Ereignissen (Touchstart, Touchmove und Touchend)
- Ausführliche Erläuterung der Beispiele für Bildzeichnungen in HTML5 Canvas 9
- Reguläre Ausdrücke und neue HTML5-Elemente
- So kombinieren Sie NodeJS und HTML5, um mehrere Dateien per Drag-and-Drop auf den Server hochzuladen

