Heim >Backend-Entwicklung >PHP-Tutorial >PHP-Methode zur Implementierung der QQ-Schnellanmeldung
PHP-Methode zur Implementierung der QQ-Schnellanmeldung
- 高洛峰Original
- 2016-12-30 13:49:352292Durchsuche
Vorwort:
PHP implementiert die QQ-Schnellanmeldung und listet drei Methoden auf
Methode 1: prozessorientiert, Rückrufadresse und erste Trigger-Anmeldung werden auf einer Methodenseite geschrieben [wegen if Make ein Urteil],
Methoden 2 und 3: Objektorientiert
1 Rufen Sie zuerst die Anmeldemethode auf und senden Sie eine Anfrage an Tencent,
2 entsprechende Parameter dieser Website OPENID, ACCESSTOKEN, Rückkehr zur entsprechenden Rückrufseite,
3. Nachdem die Rückrufseite die Parameter von Tencent empfangen hat, verwendet sie diese beiden Parameter, um die entsprechende Anforderung auszugeben, z. B. die Abfrage der Benutzerdaten.
4. Tencent führt entsprechende Vorgänge aus, z. B. die Rückgabe der Benutzerdaten an Sie
Auch wenn Sie es nicht verstehen, spielt es keine Rolle, ob Sie dies tun kann es erreichen.
Frühe Vorbereitung:
Wenn Sie die Funktionen von Tencent nutzen, müssen Sie ihnen „Hallo“ sagen!
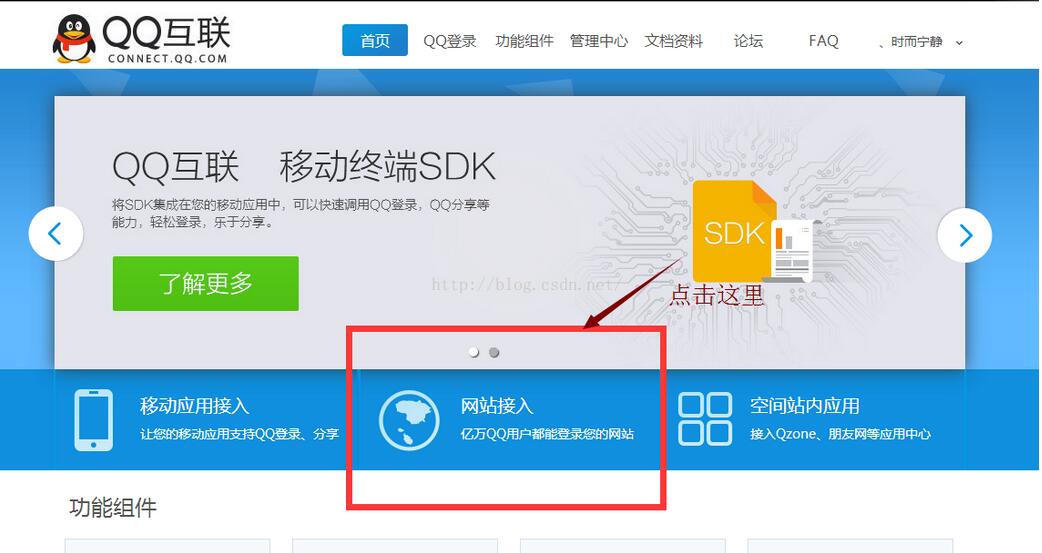
QQ-Internet-Homepage: http://connect.qq.com/
Gehen Sie nach dem Aufrufen der Website wie folgt vor:
1. Betreten Sie die offizielle Website

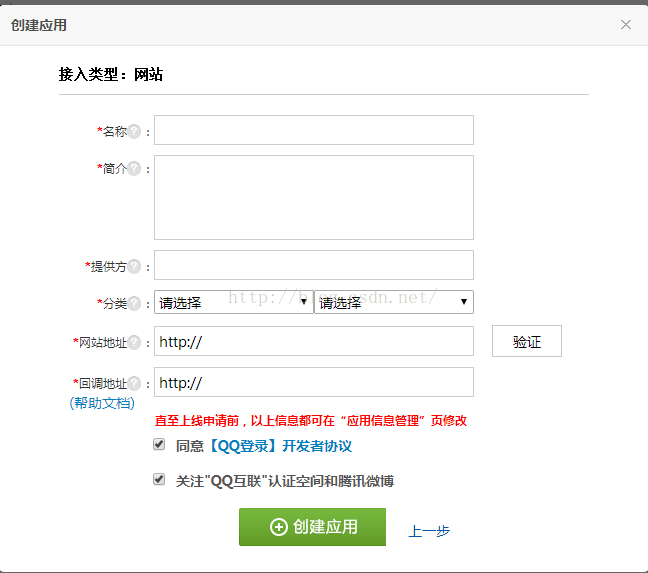
2. Bewerben Sie sich, um eine [Website]-Anwendung zu erstellen

3. Geben Sie die erforderlichen Informationen ein
Notieren Sie die Website-Adresse: Geben Sie die URL für die schnelle Anmeldung ein, z. B.: http://www.test.com. Rückrufadresse: Nachdem Sie QQ für die schnelle Anmeldung gesendet haben, erhalten Sie diese Diese Informationen werden auf dieser Seite übernommen. zB: http://www.test.com/accept_info.php
[Detaillierte Informationen zum Ausfüllen des Antrags finden Sie in den offiziellen Tipps, die hier nicht beschrieben werden]
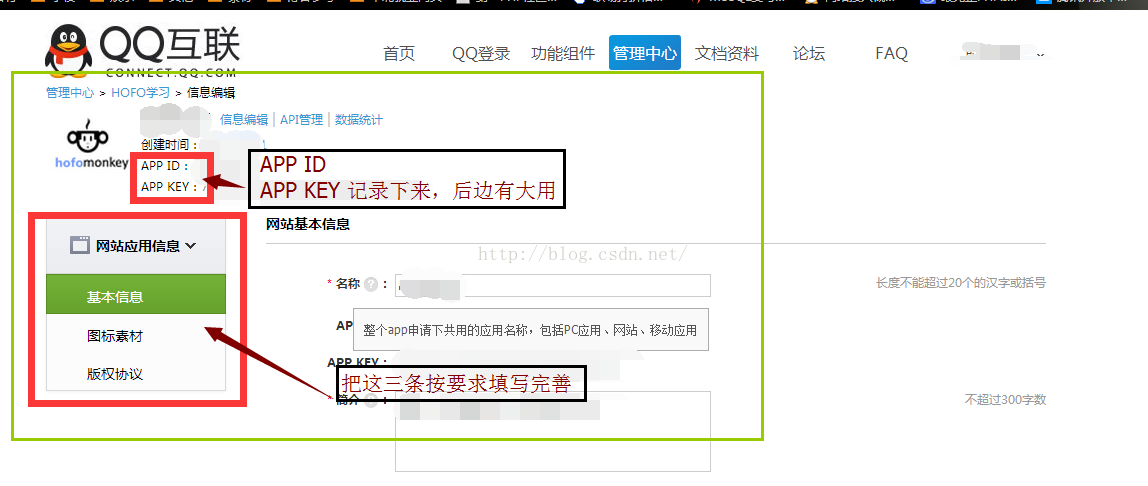
 4. Vervollständigen Sie nach erfolgreicher Bewerbung die Informationen
 abschließende Anforderungen, erhalten Sie APP_ID, APP_KEY
5 >
in Schreiben Sie es wie folgt in Ihre entsprechende PHP-DateiMethode 1, prozessorientierte Methode
Verwendung: Nachdem Sie $app_id, $app_secret, $my_url konfiguriert haben, kopieren Sie die anderen so, wie sie sind, und $ user_data sind die zurückgegebenen AnmeldeinformationenCode:
Methode 2, objektorientiert mit der Klasse QQ_LoginAction.class
//应用的APPID
$app_id = "你的APPID";
//应用的APPKEY
$app_secret = "你的APPKEY";
//【成功授权】后的回调地址,即此地址在腾讯的信息中有储存
$my_url = "你的回调网址";
//Step1:获取Authorization Code
session_start();
$code = $_REQUEST["code"];//存放Authorization Code
if(empty($code))
{
//state参数用于防止CSRF攻击,成功授权后回调时会原样带回
$_SESSION['state'] = md5(uniqid(rand(), TRUE));
//拼接URL
$dialog_url = "https://graph.qq.com/oauth2.0/authorize?response_type=code&client_id="
. $app_id . "&redirect_uri=" . urlencode($my_url) . "&state="
. $_SESSION['state'];
echo("<script> top.location.href='" . $dialog_url . "'</script>");
}
//Step2:通过Authorization Code获取Access Token
if($_REQUEST['state'] == $_SESSION['state'] || 1)
{
//拼接URL
$token_url = "https://graph.qq.com/oauth2.0/token?grant_type=authorization_code&"
. "client_id=" . $app_id . "&redirect_uri=" . urlencode($my_url)
. "&client_secret=" . $app_secret . "&code=" . $code;
$response = file_get_contents($token_url);
if (strpos($response, "callback") !== false)//如果登录用户临时改变主意取消了,返回true!==false,否则执行step3
{
$lpos = strpos($response, "(");
$rpos = strrpos($response, ")");
$response = substr($response, $lpos + 1, $rpos - $lpos -1);
$msg = json_decode($response);
if (isset($msg->error))
{
echo "<h3>error:</h3>" . $msg->error;
echo "<h3>msg :</h3>" . $msg->error_description;
exit;
}
}
//Step3:使用Access Token来获取用户的OpenID
$params = array();
parse_str($response, $params);//把传回来的数据参数变量化
$graph_url = "https://graph.qq.com/oauth2.0/me?access_token=".$params['access_token'];
$str = file_get_contents($graph_url);
if (strpos($str, "callback") !== false)
{
$lpos = strpos($str, "(");
$rpos = strrpos($str, ")");
$str = substr($str, $lpos + 1, $rpos - $lpos -1);
}
$user = json_decode($str);//存放返回的数据 client_id ,openid
if (isset($user->error))
{
echo "<h3>error:</h3>" . $user->error;
echo "<h3>msg :</h3>" . $user->error_description;
exit;
}
//echo("Hello " . $user->openid);
//echo("Hello " . $params['access_token']);
//Step4:使用<span style="font-family: Arial, Helvetica, sans-serif;">openid,</span><span style="font-family: Arial, Helvetica, sans-serif;">access_token来获取所接受的用户信息。</span>
$user_data_url = "https://graph.qq.com/user/get_user_info?access_token={$params['access_token']}&oauth_consumer_key={$app_id}&openid={$user->openid}&format=json";
$user_data = file_get_contents($user_data_url);//此为获取到的user信息
}
else
{
echo("The state does not match. You may be a victim of CSRF.");
}1. APPID, APPKEY CALLBACK (Rückruf) richtig konfigurieren URL) in QQ_LoginAction.class2. In der aufrufenden Methode lautet der Code:
3. Auf der Rückrufseite lautet der Code:
$qq_login = new \Component\QQ_LoginAction();    //引入此类文件即可
$qq_login->qq_login();          //调用登录方法,向腾讯发出快速登录请求
4 . $user_data sind die zurückgegebenen Benutzerdaten.
5.QQ_LoginAction.class.php-Dateicode: [ThinkPHP3.2 verwendet]$qc = new \Component\QQ_LoginAction(); $acs = $qc->qq_callback();<span style="white-space:pre"> //access_token $oid=$qc->get_openid();<span style="white-space:pre"> //openid $user_data = $qc->get_user_info();<span style="white-space:pre"> //get_user_info()为获得该用户的信息,其他操作方法见API文档
Methode drei, objektorientiert unter Verwendung des von Tencent bereitgestellten SDK
<?php
namespace Component;
session_start();
define('APPID','XXXX'); //appid
define('APPKEY','XXXX'); //appkey
define('CALLBACK','XXXX'); //回调地址
define('SCOPE','get_user_info,list_album,add_album,upload_pic,add_topic,add_weibo'); //授权接口列表
class QQ_LoginAction {
const GET_AUTH_CODE_URL = "https://graph.qq.com/oauth2.0/authorize";
const GET_ACCESS_TOKEN_URL = "https://graph.qq.com/oauth2.0/token";
const GET_OPENID_URL = "https://graph.qq.com/oauth2.0/me";
private $APIMap = array(
"get_user_info" => array( //获取用户资料
"https://graph.qq.com/user/get_user_info",
array("format" => "json"),
),
"add_t" => array( //发布一条普通微博
"https://graph.qq.com/t/add_t",
array("format" => "json", "content","#clientip","#longitude","#latitude","#compatibleflag"),
"POST"
),
"add_pic_t" => array( //发布一条图片微博
"https://graph.qq.com/t/add_pic_t",
array("content", "pic", "format" => "json", "#clientip", "#longitude", "#latitude", "#syncflag", "#compatiblefalg"),
"POST"
),
"del_t" => array( //删除一条微博
"https://graph.qq.com/t/del_t",
array("id", "format" => "json"),
"POST"
),
"get_repost_list" => array( //获取单条微博的转发或点评列表
"https://graph.qq.com/t/get_repost_list",
array("flag", "rootid", "pageflag", "pagetime", "reqnum", "twitterid", "format" => "json")
),
"get_info" => array( //获取当前用户资料
"https://graph.qq.com/user/get_info",
array("format" => "json")
),
"get_other_info" => array( //获取其他用户资料
"https://graph.qq.com/user/get_other_info",
array("format" => "json", "#name-1", "#fopenid-1")
),
"get_fanslist" => array(
"https://graph.qq.com/relation/get_fanslist", //我的微博粉丝列表
array("format" => "json", "reqnum", "startindex", "#mode", "#install", "#sex")
),
"get_idollist" => array(
"https://graph.qq.com/relation/get_idollist", //我的微博收听列表
array("format" => "json", "reqnum", "startindex", "#mode", "#install")
),
"add_idol" => array(
"https://graph.qq.com/relation/add_idol", //微博收听某用户
array("format" => "json", "#name-1", "#fopenids-1"),
"POST"
),
"del_idol" => array( //微博取消收听某用户
"https://graph.qq.com/relation/del_idol",
array("format" => "json", "#name-1", "#fopenid-1"),
"POST"
)
);
private $keysArr;
function __construct(){
if($_SESSION["openid"]){
$this->keysArr = array(
"oauth_consumer_key" => APPID,
"access_token" => $_SESSION['access_token'],
"openid" => $_SESSION["openid"]
);
}else{
$this->keysArr = array(
"oauth_consumer_key" => APPID
);
}
}
public function qq_login(){
//-------生成唯一随机串防CSRF攻击
$_SESSION['state'] = md5(uniqid(rand(), TRUE));
$keysArr = array(
"response_type" => "code",
"client_id" => APPID,
"redirect_uri" => CALLBACK,
"state" => $_SESSION['state'],
"scope" => SCOPE
);
$login_url = self::GET_AUTH_CODE_URL.'?'.http_build_query($keysArr);
header("Location:$login_url");
}
public function qq_callback(){
//--------验证state防止CSRF攻击
if($_GET['state'] != $_SESSION['state']){
return false;
}
//-------请求参数列表
$keysArr = array(
"grant_type" => "authorization_code",
"client_id" => APPID,
"redirect_uri" => CALLBACK,
"client_secret" => APPKEY,
"code" => $_GET['code']
);
//------构造请求access_token的url
$token_url = self::GET_ACCESS_TOKEN_URL.'?'.http_build_query($keysArr);
$response = $this->get_contents($token_url);
if(strpos($response, "callback") !== false){
$lpos = strpos($response, "(");
$rpos = strrpos($response, ")");
$response = substr($response, $lpos + 1, $rpos - $lpos -1);
$msg = json_decode($response);
if(isset($msg->error)){
$this->showError($msg->error, $msg->error_description);
}
}
$params = array();
parse_str($response, $params);
$_SESSION["access_token"]=$params["access_token"];
$this->keysArr['access_token']=$params['access_token'];
return $params["access_token"];
}
public function get_contents($url){
if (ini_get("allow_url_fopen") == "1") {
$response = file_get_contents($url);
}else{
$ch = curl_init();
curl_setopt($ch, CURLOPT_SSL_VERIFYPEER, FALSE);
curl_setopt($ch, CURLOPT_RETURNTRANSFER, TRUE);
curl_setopt($ch, CURLOPT_URL, $url);
$response = curl_exec($ch);
curl_close($ch);
}
if(empty($response)){
return false;
}
return $response;
}
public function get_openid(){
//-------请求参数列表
$keysArr = array(
"access_token" => $_SESSION["access_token"]
);
$graph_url = self::GET_OPENID_URL.'?'.http_build_query($keysArr);
$response = $this->get_contents($graph_url);
//--------检测错误是否发生
if(strpos($response, "callback") !== false){
$lpos = strpos($response, "(");
$rpos = strrpos($response, ")");
$response = substr($response, $lpos + 1, $rpos - $lpos -1);
}
$user = json_decode($response);
if(isset($user->error)){
$this->showError($user->error, $user->error_description);
}
//------记录openid
$_SESSION['openid']=$user->openid;
$this->keysArr['openid']=$user->openid;
return $user->openid;
}
/**
* showError
* 显示错误信息
* @param int $code 错误代码
* @param string $description 描述信息(可选)
*/
public function showError($code, $description = '$'){
echo "<meta charset=\"UTF-8\">";
echo "<h3>error:</h3>$code";
echo "<h3>msg :</h3>$description";
exit();
}
/**
* _call
* 魔术方法,做api调用转发
* @param string $name 调用的方法名称
* @param array $arg 参数列表数组
* @since 5.0
* @return array 返加调用结果数组
*/
public function __call($name,$arg){
//如果APIMap不存在相应的api
if(empty($this->APIMap[$name])){
$this->showError("api调用名称错误","不存在的API: <span style='color:red;'>$name</span>");
}
//从APIMap获取api相应参数
$baseUrl = $this->APIMap[$name][0];
$argsList = $this->APIMap[$name][1];
$method = isset($this->APIMap[$name][2]) ? $this->APIMap[$name][2] : "GET";
if(empty($arg)){
$arg[0] = null;
}
$responseArr = json_decode($this->_applyAPI($arg[0], $argsList, $baseUrl, $method),true);
//检查返回ret判断api是否成功调用
if($responseArr['ret'] == 0){
return $responseArr;
}else{
$this->showError($responseArr['ret'], $responseArr['msg']);
}
}
//调用相应api
private function _applyAPI($arr, $argsList, $baseUrl, $method){
$pre = "#";
$keysArr = $this->keysArr;
$optionArgList = array();//一些多项选填参数必选一的情形
foreach($argsList as $key => $val){
$tmpKey = $key;
$tmpVal = $val;
if(!is_string($key)){
$tmpKey = $val;
if(strpos($val,$pre) === 0){
$tmpVal = $pre;
$tmpKey = substr($tmpKey,1);
if(preg_match("/-(\d$)/", $tmpKey, $res)){
$tmpKey = str_replace($res[0], "", $tmpKey);
$optionArgList[]= $tmpKey;
}
}else{
$tmpVal = null;
}
}
//-----如果没有设置相应的参数
if(!isset($arr[$tmpKey]) || $arr[$tmpKey] === ""){
if($tmpVal == $pre){
continue;
}else if($tmpVal){//则使用默认的值
$arr[$tmpKey] = $tmpVal;
}else{
$this->showError("api调用参数错误","未传入参数$tmpKey");
}
}
$keysArr[$tmpKey] = $arr[$tmpKey];
}
//检查选填参数必填一的情形
if(count($optionArgList)!=0){
$n = 0;
foreach($optionArgList as $val){
if(in_array($val, array_keys($keysArr))){
$n++;
}
}
if(!$n){
$str = implode(",",$optionArgList);
$this->showError("api调用参数错误",$str."必填一个");
}
}
if($method == "POST"){
$response = $this->post($baseUrl, $keysArr, 0);
}else if($method == "GET"){
$baseUrl=$baseUrl.'?'.http_build_query($keysArr);
$response = $this->get_contents($baseUrl);
}
return $response;
}
public function post($url, $keysArr, $flag = 0){
$ch = curl_init();
if(! $flag) curl_setopt($ch, CURLOPT_SSL_VERIFYPEER, FALSE);
curl_setopt($ch, CURLOPT_RETURNTRANSFER, TRUE);
curl_setopt($ch, CURLOPT_POST, TRUE);
curl_setopt($ch, CURLOPT_POSTFIELDS, $keysArr);
curl_setopt($ch, CURLOPT_URL, $url);
$ret = curl_exec($ch);
curl_close($ch);
return $ret;
}
}Adresse: http://wiki.connect.qq.com/%E7%BD%91%E7%AB%99%E6%8E%A5%E5% 85%A5%E6 %A6%82%E8%BF%B0
Auf diese Weise ist die QQ-Schnellanmeldung tatsächlich ganz einfach.
Wenn etwas unklar ist, können Sie die offizielle Einführung für weitere Details lesen,
Tipps: So testen Sie die QQ-Schnellanmeldung lokal
Methode: Ändern Sie die HOST-Konfigurationsdatei
2. 127.0.0.1 www.test.com
hinzufügen und fertig.
Das Obige ist der gesamte Inhalt dieses Artikels. Ich hoffe, dass er zum Lernen aller beiträgt. Ich hoffe auch, dass jeder die PHP-Chinesisch-Website unterstützt.
In Verbindung stehende Artikel
Mehr sehen- So verwenden Sie cURL zum Implementieren von Get- und Post-Anfragen in PHP
- So verwenden Sie cURL zum Implementieren von Get- und Post-Anfragen in PHP
- So verwenden Sie cURL zum Implementieren von Get- und Post-Anfragen in PHP
- So verwenden Sie cURL zum Implementieren von Get- und Post-Anfragen in PHP
- Alle Ausdruckssymbole in regulären Ausdrücken (Zusammenfassung)

