
Heim >Web-Frontend >js-Tutorial >情人节专属 纯js脚本1k大小的3D玫瑰效果_javascript技巧
情人节专属 纯js脚本1k大小的3D玫瑰效果_javascript技巧

- WBOYWBOYWBOYWBOYWBOYWBOYWBOYWBOYWBOYWBOYWBOYWBOYWBOriginal
- 2016-05-16 17:56:201088Durchsuche
前年圣诞节上,西班牙程序员Roman Cortes带来了用纯javascript脚本编写的神奇3D圣诞树,令人印象深刻。2月14日情人节就要来临了,还是Roman Cortes,这次他又带来了用javascript脚本编写的红色玫瑰花。用代码做出的玫瑰花,这才是牛逼程序员送给女友的最好情人节礼物呢!(提示:在不同浏览器下观看效果、速度会有很大的不同)
图片是由代码生成,用户可以刷新该页面,重复观看这朵玫瑰的呈现过程。
3D玫瑰花的实现代码如下:
|
with(m=Math)C=cos,S=sin,P=pow,R=random;c.width=c.height=f=500;h=-250;function p(a,b,c){if(c>60)return[S(a*7)*(13+5/(.2+P(b*4,4)))-S(b)*50,b*f+50,625+C(a*7)*(13+5/(.2+P(b*4,4)))+b*400,a*1-b/2,a];A=a*2-1;B=b*2-1;if(A*A+B*B37){n=(j=c&1)?6:4;o=.5/(a+.01)+C(b*125)*3-a*300;w=b*h;return[o*C(n)+w*S(n)+j*610-390,o*S(n)-w*C(n)+550-j*350,1180+C(B+A)*99-j*300,.4-a*.1+P(1-B*B,-h*6)*.15-a*b*.4+C(a+b)/5+P(C((o*(a+1)+(B>0?w:-w))/25),30)*.1*(1-B*B),o/1e3+.7-o*w*3e-6]}if(c>32){c=c*1.16-.15;o=a*45-20;w=b*b*h;z=o*S(c)+w*C(c)+620;return[o*C(c)-w*S(c),28+C(B*.5)*99-b*b*b*60-z/2-h,z,(b*b*.3+P((1-(A*A)),7)*.15+.3)*b,b*.7]}o=A*(2-b)*(80-c*2);w=99-C(A)*120-C(b)*(-h-c*4.9)+C(P(1-b,7))*50+c*2;z=o*S(c)+w*C(c)+700;return[o*C(c)-w*S(c),B*99-C(P(b, 7))*50-c/3-z/1.35+450,z,(1-b/1.2)*.9+a*.1, P((1-b),20)/4+.05]}}setInterval('for(i=0;iz)m[q]=z,a.fillStyle="rgb("+~(s[3]*h)+","+~(s[4]*h)+","+~(s[3]*s[3]*-80)+")",a.fillRect(x,y,1,1)}',0) |
当然,感兴趣的人可以了解下面的实现过程与相关理论:
这朵三维代码玫瑰的呈现效果采用了蒙特卡罗方法,创造者对蒙特卡罗方法非常推崇,他表示在功能优化和采样方面,蒙特卡罗方法是“令人难以置信的强大工具”。关于蒙特卡罗方法可以参考:Monte Carlo method 。
具体操作:
外观采样呈现效果绘制
我用了多个不同的形状图来组成这朵代码玫瑰。共使用了31个形状:24个花瓣,4个萼片,2个叶子和1根花茎,其中每一个形状图都用代码进行描绘。
首先,来定义一个采样范围:
|
function surface(a, b) { // I'm using a and b as parameters ranging from 0 to 1. return { x: a*50, y: b*50 }; // this surface will be a square of 50x50 units of size } |
然后,编写形状描绘代码:
|
var canvas = document.body.appendChild(document.createElement("canvas")), context = canvas.getContext("2d"), a, b, position; // Now I'm going to sample the surface at .1 intervals for a and b parameters: for (a = 0; a for (b = 0; b position = surface(a, b); context.fillRect(position.x, position.y, 1, 1); } } |
这时,看到的效果是这样的:
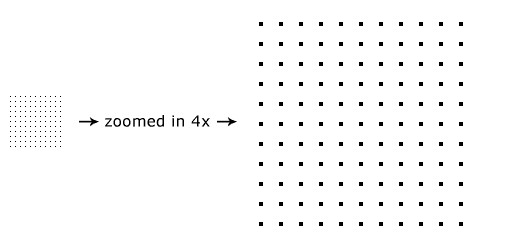
现在,尝试一下更密集的采样间隔:
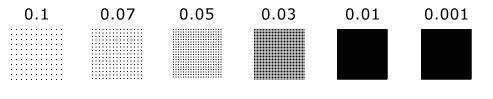
正如现在所看到的,因为采样间隔越来越密集,点越来越接近,到最高密度时,相邻点之间的距离小于一个像素,肉眼就看不到间隔(见0.01)。为了不造成太大的视觉差,再进一步缩小采样间隔,此时,绘制区已经填满(比较结果为0.01和0.001)。
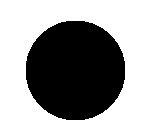
接下来,我用这个公式来绘制一个圆形:(X-X0)^ 2 +(Y-Y0)^ 2
|
function surface(a, b) { var x = a * 100, y = b * 100, radius = 50, x0 = 50, y0 = 50; if ((x - x0) * (x - x0) + (y - y0) * (y - y0) // inside the circle return { x: x, y: y }; } else { // outside the circle return null; } } |
为了防止溢出,还要加上一个采样条件:
|
if (position = surface(a, b)) { context.fillRect(position.x, position.y, 1, 1); } |
结果如下:
有不同的方法来定义一个圆,其中一些并不需要拒绝采样。我并无一定要使用哪一种来定义圆圈的意思,所以下面用另一种方法来定义一个圆:
|
function surface(a, b) { // Circle using polar coordinates var angle = a * Math.PI * 2, radius = 50, x0 = 50, y0 = 50; return { x: Math.cos(angle) * radius * b + x0, y: Math.sin(angle) * radius * b + y0 }; } |
如图:

(此方法相比前一个方法需要密集采样以进行填充。)
好了,现在让圆变形,以使它看起来更像是一个花瓣:
|
function surface(a, b) { var x = a * 100, y = b * 100, radius = 50, x0 = 50, y0 = 50; if ((x - x0) * (x - x0) + (y - y0) * (y - y0) return { x: x, y: y * (1 + b) / 2 // deformation }; } else { return null; } } |
结果:
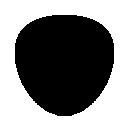
这看起来已经很像一个玫瑰花瓣的形状了。在这里也可以试试通过修改一些函数数值,将会出现很多有趣的形状。
接下来应该给它添加色彩了:
|
function surface(a, b) { var x = a * 100, y = b * 100, radius = 50, x0 = 50, y0 = 50; if ((x - x0) * (x - x0) + (y - y0) * (y - y0) return { x: x, y: y * (1 + b) / 2, r: 100 + Math.floor((1 - b) * 155), // this will add a gradient g: 50, b: 50 }; } else { return null; } } for (a = 0; a for (b = 0; b if (point = surface(a, b)) { context.fillStyle = "rgb(" + point.r + "," + point.g + "," + point.b + ")"; context.fillRect(point.x, point.y, 1, 1); } } } |
结果:
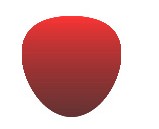
一片带色的花瓣就出现了。
3D曲面和透视投影
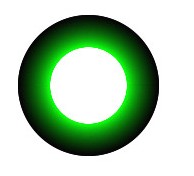
定义三维表面很简单,比如,来定义一个管状物体:
|
function surface(a, b) { var angle = a * Math.PI * 2, radius = 100, length = 400; return { x: Math.cos(angle) * radius, y: Math.sin(angle) * radius, z: b * length - length / 2, // by subtracting length/2 I have centered the tube at (0, 0, 0) r: 0, g: Math.floor(b * 255), b: 0 }; } |
接着添加投影透视图,首先需要我们定义一个摄像头:
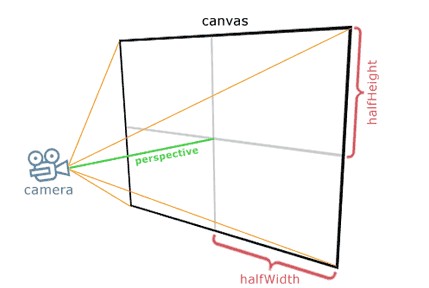
如上图,将摄像头放置在(0,0,Z)位置,画布在X / Y平面。投影到画布上的采样点为:
|
var pX, pY, // projected on canvas x and y coordinates perspective = 350, halfHeight = canvas.height / 2, halfWidth = canvas.width / 2, cameraZ = -700; for (a = 0; a for (b = 0; b if (point = surface(a, b)) { pX = (point.x * perspective) / (point.z - cameraZ) + halfWidth; pY = (point.y * perspective) / (point.z - cameraZ) + halfHeight; context.fillStyle = "rgb(" + point.r + "," + point.g + "," + point.b + ")"; context.fillRect(pX, pY, 1, 1); } } } |
效果为:
z-buffer
z-buffer在计算机图形学中是一个相当普遍的技术,在为物件进行着色时,执行“隐藏面消除”工作,使隐藏物件背后的部分就不会被显示出来。

上图是用z-buffer技术处理后的玫瑰。(可以看到已经具有立体感了)
代码如下:
|
var zBuffer = [], zBufferIndex; for (a = 0; a for (b = 0; b if (point = surface(a, b)) { pX = Math.floor((point.x * perspective) / (point.z - cameraZ) + halfWidth); pY = Math.floor((point.y * perspective) / (point.z - cameraZ) + halfHeight); zBufferIndex = pY * canvas.width + pX; if ((typeof zBuffer[zBufferIndex] === "undefined") || (point.z zBuffer[zBufferIndex] = point.z; context.fillStyle = "rgb(" + point.r + "," + point.g + "," + point.b + ")"; context.fillRect(pX, pY, 1, 1); } } } } |
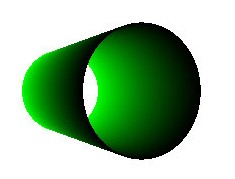
旋转
你可以使用任何矢量旋转的方法。在代码玫瑰的创建中,我使用的是欧拉旋转。现在将之前编写的管状物进行旋转,实现绕Y轴旋转:
|
function surface(a, b) { var angle = a * Math.PI * 2, radius = 100, length = 400, x = Math.cos(angle) * radius, y = Math.sin(angle) * radius, z = b * length - length / 2, yAxisRotationAngle = -.4, // in radians! rotatedX = x * Math.cos(yAxisRotationAngle) + z * Math.sin(yAxisRotationAngle), rotatedZ = x * -Math.sin(yAxisRotationAngle) + z * Math.cos(yAxisRotationAngle); return { x: rotatedX, y: y, z: rotatedZ, r: 0, g: Math.floor(b * 255), b: 0 }; } |
效果:
蒙特卡罗方法
关于采样时间,间隔过大过小都会引起极差的视觉感受,所以,需要设置合理的采样间隔,这里使用蒙特卡罗方法。
|
var i; window.setInterval(function () { for (i = 0; i if (point = surface(Math.random(), Math.random())) { pX = Math.floor((point.x * perspective) / (point.z - cameraZ) + halfWidth); pY = Math.floor((point.y * perspective) / (point.z - cameraZ) + halfHeight); zBufferIndex = pY * canvas.width + pX; if ((typeof zBuffer[zBufferIndex] === "undefined") || (point.z zBuffer[zBufferIndex] = point.z; context.fillStyle = "rgb(" + point.r + "," + point.g + "," + point.b + ")"; context.fillRect(pX, pY, 1, 1); } } } }, 0); |
设置a和b为随机参数,用足够的采样完成表面填充。我每次绘制10000点,然后静待屏幕完成更新。
另外需要注意的是,如果随机数发生错误时,表面填充效果会出错。有些浏览器中,Math.random的执行是线性的,这就有可能导致表面填充效果出错。这时,就得使用类似Mersenne Twister(一种随机数算法)这样的东西去进行高质量的PRNG采样,从而避免错误的发生。
完成
为了使玫瑰的每个部分在同一时间完成并呈现,还需要添加一个功能,为每部分设置一个参数以返回值来进行同步。并用一个分段函数代表玫瑰的各个部分。比如在花瓣部分,我用旋转和变形来创建它们。
虽然表面采样方法是创建三维图形非常著名的、最古老的方法之一,但这种把蒙特卡罗、z-buffer加入到表面采样中的方法并不常见。对于现实生活场景的制作,这也许算不上很有创意,但它简易的代码实现和很小的体积仍令人满意。
希望这篇文章能激发计算机图形学爱好者来尝试不同的呈现方法,并从中获得乐趣。(Roman Cortes)
英文原址:romancortes.com
In Verbindung stehende Artikel
Mehr sehen- Eine eingehende Analyse der Bootstrap-Listengruppenkomponente
- Detaillierte Erläuterung des JavaScript-Funktions-Curryings
- Vollständiges Beispiel für die Generierung von JS-Passwörtern und die Erkennung der Stärke (mit Download des Demo-Quellcodes)
- Angularjs integriert WeChat UI (weui)
- Wie man mit JavaScript schnell zwischen traditionellem Chinesisch und vereinfachtem Chinesisch wechselt und wie Websites den Wechsel zwischen vereinfachtem und traditionellem Chinesisch unterstützen – Javascript-Kenntnisse