前言
上一篇文章,我们讲解了图像的虚拟边缘,这篇文章开始进行平滑(也就是模糊)处理。
基本原理
这里直接引用OpenCV 2.4+ C++ 平滑处理和OpenCV 2.4+ C++ 边缘梯度计算的相关内容:
平滑也称模糊, 是一项简单且使用频率很高的图像处理方法。
平滑处理时需要用到一个滤波器
。 最常用的滤波器是线性 滤波器,线性滤波处理的输出像素值(例如:)是输入像素值(例如:
)的加权平均:
, 它仅仅是一个加权系数。
称为核
这里涉及一种叫做“卷积”的运算,那么卷积是什么呢?
卷积是在每一个图像块与某个算子(核)之间进行的运算。
核?!
nbsp;dsds
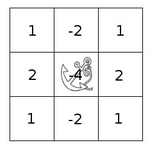
核就是一个固定大小的数值数组。该数组带有一个锚点
,一般位于数组中央。

可是这怎么运算啊?
假如你想得到图像的某个特定位置的卷积值,可用下列方法计算:
将核的锚点放在该特定位置的像素上,同时,核内的其他值与该像素邻域的各像素重合;将核内各值与相应像素值相乘,并将乘积相加;将所得结果放到与锚点对应的像素上;对图像所有像素重复上述过程。
用公式表示上述过程如下:
在图像边缘的卷积怎么办呢?
计算卷积前,需要通过复制源图像的边界创建虚拟像素,这样边缘的地方也有足够像素计算卷积了。这就是为什么上一篇文章需要做虚拟边缘函数。
均值平滑
均值平滑实际上就是内核元素全是1的卷积运算,然后再除以内核的大小,用数学表达式来表示就是:

下面我们来实现均值平滑函数blur:
function blur(__src, __size1, __size2, __borderType, __dst){
if(__src.type && __src.type == "CV_RGBA"){
var height = __src.row,
width = __src.col,
dst = __dst || new Mat(height, width, CV_RGBA),
dstData = dst.data;
var size1 = __size1 || 3,
size2 = __size2 || size1,
size = size1 * size2;
if(size1 % 2 !== 1 || size2 % 2 !== 1){
console.error("size大小必须是奇数");
return __src;
}
var startX = Math.floor(size1 / 2),
startY = Math.floor(size2 / 2);
var withBorderMat = copyMakeBorder(__src, startY, startX, 0, 0, __borderType),
mData = withBorderMat.data,
mWidth = withBorderMat.col;
var newValue, nowX, offsetY, offsetI;
var i, j, c, y, x;
for(i = height; i--;){
offsetI = i * width;
for(j = width; j--;){
for(c = 3; c--;){
newValue = 0;
for(y = size2; y--;){
offsetY = (y + i) * mWidth * 4;
for(x = size1; x--;){
nowX = (x + j) * 4 + c;
newValue += mData[offsetY + nowX];
}
}
dstData[(j + offsetI) * 4 + c] = newValue / size;
}
dstData[(j + offsetI) * 4 + 3] = mData[offsetY + startY * mWidth * 4 + (j + startX) * 4 + 3];
}
}
}else{
console.error("不支持类型。");
}
return dst;
}
其中size1和size2分别是核的横向和纵向大小,并且必须是正奇数。
高斯平滑
最有用的滤波器 (尽管不是最快的)。 高斯滤波是将输入数组的每一个像素点与高斯内核
卷积将卷积和当作输出像素值。
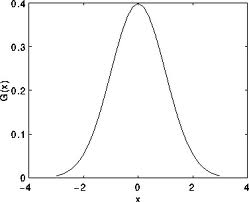
参考一维高斯函数,我们可以看见,他是个中间大两边小的函数。
所以高斯滤波器其加权数是中间大,四周小的。
其二维高斯函数为:

其中
 为均值 (峰值对应位置),
 代表标准差 (变量
 和 变量
和 变量
 各有一个均值,也各有一个标准差)。
这里参考OpenCV的实现,不过应该还有优化空间,因为还没用到分离滤波器。
首先我们做一个getGaussianKernel来返回高斯滤波器的一维数组。
function getGaussianKernel(__n, __sigma){
var SMALL_GAUSSIAN_SIZE = 7,
smallGaussianTab = [[1],
[0.25, 0.5, 0.25],
[0.0625, 0.25, 0.375, 0.25, 0.0625],
[0.03125, 0.109375, 0.21875, 0.28125, 0.21875, 0.109375, 0.03125]
];
var fixedKernel = __n & 2 == 1 && __n > 1] : 0;
var sigmaX = __sigma > 0 ? __sigma : ((__n - 1) * 0.5 - 1) * 0.3 + 0.8,
scale2X = -0.5 / (sigmaX * sigmaX),
sum = 0;
var i, x, t, kernel = [];
for(i = 0; i x = i - (__n - 1) * 0.5;
t = fixedKernel ? fixedKernel[i] : Math.exp(scale2X * x * x);
kernel[i] = t;
sum += t;
}
sum = 1 / sum;
for(i = __n; i--;){
kernel[i] *= sum;
}
return kernel;
};
然后通过两个这个一维数组,便可以计算出一个完整的高斯内核,再利用blur里面用到的循环方法,就可以算出高斯平滑后的矩阵了。
function GaussianBlur(__src, __size1, __size2, __sigma1, __sigma2, __borderType, __dst){
if(__src.type && __src.type == "CV_RGBA"){
var height = __src.row,
width = __src.col,
dst = __dst || new Mat(height, width, CV_RGBA),
dstData = dst.data;
var sigma1 = __sigma1 || 0,
sigma2 = __sigma2 || __sigma1;
var size1 = __size1 || Math.round(sigma1 * 6 + 1) | 1,
size2 = __size2 || Math.round(sigma2 * 6 + 1) | 1,
size = size1 * size2;
if(size1 % 2 !== 1 || size2 % 2 !== 1){
console.error("size必须是奇数。");
return __src;
}
var startX = Math.floor(size1 / 2),
startY = Math.floor(size2 / 2);
var withBorderMat = copyMakeBorder(__src, startY, startX, 0, 0, __borderType),
mData = withBorderMat.data,
mWidth = withBorderMat.col;
var kernel1 = getGaussianKernel(size1, sigma1),
kernel2,
kernel = new Array(size1 * size2);
if(size1 === size2 && sigma1 === sigma2)
kernel2 = kernel1;
else
kernel2 = getGaussianKernel(size2, sigma2);
var i, j, c, y, x;
for(i = kernel2.length; i--;){
for(j = kernel1.length; j--;){
kernel[i * size1 + j] = kernel2[i] * kernel1[j];
}
}
var newValue, nowX, offsetY, offsetI;
for(i = height; i--;){
offsetI = i * width;
for(j = width; j--;){
for(c = 3; c--;){
newValue = 0;
for(y = size2; y--;){
offsetY = (y + i) * mWidth * 4;
for(x = size1; x--;){
nowX = (x + j) * 4 + c;
newValue += (mData[offsetY + nowX] * kernel[y * size1 + x]);
}
}
dstData[(j + offsetI) * 4 + c] = newValue;
}
dstData[(j + offsetI) * 4 + 3] = mData[offsetY + startY * mWidth * 4 + (j + startX) * 4 + 3];
}
}
}else{
console.error("不支持的类型");
}
return dst;
}
中值平滑
中值滤波将图像的每个像素用邻域 (以当前像素为中心的正方形区域)像素的
中值代替 。依然使用blur里面用到的循环,只要得到核中的所有值,再通过sort排序便可以得到中值,然后锚点由该值替代。
function medianBlur(__src, __size1, __size2, __borderType, __dst){
if(__src.type && __src.type == "CV_RGBA"){
var height = __src.row,
width = __src.col,
dst = __dst || new Mat(height, width, CV_RGBA),
dstData = dst.data;
var size1 = __size1 || 3,
size2 = __size2 || size1,
size = size1 * size2;
if(size1 % 2 !== 1 || size2 % 2 !== 1){
console.error("size必须是奇数");
return __src;
}
var startX = Math.floor(size1 / 2),
startY = Math.floor(size2 / 2);
var withBorderMat = copyMakeBorder(__src, startY, startX, 0, 0, __borderType),
mData = withBorderMat.data,
mWidth = withBorderMat.col;
var newValue = [], nowX, offsetY, offsetI;
var i, j, c, y, x;
for(i = height; i--;){
offsetI = i * width;
for(j = width; j--;){
for(c = 3; c--;){
for(y = size2; y--;){
offsetY = (y + i) * mWidth * 4;
for(x = size1; x--;){
nowX = (x + j) * 4 + c;
newValue[y * size1 + x] = mData[offsetY + nowX];
}
}
newValue.sort();
dstData[(j + offsetI) * 4 + c] = newValue[Math.round(size / 2)];
}
dstData[(j + offsetI) * 4 + 3] = mData[offsetY + startY * mWidth * 4 + (j + startX) * 4 + 3];
}
}
}else{
console.error("类型不支持");
}
return dst;
};
 Die Zukunft von Python und JavaScript: Trends und VorhersagenApr 27, 2025 am 12:21 AM
Zu den zukünftigen Trends von Python und JavaScript gehören: 1. Python wird seine Position in den Bereichen wissenschaftlicher Computer und KI konsolidieren. JavaScript wird die Entwicklung der Web-Technologie fördern. Beide werden die Anwendungsszenarien in ihren jeweiligen Bereichen weiter erweitern und mehr Durchbrüche in der Leistung erzielen.
 Python vs. JavaScript: Entwicklungsumgebungen und ToolsApr 26, 2025 am 12:09 AM
Sowohl Python als auch JavaScripts Entscheidungen in Entwicklungsumgebungen sind wichtig. 1) Die Entwicklungsumgebung von Python umfasst Pycharm, Jupyternotebook und Anaconda, die für Datenwissenschaft und schnelles Prototyping geeignet sind. 2) Die Entwicklungsumgebung von JavaScript umfasst Node.JS, VSCODE und WebPack, die für die Entwicklung von Front-End- und Back-End-Entwicklung geeignet sind. Durch die Auswahl der richtigen Tools nach den Projektbedürfnissen kann die Entwicklung der Entwicklung und die Erfolgsquote der Projekte verbessert werden.
 Ist JavaScript in C geschrieben? Prüfung der BeweiseApr 25, 2025 am 12:15 AM
Ja, der Motorkern von JavaScript ist in C. 1) Die C -Sprache bietet eine effiziente Leistung und die zugrunde liegende Steuerung, die für die Entwicklung der JavaScript -Engine geeignet ist. 2) Die V8-Engine als Beispiel wird sein Kern in C geschrieben, wobei die Effizienz und objektorientierte Eigenschaften von C kombiniert werden.
 JavaScripts Rolle: das Web interaktiv und dynamisch machenApr 24, 2025 am 12:12 AM
JavaScript ist das Herzstück moderner Websites, da es die Interaktivität und Dynamik von Webseiten verbessert. 1) Es ermöglicht die Änderung von Inhalten, ohne die Seite zu aktualisieren, 2) Webseiten durch DOMAPI zu manipulieren, 3) Komplexe interaktive Effekte wie Animation und Drag & Drop, 4) die Leistung und Best Practices optimieren, um die Benutzererfahrung zu verbessern.
 C und JavaScript: Die Verbindung erklärteApr 23, 2025 am 12:07 AM
C und JavaScript erreichen die Interoperabilität durch WebAssembly. 1) C -Code wird in das WebAssembly -Modul zusammengestellt und in die JavaScript -Umgebung eingeführt, um die Rechenleistung zu verbessern. 2) In der Spieleentwicklung kümmert sich C über Physik -Engines und Grafikwiedergabe, und JavaScript ist für die Spiellogik und die Benutzeroberfläche verantwortlich.
 Von Websites zu Apps: Die verschiedenen Anwendungen von JavaScriptApr 22, 2025 am 12:02 AM
JavaScript wird in Websites, mobilen Anwendungen, Desktop-Anwendungen und serverseitigen Programmierungen häufig verwendet. 1) In der Website -Entwicklung betreibt JavaScript DOM zusammen mit HTML und CSS, um dynamische Effekte zu erzielen und Frameworks wie JQuery und React zu unterstützen. 2) Durch reaktnatives und ionisches JavaScript wird ein plattformübergreifendes mobile Anwendungen entwickelt. 3) Mit dem Elektronenframework können JavaScript Desktop -Anwendungen erstellen. 4) Node.js ermöglicht es JavaScript, auf der Serverseite auszuführen und unterstützt hohe gleichzeitige Anforderungen.
 Python gegen JavaScript: Anwendungsfälle und Anwendungen verglichenApr 21, 2025 am 12:01 AM
Python eignet sich besser für Datenwissenschaft und Automatisierung, während JavaScript besser für die Entwicklung von Front-End- und Vollstapel geeignet ist. 1. Python funktioniert in Datenwissenschaft und maschinellem Lernen gut und unter Verwendung von Bibliotheken wie Numpy und Pandas für die Datenverarbeitung und -modellierung. 2. Python ist prägnant und effizient in der Automatisierung und Skripten. 3. JavaScript ist in der Front-End-Entwicklung unverzichtbar und wird verwendet, um dynamische Webseiten und einseitige Anwendungen zu erstellen. 4. JavaScript spielt eine Rolle bei der Back-End-Entwicklung durch Node.js und unterstützt die Entwicklung der Vollstapel.
 Die Rolle von C/C bei JavaScript -Dolmetschern und CompilernApr 20, 2025 am 12:01 AM
C und C spielen eine wichtige Rolle in der JavaScript -Engine, die hauptsächlich zur Implementierung von Dolmetschern und JIT -Compilern verwendet wird. 1) C wird verwendet, um JavaScript -Quellcode zu analysieren und einen abstrakten Syntaxbaum zu generieren. 2) C ist für die Generierung und Ausführung von Bytecode verantwortlich. 3) C implementiert den JIT-Compiler, optimiert und kompiliert Hot-Spot-Code zur Laufzeit und verbessert die Ausführungseffizienz von JavaScript erheblich.


Heiße KI -Werkzeuge

Undresser.AI Undress
KI-gestützte App zum Erstellen realistischer Aktfotos

AI Clothes Remover
Online-KI-Tool zum Entfernen von Kleidung aus Fotos.

Undress AI Tool
Ausziehbilder kostenlos

Clothoff.io
KI-Kleiderentferner

Video Face Swap
Tauschen Sie Gesichter in jedem Video mühelos mit unserem völlig kostenlosen KI-Gesichtstausch-Tool aus!

Heißer Artikel

Heiße Werkzeuge

PHPStorm Mac-Version
Das neueste (2018.2.1) professionelle, integrierte PHP-Entwicklungstool

mPDF
mPDF ist eine PHP-Bibliothek, die PDF-Dateien aus UTF-8-codiertem HTML generieren kann. Der ursprüngliche Autor, Ian Back, hat mPDF geschrieben, um PDF-Dateien „on the fly“ von seiner Website auszugeben und verschiedene Sprachen zu verarbeiten. Es ist langsamer und erzeugt bei der Verwendung von Unicode-Schriftarten größere Dateien als Originalskripte wie HTML2FPDF, unterstützt aber CSS-Stile usw. und verfügt über viele Verbesserungen. Unterstützt fast alle Sprachen, einschließlich RTL (Arabisch und Hebräisch) und CJK (Chinesisch, Japanisch und Koreanisch). Unterstützt verschachtelte Elemente auf Blockebene (wie P, DIV),

MinGW – Minimalistisches GNU für Windows
Dieses Projekt wird derzeit auf osdn.net/projects/mingw migriert. Sie können uns dort weiterhin folgen. MinGW: Eine native Windows-Portierung der GNU Compiler Collection (GCC), frei verteilbare Importbibliotheken und Header-Dateien zum Erstellen nativer Windows-Anwendungen, einschließlich Erweiterungen der MSVC-Laufzeit zur Unterstützung der C99-Funktionalität. Die gesamte MinGW-Software kann auf 64-Bit-Windows-Plattformen ausgeführt werden.

MantisBT
Mantis ist ein einfach zu implementierendes webbasiertes Tool zur Fehlerverfolgung, das die Fehlerverfolgung von Produkten unterstützen soll. Es erfordert PHP, MySQL und einen Webserver. Schauen Sie sich unsere Demo- und Hosting-Services an.

EditPlus chinesische Crack-Version
Geringe Größe, Syntaxhervorhebung, unterstützt keine Code-Eingabeaufforderungsfunktion


 )是输入像素值(例如:
 )的加权平均:

 称为核
称为核


