Heim >Web-Frontend >js-Tutorial >Ändern Sie die lokale Schnittstelle „bolt.new', um die Eingabe des API-Schlüssels zu ermöglichen
Ändern Sie die lokale Schnittstelle „bolt.new', um die Eingabe des API-Schlüssels zu ermöglichen
- Linda HamiltonOriginal
- 2024-11-23 14:24:16531Durchsuche
In Bolt.new kann der API-Schlüssel mithilfe von Umgebungsvariablen konfiguriert werden, aber dieses Mal werden wir ihn ändern, um die Eingabe des API-Schlüssels direkt über die Schnittstelle zu ermöglichen.
Änderungsdetails
Seitenleiste
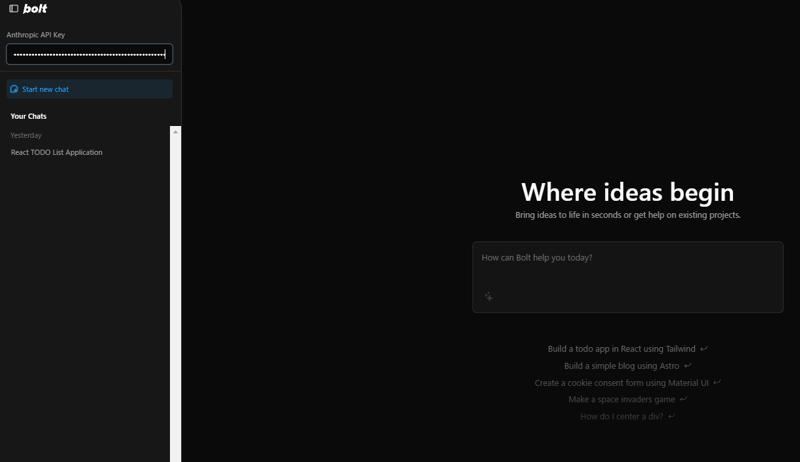
Wir ermöglichen die API-Schlüsseleingabe direkt über die Seitenleiste.
In der Seitenleiste, die derzeit den Chatverlauf anzeigt, fügen wir oben ein neues Formular zur Eingabe des API-Schlüssels ein.
Um dies zu erreichen, ändern Sie die Datei Bolt.new/app/components/sidebar/Menu.client.tsx.
Importieren Sie zunächst die Funktion zur Verarbeitung der API-Schlüsseleingabe:
import { ApiKeyInput } from '~/components/sidebar/ApiKeyInput';
Die Datei „bolt.new/app/components/sidebar/ApiKeyInput.tsx“ wird später erstellt.
Fügen Sie als Nächstes ein Formular zur Eingabe des API-Schlüssels im Menü hinzu.
...
  return (
      <motion.div
        ref={menuRef}
        initial="closed"
        animate={open ? 'open' : 'closed'}
        variants={menuVariants}
        className="flex flex-col side-menu fixed top-0 w-[350px] h-full bg-bolt-elements-background-depth-2 border-r rounded-r-3xl border-bolt-elements-borderColor z-sidebar shadow-xl shadow-bolt-elements-sidebar-dropdownShadow text-sm"
      >
        <div className="flex items-center h-[var(--header-height)]">{/* Placeholder */}</div>
        <div className="flex-1 flex flex-col h-full w-full overflow-hidden">
          <ApiKeyInput /> {/* Add this line */}
          <div className="p-4">
...
Der hinzugefügte Code sollte hier platziert werden.
Als nächstes erstellen Sie die Datei Bolt.new/app/components/sidebar/ApiKeyInput.tsx mit folgendem Inhalt:
import React, { useState } from 'react';

export function ApiKeyInput() {
  const [apiKey, setApiKey] = useState(localStorage.getItem('apiKey') || '');

  const handleChange = (event: React.ChangeEvent<HTMLInputElement>) => {
    const value = event.target.value;
    setApiKey(value);
    localStorage.setItem('apiKey', value);
    // Trigger API key change event
    window.dispatchEvent(new Event('apiKeyChanged'));
  };

  return (
    <div className="px-4 py-3 border-b border-bolt-elements-borderColor">
      <label
        htmlFor="api-key"
        className="block text-bolt-elements-textSecondary text-sm mb-2"
      >
        Anthropic API Key
      </label>
      <input
        type="password"
       >


<p>This component will allow the user to input and store the API key in localStorage and trigger a custom event when the key is changed.  </p>

<h3>


  Chat Screen Modification
</h3>

<p>Update the chat screen to disable message sending until an API key is entered.<br><br>
Below is the revised code for bolt.new/app/components/chat/BaseChat.client.tsx, with additions marked between // Append start and // Append end:<br>
</p>

<pre class="brush:php;toolbar:false">export const BaseChat = React.forwardRef<HTMLDivElement, BaseChatProps>(
  (
    {
      textareaRef,
      messageRef,
      scrollRef,
      showChat = true,
      chatStarted = false,
      isStreaming = false,
      enhancingPrompt = false,
      promptEnhanced = false,
      messages,
      input = '',
      sendMessage,
      handleInputChange,
      enhancePrompt,
      handleStop,
    },
    ref,
  ) => {
    // Append start
    const [isApiKeyMissing, setIsApiKeyMissing] = useState(true); // Track API key presence

    useEffect(() => {
      const checkApiKey = () => {
        const apiKey = localStorage.getItem('apiKey');
        console.log('apiKey:', apiKey);
        setIsApiKeyMissing(!apiKey);
      };

      // Initial check
      checkApiKey();

      // Add listener for API key changes
      window.addEventListener('apiKeyChanged', checkApiKey);

      return () => {
        window.removeEventListener('apiKeyChanged', checkApiKey);
      };
    }, []);
    // Append end

    const TEXTAREA_MAX_HEIGHT = chatStarted ? 400 : 200;

    return (
      <div
        ref={ref}
        className={classNames(
          styles.BaseChat,
          'relative flex h-full w-full overflow-hidden bg-bolt-elements-background-depth-1',
        )}
        data-chat-visible={showChat}
      >
        <ClientOnly>{() => <Menu />}</ClientOnly>
        <div ref={scrollRef} className="flex overflow-y-auto w-full h-full">
          <div className={classNames(styles.Chat, 'flex flex-col flex-grow min-w-[var(--chat-min-width)] h-full')}>
            {!chatStarted && (
              <div>


<p>This ensures that users cannot send messages until they enter an API key, with clear visual feedback provided.</p>

<h3>


  Passing the API Key to the LLM
</h3>

<p>To ensure the API key entered on the interface is accessible to the LLM, update the file bolt.new/app/lib/.server/llm/api-key.ts as follows:<br>
</p>

<pre class="brush:php;toolbar:false">import { env } from 'node:process';

export function getAPIKey(cloudflareEnv: Env) {
  // Append start
  const localApiKey = typeof window !== 'undefined' ? localStorage.getItem('apiKey') : null;
  return localApiKey || env.ANTHROPIC_API_KEY || cloudflareEnv.ANTHROPIC_API_KEY;
  // Append end
}
Dadurch wird sichergestellt, dass das System den über die Benutzeroberfläche eingegebenen API-Schlüssel (localApiKey) priorisiert. Wenn in localStorage kein Schlüssel gefunden wird, wird auf Umgebungsvariablen (env.ANTHROPIC_API_KEY oder cloudflareEnv.ANTHROPIC_API_KEY) zurückgegriffen.
Testen der Implementierung
Nach Abschluss der Änderungen verwenden Sie die folgenden Befehle, um Bolt.new zu erstellen und zu starten:
pnpm run build
pnpm run start
Schritte zur Verifizierung
- Starten Sie die Anwendung im Browser Bestätigen Sie, dass vor der Eingabe eines API-Schlüssels die Nachrichteneingabe deaktiviert ist und eine Warnung angezeigt wird.

- Geben Sie den API-Schlüssel ein Verwenden Sie das Formular in der Seitenleiste, um den API-Schlüssel einzugeben.

- Überprüfen Sie, ob Nachrichten gesendet werden können Bestätigen Sie nach Eingabe des API-Schlüssels, dass die Nachrichteneingabe aktiviert ist und Nachrichten erfolgreich gesendet werden können.

Diese Schritte stellen sicher, dass sich die Funktionalität nach den Änderungen wie vorgesehen verhält.
Das obige ist der detaillierte Inhalt vonÄndern Sie die lokale Schnittstelle „bolt.new', um die Eingabe des API-Schlüssels zu ermöglichen. Für weitere Informationen folgen Sie bitte anderen verwandten Artikeln auf der PHP chinesischen Website!
In Verbindung stehende Artikel
Mehr sehen- Eine eingehende Analyse der Bootstrap-Listengruppenkomponente
- Detaillierte Erläuterung des JavaScript-Funktions-Curryings
- Vollständiges Beispiel für die Generierung von JS-Passwörtern und die Erkennung der Stärke (mit Download des Demo-Quellcodes)
- Angularjs integriert WeChat UI (weui)
- Wie man mit JavaScript schnell zwischen traditionellem Chinesisch und vereinfachtem Chinesisch wechselt und wie Websites den Wechsel zwischen vereinfachtem und traditionellem Chinesisch unterstützen – Javascript-Kenntnisse

