Heim >Web-Frontend >HTML-Tutorial >Vite.js-Tutorial – So installieren und verwenden Sie Vite in Ihren Webprojekten
Vite.js-Tutorial – So installieren und verwenden Sie Vite in Ihren Webprojekten
- PHP中文网Original
- 2024-09-30 11:26:07798Durchsuche
Vite.js ist ein schnelles Entwicklungstool für moderne Webprojekte. Der Schwerpunkt liegt auf Geschwindigkeit und Leistung durch Verbesserung der Entwicklungserfahrung.
Vite verwendet native Browser-ES-Importe, um die Unterstützung moderner Browser ohne Build-Prozess zu ermöglichen.

Vite besteht aus zwei Hauptteilen:
- Der Entwicklungsserver bietet Unterstützung für Hot Module Replacement (HMR) zum Aktualisieren von Modulen während der Ausführung der Anwendung. Wenn Änderungen am Quellcode einer Anwendung vorgenommen werden, werden nur die Änderungen aktualisiert und nicht die gesamte Anwendung neu geladen. Diese Funktion hilft, die Entwicklungszeit zu verkürzen.
- Der Build-Befehl ermöglicht es Entwicklern, ihren Code mit Rollup zu bündeln, der vorkonfiguriert ist, um hochoptimierte statische Assets für die Produktion auszugeben.
Wie Vite. js funktioniert
Als ES-Module in ES2015 eingeführt wurden, unterstützten viele Browser ES6-Module nur unzureichend. Um dieses Problem zu beheben, unterstützen moderne Browser jetzt native ES-Module. Dadurch können Entwickler die Import- und Exportanweisungen nativ verwenden.
In nativem ES muss der Import entweder eine relative oder eine absolute URL erhalten, da reine Modulimporte wie:
import { someMethod } from 'my-dep'Der obige Code löst einen Fehler im Browser aus, da viele Browser keine Unterstützung für ES6-Module bieten. Die Frage ist nun also, wie Vite damit umgeht?Vite erkennt automatisch bloße Modulimporte aus Ihren Quelldateien und führt die folgenden zwei Aktionen für sie aus:
- Vite wird vor- Bündeln Sie die Quelldateien, um das Laden von Seiten zu beschleunigen und CommonJS-/UMD-Module in ESM zu konvertieren.
- Damit Browser Module importieren können, ohne Fehler auszulösen, schreibt Vite die Importe in gültige URLs wie diese um
/node_modules/.vite/my-dep.js?v=f3sf2ebbWarum Vite verwenden?Da wir nun wissen, was Vite ist und wie es funktioniert, fragen Sie sich vielleicht, warum Sie Vite verwenden sollten.Es gibt viele Gründe dafür Sie sollten Vite für Ihr Projekt verwenden. Werfen wir einen kurzen Blick auf einige davon.LeistungDie Vorbündelung mit Vites ESbuild macht es 10 bis 100 Mal schneller als die Verwendung jedes anderen JS-Bundlers. Dies liegt daran, dass es dazu beiträgt, die Seitengeschwindigkeit zu verbessern und CommonJS-/UMD-Module in ESM zu konvertieren.Laut der Vite-Dokumentation
„Der Vorbündelungsschritt wird mit esbuild und makes durchgeführt.“ Die Kaltstartzeit von Vite ist deutlich schneller als bei jedem JavaScript-basierten Bundler ganze Seite. Mit der HMR-API lädt der Browser nur den geänderten Abschnitt der Seite und behält dennoch den Status der Anwendung bei.Es ist nicht erforderlich, die HMR-API in Ihrer App manuell zu konfigurieren. Es wird Ihrem Projekt während der Anwendungsinstallation automatisch hinzugefügt.
Mit der HMR-Leistung können Sie leichtere und schnellere Anwendungen entwerfen, unabhängig von der Anzahl der Module oder der Größe Ihrer Anwendung.
Konfigurationsoptionen
Vite ermöglicht Ihnen mehr Kontrolle über die Konfiguration Ihres Projekts, indem Sie die Standardkonfiguration mit vite.config.js oder vite.config.ts erweitern. Diese befinden sich im Basisstammverzeichnis des Projekts.
Sie können auch andere Konfigurationsdateien mit der --config CLI-Option angeben, wie unten gezeigt:
Was Sie benötigenSie müssen die folgende Software auf Ihrem Computer installiert haben, bevor Sie ein Vite-Projekt erstellen können:vite --config my-config.jsNode.js Version 12.2.0 oder höher (um zu überprüfen, ob Sie Node installiert haben). Ihr Computer führt node -v auf dem Terminal aus)Npm / Yarn
- Sobald Sie diese auf Ihrem Computer installiert haben, können Sie jetzt ein Vite-Projekt erstellen.
- So erstellen Sie ein Vite-Projekt
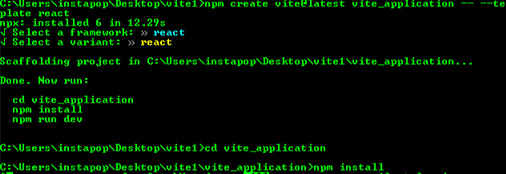
- Um eine Vite-Anwendung zu erstellen, öffnen Sie Ihr Terminal und navigieren Sie zu dem Ordner, in dem Sie das Vite-Programm speichern möchten. Führen Sie dann diesen Befehl aus:

Next, run the following commands to finish the installation:
cd vite_applicationnpm install

The installation may take a few minutes, so just wait until it's completed.
How to Run a Vite Application
To run your Vite application on the terminal, navigate to the application folder (vite_application) and then run the dev command below to start the development server:
npm run dev
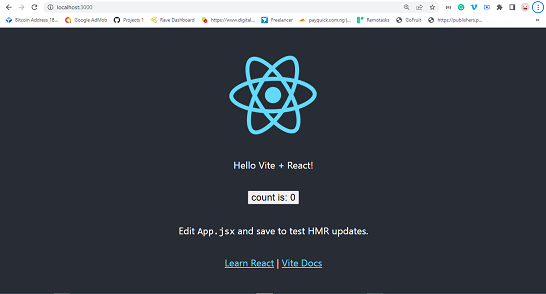
Running the above command will start the development server. Then open your terminal and enter http://localhost:3000.
You should see something like this in the browser:
 React application
Vite Folder Structure
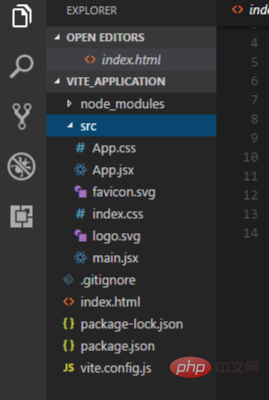
Let's have a look at how Vite application folders are organized. We'll also look at a few of the folders and files in detail.
Note: if you are using a different framework and template, the file name will not be the same.

Vite folder structure
node_modules folder
The node_modules folder contains all the necessary dependencies for the application, which are specified in the package.json file.
All of the configured dependencies in package.json will be downloaded into the node_modules folder once the npm install command is run.
When pushing your source code to GitHub, you don't need to push the node_modules folder because users can install all the necessary dependencies used in your application through the package.json.
You can find the package.json file in the application parent's root directory.
src folder
The src folder is one of the folder that we interact with most when developing Vite applications. This folder contains app.jsx, main.jsx, app.css and index.js.
All of your application's assets, such as images, videos, and other files, must be stored in the src folder because Vite automatically rebases all URLs inside index.html.
App.jsx and main.jsx
The app.jsx file is the base component that serves as a container for all of the other components used in the application.
The main.jsx file is where you target the root id from the index.html and render all the components used in the application.
index.css and app.css
These files contain all of the CSS styles used in the program. You can add your own CSS file or change the style.
Das obige ist der detaillierte Inhalt vonVite.js-Tutorial – So installieren und verwenden Sie Vite in Ihren Webprojekten. Für weitere Informationen folgen Sie bitte anderen verwandten Artikeln auf der PHP chinesischen Website!

