
Heim >Backend-Entwicklung >Golang >Erstellen eines Bots für Bluesky Social
Erstellen eines Bots für Bluesky Social

- DDDOriginal
- 2024-09-14 06:29:321137Durchsuche
Wie der Bot funktionieren wird
Wir werden einen Bot für das soziale Netzwerk Bluesky entwickeln, wir werden dafür Golang verwenden, dieser Bot wird einige Hashtags über Websocket überwachen,
Wenn es einen dieser Hashtags findet, wird ein erneuter Beitrag erstellt und der ursprüngliche Beitrag mit „Gefällt mir“ markiert.
Wir werden einige wirklich coole Dinge behandeln, wie Websocket, AT (von bluesky verwendetes Protokoll), CAR (Content Addressable aRchive) und CBOR (Concise Binary Object Representation) sind zwei Formate, die zum effizienten Speichern und Übertragen von Daten verwendet werden.
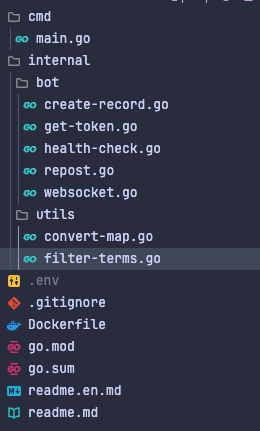
Projektstruktur
Das Projekt wird eine einfache Struktur haben, intern werden wir ein Paket namens Bot mit dem gesamten Code zum Ausführen des Bots haben,
Innerhalb der Utils werden wir einige Funktionen haben, die uns helfen.
In der .env-Datei haben wir die Bluesky-Anmeldeinformationen für den Zugriff auf die API.
Anmeldeinformationen einrichten
Zur Authentifizierung bei der bluesky API müssen wir eine Kennung und ein Passwort angeben, aber wir können das Passwort nicht für den Zugriff auf unser Konto verwenden,
Dazu erstellen wir App-Passwörter. Greifen Sie einfach auf Ihr Konto in bluesky zu, greifen Sie auf die Einstellungen zu und dann auf App-Passwörter.
Fügen Sie dieses generierte Passwort wie folgt in die .env-Datei ein:
BLUESKY_IDENTIFIER=<seu_identificador>
BLUESKY_PASSWORD=<seu_app_password>
Generieren des API-Tokens
Immer wenn unser Bot einen neuen Hashtag identifiziert, den wir überwachen, erfolgt eine Antwort, aber wir benötigen einen Bearer-Token, um den Repost durchführen zu können,
Wir werden eine Funktion erstellen, die das Token generiert, wir werden dies in der Datei get-token.go tun.
Zuerst definieren wir eine globale Variable für die API-URL.
var (
  API_URL = "https://bsky.social/xrpc"
)
Jetzt definieren wir unsere Struktur mit den Daten, die von der API zurückgegeben werden.
type DIDDoc struct {
  Context            []string `json:"@context"`
  ID                 string   `json:"id"`
  AlsoKnownAs        []string `json:"alsoKnownAs"`
  VerificationMethod []struct {
    ID                 string `json:"id"`
    Type               string `json:"type"`
    Controller         string `json:"controller"`
    PublicKeyMultibase string `json:"publicKeyMultibase"`
  } `json:"verificationMethod"`
  Service []struct {
    ID              string `json:"id"`
    Type            string `json:"type"`
    ServiceEndpoint string `json:"serviceEndpoint"`
  } `json:"service"`
}

type DIDResponse struct {
  DID             string `json:"did"`
  DIDDoc          DIDDoc `json:"didDoc"`
  Handle          string `json:"handle"`
  Email           string `json:"email"`
  EmailConfirmed  bool   `json:"emailConfirmed"`
  EmailAuthFactor bool   `json:"emailAuthFactor"`
  AccessJwt       string `json:"accessJwt"`
  RefreshJwt      string `json:"refreshJwt"`
  Active          bool   `json:"active"`
}
Jetzt erstellen wir die getToken-Funktion, die eine DIDResponse zurückgibt (Sie können ihr einen beliebigen Namen geben).
func getToken() (*DIDResponse, error) {
  requestBody, err := json.Marshal(map[string]string{
    "identifier": os.Getenv("BLUESKY_IDENTIFIER"),
    "password":   os.Getenv("BLUESKY_PASSWORD"),
  })
  if err != nil {
    return nil, fmt.Errorf("failed to marshal request body: %w", err)
  }

  url := fmt.Sprintf("%s/com.atproto.server.createSession", API_URL)

  resp, err := http.Post(url, "application/json", bytes.NewBuffer(requestBody))
  if err != nil {
    return nil, fmt.Errorf("failed to send request: %w", err)
  }
  defer resp.Body.Close()

  if resp.StatusCode != http.StatusOK {
    return nil, fmt.Errorf("unexpected status code: %d", resp.StatusCode)
  }

  var tokenResponse DIDResponse
  if err := json.NewDecoder(resp.Body).Decode(&tokenResponse); err != nil {
    return nil, fmt.Errorf("failed to decode response: %w", err)
  }

  return &tokenResponse, nil
}
Diese Funktion ruft den Bluesky-Endpunkt com.atproto.server.createSession auf. Wir werden einige Daten erhalten, aber was jetzt zählt, ist das accessJwt, das wir benötigen, um unseren Bot über Bearer zu autorisieren und damit die zu generierende Funktion Der Token ist fertig.
Erstellen des Websockets
Dies wird die komplexeste Funktion des Bots sein, wir müssen den Bluesky-Endpunkt nutzen.
Erstellen wir zunächst eine Variable zum Speichern des Endpunkts, mehr dazu in den Dokumenten
var (
  wsURL = "wss://bsky.network/xrpc/com.atproto.sync.subscribeRepos"
)
Jetzt erstellen wir die Strukturen:
type RepoCommitEvent struct {
  Repo   string      `cbor:"repo"`
  Rev    string      `cbor:"rev"`
  Seq    int64       `cbor:"seq"`
  Since  string      `cbor:"since"`
  Time   string      `cbor:"time"`
  TooBig bool        `cbor:"tooBig"`
  Prev   interface{} `cbor:"prev"`
  Rebase bool        `cbor:"rebase"`
  Blocks []byte      `cbor:"blocks"`

  Ops []RepoOperation `cbor:"ops"`
}

type RepoOperation struct {
  Action string      `cbor:"action"`
  Path   string      `cbor:"path"`
  Reply  *Reply      `cbor:"reply"`
  Text   []byte      `cbor:"text"`
  CID    interface{} `cbor:"cid"`
}

type Reply struct {
  Parent Parent `json:"parent"`
  Root   Root   `json:"root"`
}

type Parent struct {
  Cid string `json:"cid"`
  Uri string `json:"uri"`
}

type Root struct {
  Cid string `json:"cid"`
  Uri string `json:"uri"`
}

type Post struct {
  Type  string `json:"$type"`
  Text  string `json:"text"`
  Reply *Reply `json:"reply"`
}
Wir werden auch das Gorilla Websocket-Paket verwenden, laden Sie das Paket herunter mit:
go get github.com/gorilla/websocket
Die Websocket-Funktion sieht zunächst so aus:
func Websocket() error {
  conn, _, err := websocket.DefaultDialer.Dial(wsURL, nil)
  if err != nil {
    slog.Error("Failed to connect to WebSocket", "error", err)
    return err
  }
  defer conn.Close()

  for {
    _, message, err := conn.ReadMessage()
    if err != nil {
      slog.Error("Error reading message from WebSocket", "error", err)
      continue
    }
  }
}
Damit können wir jetzt über einen Websocket empfangene Nachrichten mit einem unendlichen for lesen, aber die Nachrichten sind in CBOR codiert.
Was ist CBOR?
CBOR (Concise Binary Object Representation) ist ein binäres Datenformat, das zur kompakten und effizienten Darstellung von Daten verwendet wird.
Es ähnelt JSON, verwendet jedoch anstelle von menschenlesbarem Text Binärbytes, wodurch die Übertragung und Verarbeitung kleiner und schneller wird.
Um es zu entschlüsseln, müssen wir dieses Paket verwenden.
decoder := cbor.NewDecoder(bytes.NewReader(message))
Verwandeln Sie die Nachricht einfach in einen Reader, etwa so:
func Websocket() error {
  conn, _, err := websocket.DefaultDialer.Dial(wsURL, nil)
  if err != nil {
    slog.Error("Failed to connect to WebSocket", "error", err)
    return err
  }
  defer conn.Close()

  slog.Info("Connected to WebSocket", "url", wsURL)

  for {
     _, message, err := conn.ReadMessage()
    if err != nil {
      slog.Error("Error reading message from WebSocket", "error", err)
      continue
    }

    decoder := cbor.NewDecoder(bytes.NewReader(message))

    for {
      var evt RepoCommitEvent
      err := decoder.Decode(&evt)
      if err == io.EOF {
        break
      }
      if err != nil {
        slog.Error("Error decoding CBOR message", "error", err)
        break
      }
    }
  }
}
decoder.Decode(&evt): Der Decoder ist dafür verantwortlich, die empfangenen Daten zu lesen und sie vom CBOR-Format in den RepoCommitEvent-Typ zu dekodieren. Das EVT speichert die entschlüsselten Daten.
if err == io.EOF { break }: Wenn der Decoder das Ende der Daten erreicht (es sind keine Nachrichten mehr vorhanden), gibt er io.EOF (Ende der Datei) zurück. In diesem Fall wird die Schleife mit „Break“ unterbrochen, da keine Daten mehr verarbeitet werden müssen.
Erstellen des handleEvents
Lassen Sie uns eine Funktion erstellen, um das Ereignis zu verarbeiten:
func handleEvent(evt RepoCommitEvent) error {
  for _, op := range evt.Ops {
    if op.Action == "create" {
      if len(evt.Blocks) > 0 {
        err := handleCARBlocks(evt.Blocks, op)
        if err != nil {
          slog.Error("Error handling CAR blocks", "error", err)
          return err
        }
      }
    }
  }

  return nil
}
evt-Parameter: Die Funktion empfängt einen evt-Parameter, der ein Ereignis vom Typ RepoCommitEvent ist. Dieses Ereignis enthält eine Liste von Ops-Vorgängen und möglicherweise Blockdatenblöcke, die mit diesen Vorgängen in Zusammenhang stehen.
Loop over Ops: Das evt-Ereignis kann mehrere Vorgänge enthalten. Der Code durchläuft jede dieser Operationen mithilfe der for _, op := range evt.Ops-Schleife.
Überprüfung der Aktion op.Action == „create“: Für jede Operation prüft der Code, ob die zugehörige Aktion „create“ ist, d. h. ob die Operation etwas Neues in bluesky erstellt, beispielsweise einen Beitrag oder andere Art von Inhalten.
Wenn es Blöcke len(evt.Blocks) > 0: Wenn der Erstellungsvorgang erkannt wird, prüft der Code, ob das Ereignis Blocks-Datenblöcke enthält. Diese Blöcke enthalten zusätzliche Informationen, die sich möglicherweise auf den Vorgang beziehen.
Verarbeitung von handleCARBlocks-Blöcken: Wenn Blöcke vorhanden sind, wird die Funktion handleCARBlocks aufgerufen, um diese Blöcke zu verarbeiten. Diese Funktion ist für die Interpretation der Daten innerhalb der Blöcke verantwortlich (wir werden weiter unten auf CAR eingehen).
What is CAR?
CAR (Content Addressable Archive) is an archive format that stores data efficiently and securely using content addressing. This means that each piece of data is identified by its content rather than a specific location.
Here is a simple explanation:
Content Identified by Hash: Each block of data in a CAR file is identified by a hash (a unique identifier generated from the content of the data). This ensures that the same piece of data always has the same identifier.
Used in IPFS and IPLD: CAR is widely used in systems such as IPFS (InterPlanetary File System) and IPLD (InterPlanetary Linked Data), where data is distributed and retrieved over the network based on content rather than location like bluesky.
Data Blocks: A CAR file can store multiple blocks of data, and each block can be retrieved individually using its content identifier (CID).
Efficient and Safe: Since a block's identifier depends on its content, it is easy to verify that the data is correct and has not been altered.
This is a very simple explanation, if you want to go deeper, I recommend accessing this.
Creating the handleCARBlocks
This will be the most complex function of the bot:
func handleCARBlocks(blocks []byte, op RepoOperation) error {
  if len(blocks) == 0 {
    return errors.New("no blocks to process")
  }

  reader, err := carv2.NewBlockReader(bytes.NewReader(blocks))
  if err != nil {
    slog.Error("Error creating CAR block reader", "error", err)
    return err
  }

  for {
    block, err := reader.Next()
    if err == io.EOF {
        break
    }
    if err != nil {
      slog.Error("Error reading CAR block", "error", err)
      break
    }

    if opTag, ok := op.CID.(cbor.Tag); ok {
      if cidBytes, ok := opTag.Content.([]byte); ok {
        c, err := decodeCID(cidBytes)
        if err != nil {
          slog.Error("Error decoding CID from bytes", "error", err)
          continue
        }

        if block.Cid().Equals(c) {
          var post Post
          err := cbor.Unmarshal(block.RawData(), &post)
          if err != nil {
            slog.Error("Error decoding CBOR block", "error", err)
            continue
          }

          if post.Text == "" || post.Reply == nil {
            continue
          }

          if utils.FilterTerms(post.Text) {
            repost(&post) // we will still create
          }
        }
      }
    }
  }

  return nil
}
We will still create the repost() function, we will pass a pointer to *Post as a parameter.
Remember that our bot only monitors post comments, if a post is created and the hashtag we are monitoring is inserted, the repost will not be made, this
validation if post.Text == "" || post.Reply == nil will prevent it, it is necessary to have a reply and this only happens if it is a comment on a post.
The handleCARBlocks function processes data blocks in CAR format. Let's understand step by step what the function does in a simple way:
- Initial Block Verification:
if len(blocks) == 0 {
  return errors.New("no blocks to process")
}
If the blocks are empty, the function returns an error saying that there are no blocks to process.
- Creating a CAR Block Reader:
reader, err := carv2.NewBlockReader(bytes.NewReader(blocks))
The function creates a block reader to interpret the data contained in the CAR file, we are using the packages carV2 and go-cid
To install, run:
go install github.com/ipld/go-car/cmd/car@latest
go get github.com/ipfs/go-cid
- Reading the Blocks:
for {
  block, err := reader.Next()
    if err == io.EOF {
      break
    }
}
The function enters a loop to read all data blocks one by one. When all blocks are read (i.e. the end is reached), the loop stops.
- Checking the CID:
if opTag, ok := op.CID.(cbor.Tag); ok {
  if cidBytes, ok := opTag.Content.([]byte); ok {
    c, err := decodeCID(cidBytes)
The function checks whether the operation contains a CID (Content Identifier) that can be decoded. This CID identifies the specific content of the block.
- Comparing and Decoding the Block:
if block.Cid().Equals(c) {
  var post Post
  err := cbor.Unmarshal(block.RawData(), &post)
If the block read has the same CID as the operation, the block content is decoded into a format that the function understands, such as a "Post".
- Filtering the Post:
if post.Text == "" || post.Reply == nil {
  continue
}
if utils.FilterTerms(post.Text) {
  repost(&post)
}
If the post has text and a reply, it is filtered with a function called FilterTerms. If it passes the filter, it is reposted.
Creating decodeCID
The decodeCID function is responsible for decoding a content identifier (CID) from a set of bytes. It takes these bytes and tries to transform them into a CID that can be used to identify blocks of data.
func decodeCID(cidBytes []byte) (cid.Cid, error) {
  var c cid.Cid
  c, err := cid.Decode(string(cidBytes))
  if err != nil {
    return c, fmt.Errorf("error decoding CID: %w", err)
  }

  return c, nil
}
With that, we have the Websocket ready.
Creating the Hashtag Filter
Let's create the following within utils in filter-terms.go:
var (
  terms = []string{"#hashtag2", "#hashtag1"}
)

func FilterTerms(text string) bool {
  for _, term := range terms {
    if strings.Contains(strings.ToLower(text), strings.ToLower(term)) {
      return true
    }
  }
  return false
}
It is in this function that we define the hashtags to be monitored, in a simple way we receive a text that comes from the websocket and filter it based on the terms.
Creating createRecord
Let's create a function called createRecord in the create-record.go file, which will be responsible for creating a repost or a like, depending on the $type that is sent via parameter.
First, let's create a struct with the parameters we will need:
type CreateRecordProps struct {
  DIDResponse *DIDResponse
  Resource    string
  URI         string
  CID         string
}
- DIDResponse: We will use it to extract the authorization token.
- Resource: It will be used to inform whether we are going to do a like or repost.
- URI: It will be used to inform the uri of the original post.
- CID: This is what we extracted from the CAR, used as an identifier.
The final function will look like this:
func createRecord(r *CreateRecordProps) error {
  body := map[string]interface{}{
    "$type":      r.Resource,
    "collection": r.Resource,
    "repo":       r.DIDResponse.DID,
    "record": map[string]interface{}{
      "subject": map[string]interface{}{
        "uri": r.URI,
        "cid": r.CID,
      },
      "createdAt": time.Now(),
    },
  }

  jsonBody, err := json.Marshal(body)
  if err != nil {
    slog.Error("Error marshalling request", "error", err, "resource", r.Resource)
    return err
  }

  url := fmt.Sprintf("%s/com.atproto.repo.createRecord", API_URL)
  req, err := http.NewRequest("POST", url, bytes.NewBuffer(jsonBody))
  if err != nil {
    slog.Error("Error creating request", "error", err, "r.Resource", r.Resource)
    return nil
    }
  req.Header.Set("Authorization", fmt.Sprintf("Bearer %s", r.DIDResponse.AccessJwt))
  req.Header.Set("Content-Type", "application/json")

  client := &http.Client{}
  resp, err := client.Do(req)
  if err != nil {
    slog.Error("Error sending request", "error", err, "r.Resource", r.Resource)
    return nil
  }
  if resp.StatusCode != http.StatusOK {
    slog.Error("Unexpected status code", "status", resp, "r.Resource", r.Resource)
    return nil
  }

  slog.Info("Published successfully", "resource", r.Resource)

  return nil
}
It's simple to understand, we make a POST to the API_URL/com.atproto.repo.createRecord endpoint, informing that we are going to create a record, in the body we inform the $type, which informs the bluesky API the type of record we are going to create, then we assemble the request, inserting the bearer token and we do some error handling, simple, isn't it?
This way we can use the createRecord function to create several records, changing only the $type.
Sending the repost and like to Bluesky
With createRecord ready, it's simple to create the repost, let's do this in the repost.go file:
func repost(p *Post) error {
  token, err := getToken()
  if err != nil {
    slog.Error("Error getting token", "error", err)
    return err
  }

  resource := &CreateRecordProps{
    DIDResponse: token,
    Resource:    "app.bsky.feed.repost",
    URI:         p.Reply.Root.Uri,
    CID:         p.Reply.Root.Cid,
  }

  err = createRecord(resource)
  if err != nil {
    slog.Error("Error creating record", "error", err, "resource", resource.Resource)
    return err
  }

  resource.Resource = "app.bsky.feed.like"
  err = createRecord(resource)
  if err != nil {
    slog.Error("Error creating record", "error", err, "resource", resource.Resource)
    return err
  }

  return nil
}
We receive a pointer to the *Post from the Websocket() function, we set up the CreateRecordProps informing that we are going to make a repost through the app.bsky.feed.repost resource, and finally we call createRecord.
After creating the post, we will give it a like (optional), just call createRecord again, but now with the app.bsky.feed.like resource, since we created the resource in a variable, just set a new value, which is what we do resource.Resource = "app.bsky.feed.like".
With that, we can now make the repost and the like.
Creating a health check
This part is optional, it will be used only for deployment, it will be used by the hosting service to check if our bot is still working, it is a very simple endpoint that only returns a status code 200.
Let's do it in the health-check.go file:
func HealthCheck(w http.ResponseWriter, r *http.Request) {
  w.WriteHeader(http.StatusOK)
}
The HealthCheck function returns only a w.WriteHeader(http.StatusOK), this could be done directly in the main.go file, which is where we will start our web server, but I chose to separate it.
Getting the bot up and running
Well, now we just need to get everything running, let's do that in main.go:
func main() {
  slog.Info("Starting bot")
  err := godotenv.Load()
  if err != nil {
    slog.Error("Error loading .env file")
  }

  go func() {
    http.HandleFunc("/health", bot.HealthCheck)
    slog.Info("Starting health check server on :8080")

    if err := http.ListenAndServe(":8080", nil); err != nil {
      log.Fatal("Failed to start health check server:", err)
    }
  }()

  err = bot.Websocket()
  if err != nil {
    log.Fatal(err)
  }
}
Very simple too:
- err := godotenv.Load(): We use the godotenv package to be able to access the variables of the .env locally.
- go func(): We start our webserver for the HealthCheck in a goroutine.
- err = bot.Websocket(): Finally we start the Websocket.
Now, let's run:
go run cdm/main.go
We will have the bot running:
2024/09/13 09:11:31 INFO Starting bot
2024/09/13 09:11:31 INFO Starting health check server on :8080
2024/09/13 09:11:32 INFO Connected to WebSocket url=wss://bsky.network/xrpc/com.atproto.sync.subscribeRepos
We can test it on Bluesky, I used the hashtag #bot-teste for testing purposes, let's create a post and comment on it:
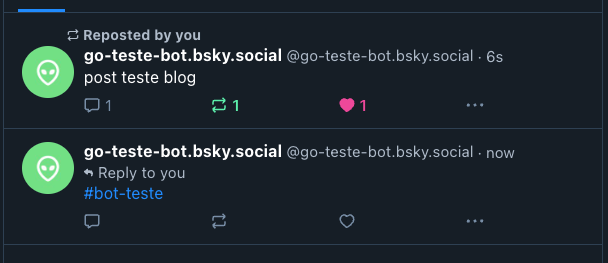
See that the repost was made and now it has the like, and in the terminal we have the logs:
2024/09/13 09:14:16 INFO Published successfully resource=app.bsky.feed.repost
2024/09/13 09:14:16 INFO Published successfully resource=app.bsky.feed.like
Final considerations
We have covered how to create a bot for the Bluesky social network, using Golang and various technologies such as Websockets, AT Protocol, CAR and CBOR.
The bot is responsible for monitoring specific hashtags and, when it finds one of them, it reposts and likes the original post.
This is just one of the features we can do with the bot, the Bluesky API is very complete and allows for several possibilities, you can use this bot and add new features ?.
Links
See the post on my blog here
Subscribe and receive notification of new posts, participate
repository of the project
bot profile on Bluesky
Bluesky documentation
Gopher credits
Das obige ist der detaillierte Inhalt vonErstellen eines Bots für Bluesky Social. Für weitere Informationen folgen Sie bitte anderen verwandten Artikeln auf der PHP chinesischen Website!