


Introduction
A graph is a data structure with a number of vertices(nodes) and edges(connections) between them.
A tree is an example of a graph. Every tree is a graph but not every graph is a tree, for example, graphs that have cycles are not trees. A tree will have one root and one unique path between two nodes whilst a graph can have many roots and multiple paths between vertices.
Basic Terminology
Vertex: A node in a graph.
Edge: The connection between two vertices.
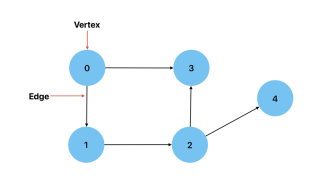
Directed: When the connection between two vertices has a direction. This implies that there is only one way to get from one vertex to another. An example could be graph showing the cities(vertices) and the routes(edges) between them.
Undirected: When the connection between two vertices on a graph goes both ways. An example could be a graph showing people(vertices) connected by their friendships.
Degree: The number of edges connected to a vertex. The vertices of a directed graph can have an indegree or an outdegree, which is the number of edges pointing towards and away from the vertex respectively.
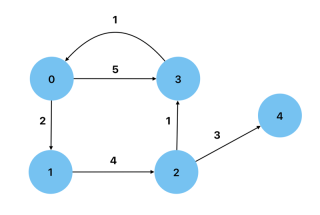
Weighted: A graph in which the edges have values as weights. An example could be a road map, where the distances between nodes are represented as weights.
Cyclic: A graph that has a path from at least one vertex back to itself.
Acyclic: A graph that has no cycles, that is to say, no node has a path back to itself. A Directed Acyclic Graph is a type of graph that can be used to show data processing flows.
Dense: When a graph has close to the maximum possible number of edges
Sparse: When a graph has close to the minimum possible number of edges.
Self-loop: When an edge has one vertex linking to itself.
Multi-edge: When a graph has multiple edges between two vertices.
Simple: When a graph has no self-loops nor multi-edges.
To get the maximum number of edges in a simple directed graph: n*(n-1) where n is the number of nodes.
To get the maximum number of edges in a simple undirected graph: n*(n-1)/2 where n is the number of nodes.
Implementing graphs in JavaScript
To implement a graph, we can start by specifying the vertices and edges of a graph, below is an example of how to do this given the following graph:
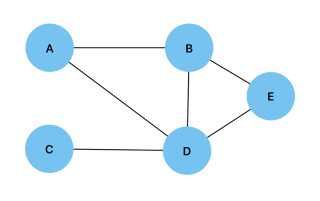
const vertices = ["A", "B", "C", "D", "E"];

const edges = [
  ["A", "B"],
  ["A", "D"],
  ["B", "D"],
  ["B", "E"],
  ["C", "D"],
  ["D", "E"],
];
Then we can create a function to find what is adjacent to a given vertex:
const findAdjacentNodes = function (node) {
  const adjacentNodes = [];
  for (let edge of edges) {
    const nodeIndex = edge.indexOf(node);
    if (nodeIndex > -1) {
      let adjacentNode = nodeIndex === 0 ? edge[1] : edge[0];
      adjacentNodes.push(adjacentNode);
    }
  }
  return adjacentNodes;
};
And another function to check if two vertices are connected:
const isConnected = function (node1, node2) {
  const adjacentNodes = new Set(findAdjacentNodes(node1));
  return adjacentNodes.has(node2);
};
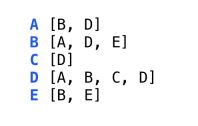
Adjacency List
An adjacency list is a representation of a graph where all of the vertices that are connected to a node are stored as a list. Below is a graph and a visual representation of its corresponding adjacency list.
An adjacency list can be implemented in JavaScript by creating two classes, a Node class and a Graph class. The Node class will consist of a constructor and a connect() method to join two vertices. It will also have the isConnected() and getAdjacentNodes() methods which work in exactly the same manner as shown above.
class Node {
  constructor(value) {
    this.value = value;
    this.edgesList = [];
  }
  connect(node) {
    this.edgesList.push(node);
    node.edgesList.push(this);
  }
  getAdjNodes() {
    return this.edgesList.map((edge) => edge.value);
  }
  isConnected(node) {
    return this.edgesList.map((edge) =>
    edge.value).indexOf(node.value) > -1;
  }
}
The Graph class consists of a constructor and the addToGraph() method which adds a new vertex to the graph.
class Graph {
  constructor(nodes) {
    this.nodes = [...nodes];
  }
  addToGraph(node) {
    this.nodes.push(node);
  }
}
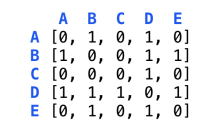
Adjacency Matrix
A 2-D array where each array represents a vertex and each index represents a possible connection between vertices. An adjacency matrix is filled with 0s and 1s, with 1 representing a connection. The value at adjacencyMatrix[node1][node2] will show whether or not there is a connection between the two specified vertices. Below is is a graph and its visual representation as an adjacency matrix.
To implement this adjacency matrix in JavaScript, we start by creating two classes, the first being the Node class:
class Node {
  constructor(value) {
    this.value = value;
  }
}
We then create the Graph class which will contain the constructor for creating the 2-D array initialized with zeros.
class Graph {
  constructor(nodes) {
    this.nodes = [...nodes];
    this.adjacencyMatrix = Array.from({ length: nodes.length },
    () => Array(nodes.length).fill(0));
   }
}
We will then add the addNode() method which will be used to add new vertices to the graph.
  addNode(node) {
    this.nodes.push(node);
    this.adjacencyMatrix.forEach((row) => row.push(0));
    this.adjacencyMatrix.push(new Array(this.nodes.length).fill(0));
  }
Next is the connect() method which will add an edge between two vertices.
  connect(node1, node2) {
    const index1 = this.nodes.indexOf(node1);
    const index2 = this.nodes.indexOf(node2);

    if (index1 > -1 && index2 > -1) {
      this.adjacencyMatrix[index1][index2] = 1;
      this.adjacencyMatrix[index2][index1] = 1;
    }
  }
We will also create the isConnected() method which can be used to check if two vertices are connected.
  isConnected(node1, node2) {
    const index1 = this.nodes.indexOf(node1);
    const index2 = this.nodes.indexOf(node2);

    if (index1 > -1 && index2 > -1) {
      return this.adjacencyMatrix[index1][index2] === 1;
    }
    return false;
  }
Lastly we will add the printAdjacencyMatrix() method to the Graph class.
  printAdjacencyMatrix() {
    console.log(this.adjacencyMatrix);
  }
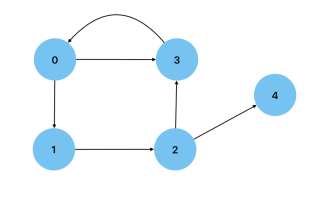
Breadth First Search
Similar to a Breadth First Search in a tree, the vertices adjacent to the current vertex are visited before visiting any subsequent children. A queue is the data structure of choice when performing a Breadth First Search on a graph.
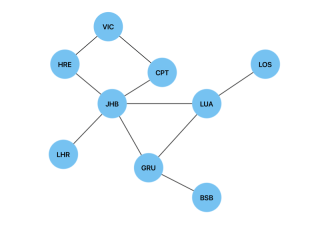
Below is a graph of international airports and their connections and we will use a Breadth First Search to find the shortest route(path) between two airports(vertices).
In order to implement this search algorithm in JavaScript, we will use the same Node and Graph classes we implemented the adjacency list above. We will create a breadthFirstTraversal() method and add it to the Graph class in order to traverse between two given vertices. This method will have the visitedNodes object, which will be used to store the visited vertices and their predecessors. It is initiated as null to show that the first vertex in our search has no predecessors.
breathFirstTraversal(start, end) {
    const queue = [start];
    const visitedNodes = {};
    visitedNodes[start.value] = null;

    while (queue.length > 0) {
      const node = queue.shift();

      if (node.value === end.value) {
        return this.reconstructedPath(visitedNodes, end);
      }
      for (const adjacency of node.edgesList) {
        if (!visitedNodes.hasOwnProperty(adjacency.value)) {
          visitedNodes[adjacency.value] = node;
          queue.push(adjacency);
        }
      }
    }
  }
Once the end vertex is found, we will use the reconstructedPath() method in the Graph class in order to return the shortest path between two vertices. Each vertex is added iteratively to the shortestPath array, which in turn must be reversed in order to come up with the correct order for the shortest path.
reconstructedPath(visitedNodes, endNode) {
    let currNode = endNode;

    const shortestPath = [];

    while (currNode !== null) {
      shortestPath.push(currNode.value);
      currNode = visitedNodes[currNode.value];
    }
    return shortestPath.reverse();
  }
In the case of the graph of international airports, breathFirstTraversal(JHB, LOS) will return JHB -> LUA -> LOS as the shortest path. In the case of a weighted graph, we would use Dijkstra's algorithm to find the shortest path.
Depth First Search
Similar to a depth first search in a tree, this algorithm will fully explore every descendant of a vertex, before backtracking to the root. A stack is the data structure of choice for depth first traversals in a graph.
A depth first search can be used to detect a cycle in a graph. We will use the same graph of international airports to illustrate this in JavaScript.
Similar to the Breadth First Search algorithm above, this implementation of a Depth First Search algorithm in JavaScript will use the previously created Node and Graph classes. We will create a helper function called depthFirstTraversal() and add it to the Graph class.
  depthFirstTraversal(start, visitedNodes = {}, parent = null) {
    visitedNodes[start.value] = true;

    for (const adjacency of start.edgesList) {
      if (!visitedNodes[adjacency.value]) {
        if (this.depthFirstTraversal(adjacency, visitedNodes, start)) {
          return true;
        }
      } else if (adjacency !== parent) {
        return true;
      }
    }

    return false;
  }
This will perform the Depth First Traversal of the graph, using the parent parameter to keep track of the previous vertex and prevent the detection of a cycle when revisiting the parent vertex. Visited vertices will be marked as true in the visitedNodes object. This method will then use recursion to visit previously unvisited vertices. If the vertex has already been visited, we check it against the parent parameter. A cycle has been found if the vertex has already been visited and it is not the parent.
We will also create the wrapper function hasCycle() in the Graph class. This function is used to detect a cycle in a disconnected graph. It will initialize the visitedNodes object and loop through all of the vertices in the graph.
hasCycle() {
    const visitedNodes = {};

    for (const node of this.nodes) {
      if (!visitedNodes[node.value]) {
        if (this.depthFirstTraversal(node, visitedNodes)) {
          return true;
        }
      }
    }
    return false;
  }
In the case of the graph of international airports, the code will return true.
Depth First Traversal of a graph is also useful for pathfinding(not necessarily shortest path) and for solving mazes.
結論
在進一步學習資料結構和演算法時,對圖作為一種資料結構及其相關演算法的深刻理解是絕對必要的。儘管不像本系列之前的文章那樣適合初學者,但本指南對於加深您對資料結構和演算法的理解應該很有用。
Das obige ist der detaillierte Inhalt vonDatenstrukturen und Algorithmen: Diagramme. Für weitere Informationen folgen Sie bitte anderen verwandten Artikeln auf der PHP chinesischen Website!

 Erstellen einer SaaS-Anwendung mit mehreren Mietern mit Next.js (Backend Integration)Apr 11, 2025 am 08:23 AM
Ich habe eine funktionale SaaS-Anwendung mit mehreren Mandanten (eine EdTech-App) mit Ihrem täglichen Tech-Tool erstellt und Sie können dasselbe tun. Was ist eine SaaS-Anwendung mit mehreren Mietern? Mit Multi-Tenant-SaaS-Anwendungen können Sie mehrere Kunden aus einem Sing bedienen
 So erstellen Sie eine SaaS-Anwendung mit mehreren Mietern mit Next.js (Frontend Integration)Apr 11, 2025 am 08:22 AM
Dieser Artikel zeigt die Frontend -Integration mit einem Backend, das durch die Genehmigung gesichert ist und eine funktionale edtech SaaS -Anwendung unter Verwendung von Next.js. erstellt. Die Frontend erfasst Benutzerberechtigungen zur Steuerung der UI-Sichtbarkeit und stellt sicher, dass API-Anfragen die Rollenbasis einhalten
 JavaScript: Erforschung der Vielseitigkeit einer WebspracheApr 11, 2025 am 12:01 AM
JavaScript ist die Kernsprache der modernen Webentwicklung und wird für seine Vielfalt und Flexibilität häufig verwendet. 1) Front-End-Entwicklung: Erstellen Sie dynamische Webseiten und einseitige Anwendungen durch DOM-Operationen und moderne Rahmenbedingungen (wie React, Vue.js, Angular). 2) Serverseitige Entwicklung: Node.js verwendet ein nicht blockierendes E/A-Modell, um hohe Parallelitäts- und Echtzeitanwendungen zu verarbeiten. 3) Entwicklung von Mobil- und Desktop-Anwendungen: Die plattformübergreifende Entwicklung wird durch reaktnative und elektronen zur Verbesserung der Entwicklungseffizienz realisiert.
 Die Entwicklung von JavaScript: Aktuelle Trends und ZukunftsaussichtenApr 10, 2025 am 09:33 AM
Zu den neuesten Trends im JavaScript gehören der Aufstieg von Typenkripten, die Popularität moderner Frameworks und Bibliotheken und die Anwendung der WebAssembly. Zukunftsaussichten umfassen leistungsfähigere Typsysteme, die Entwicklung des serverseitigen JavaScript, die Erweiterung der künstlichen Intelligenz und des maschinellen Lernens sowie das Potenzial von IoT und Edge Computing.
 Entmystifizieren JavaScript: Was es tut und warum es wichtig istApr 09, 2025 am 12:07 AM
JavaScript ist der Eckpfeiler der modernen Webentwicklung. Zu den Hauptfunktionen gehören eine ereignisorientierte Programmierung, die Erzeugung der dynamischen Inhalte und die asynchrone Programmierung. 1) Ereignisgesteuerte Programmierung ermöglicht es Webseiten, sich dynamisch entsprechend den Benutzeroperationen zu ändern. 2) Die dynamische Inhaltsgenerierung ermöglicht die Anpassung der Seiteninhalte gemäß den Bedingungen. 3) Asynchrone Programmierung stellt sicher, dass die Benutzeroberfläche nicht blockiert ist. JavaScript wird häufig in der Webinteraktion, der einseitigen Anwendung und der serverseitigen Entwicklung verwendet, wodurch die Flexibilität der Benutzererfahrung und die plattformübergreifende Entwicklung erheblich verbessert wird.
 Ist Python oder JavaScript besser?Apr 06, 2025 am 12:14 AM
Python eignet sich besser für Datenwissenschaft und maschinelles Lernen, während JavaScript besser für die Entwicklung von Front-End- und Vollstapel geeignet ist. 1. Python ist bekannt für seine prägnante Syntax- und Rich -Bibliotheks -Ökosystems und ist für die Datenanalyse und die Webentwicklung geeignet. 2. JavaScript ist der Kern der Front-End-Entwicklung. Node.js unterstützt die serverseitige Programmierung und eignet sich für die Entwicklung der Vollstapel.
 Wie installiere ich JavaScript?Apr 05, 2025 am 12:16 AM
JavaScript erfordert keine Installation, da es bereits in moderne Browser integriert ist. Sie benötigen nur einen Texteditor und einen Browser, um loszulegen. 1) Führen Sie sie in der Browser -Umgebung durch, indem Sie die HTML -Datei durch Tags einbetten. 2) Führen Sie die JavaScript -Datei nach dem Herunterladen und Installieren von node.js nach dem Herunterladen und Installieren der Befehlszeile aus.
 Wie sende ich Benachrichtigungen, bevor eine Aufgabe in Quartz beginnt?Apr 04, 2025 pm 09:24 PM
So senden Sie im Voraus Aufgabenbenachrichtigungen in Quartz Wenn der Quartz -Timer eine Aufgabe plant, wird die Ausführungszeit der Aufgabe durch den Cron -Ausdruck festgelegt. Jetzt...


Heiße KI -Werkzeuge

Undresser.AI Undress
KI-gestützte App zum Erstellen realistischer Aktfotos

AI Clothes Remover
Online-KI-Tool zum Entfernen von Kleidung aus Fotos.

Undress AI Tool
Ausziehbilder kostenlos

Clothoff.io
KI-Kleiderentferner

AI Hentai Generator
Erstellen Sie kostenlos Ai Hentai.

Heißer Artikel
Heiße Werkzeuge

SAP NetWeaver Server-Adapter für Eclipse
Integrieren Sie Eclipse mit dem SAP NetWeaver-Anwendungsserver.

MinGW – Minimalistisches GNU für Windows
Dieses Projekt wird derzeit auf osdn.net/projects/mingw migriert. Sie können uns dort weiterhin folgen. MinGW: Eine native Windows-Portierung der GNU Compiler Collection (GCC), frei verteilbare Importbibliotheken und Header-Dateien zum Erstellen nativer Windows-Anwendungen, einschließlich Erweiterungen der MSVC-Laufzeit zur Unterstützung der C99-Funktionalität. Die gesamte MinGW-Software kann auf 64-Bit-Windows-Plattformen ausgeführt werden.

SublimeText3 Mac-Version
Codebearbeitungssoftware auf Gottesniveau (SublimeText3)

VSCode Windows 64-Bit-Download
Ein kostenloser und leistungsstarker IDE-Editor von Microsoft

SublimeText3 Englische Version
Empfohlen: Win-Version, unterstützt Code-Eingabeaufforderungen!

