Heim >Backend-Entwicklung >Python-Tutorial >Erstellen eines Taschenrechners mit Flet und Python
Erstellen eines Taschenrechners mit Flet und Python
- WBOYWBOYWBOYWBOYWBOYWBOYWBOYWBOYWBOYWBOYWBOYWBOYWBOriginal
- 2024-08-29 20:30:501147Durchsuche
Einführung
Hallo, Arsey hier, ein Python-Sprecher, dies ist mein erster Blog und ich werde Sie dabei unterstützen, diese einfache Taschenrechner-App mit Flet zu erstellen. Ich freue mich sehr, dies mit Ihnen zu teilen, und los geht's.
Im heutigen digitalen Zeitalter ist die Erstellung plattformübergreifender Anwendungen eine Notwendigkeit. Bei der Fülle an verfügbaren Frameworks kann die Auswahl des richtigen Frameworks eine Herausforderung sein. Ein solches Framework ist Flet, eine Python-Bibliothek, die es Entwicklern ermöglicht, mühelos Web-, Desktop- und mobile Apps mit Flutter zu erstellen, allerdings für Python.
In diesem Blog untersuchen wir, wie man mit Flet eine einfache Taschenrechner-App erstellt, und veranschaulichen, wie einfach und effizient dieses Framework sein kann.
WARUM FLET?
Als ich mit dem Programmieren begann, war es mein Ziel, mobile Anwendungen zu erstellen. Ohne eine klare Anleitung habe ich Python als meine Muttersprache gewählt. Es hat Spaß gemacht, es zu lernen, aber als ich mehr Erfahrung sammelte, wurde mir klar, dass Python traditionell nicht für die App-Entwicklung geeignet ist, sondern eher für die Datenanalyse und verwandte Aufgaben verwendet wird.
Jetzt lerne ich die Android-Entwicklung mit Kotlin für die native Entwicklung und Dart mit Flutter für die plattformübergreifende Entwicklung und komme meinem Ziel dank dieser Bibliotheksflotte einen Schritt näher.
Diese Erkenntnis war entmutigend, bis ich Frameworks wie Kivy, Tkinter, Flet usw. entdeckte, die es ermöglichen, Python zum Erstellen von Apps zu verwenden. Im Gegensatz zu Kivy oder Tkinter sind diese Frameworks gut, erfordern jedoch viele Anpassungen, um eine gut aussehende mobile Anwendung zu entwickeln, die gut für Android und iOS funktioniert. Und da glänzt Flet.
Flet ist ein Python-Framework, das von Flutter inspiriert ist, einem beliebten UI-Toolkit von Google. Die Ergebnisse, die Sie mit flet erzielen können, sind beeindruckend und ich freue mich, mehr davon zu erzählen.
WAS ist Flet?
Flet ist ein Python-Paket, das es Entwicklern ermöglicht, Benutzeroberflächen direkt mit dem UI-Toolkit von Flutter zu erstellen.
Der Hauptvorteil von Flet besteht darin, dass es die Einfachheit von Python und die umfangreichen UI-Funktionen von Flutter kombiniert und so eine schnelle Entwicklung plattformübergreifender Anwendungen ermöglicht, ohne dass umfassende Front-End-Erfahrung erforderlich ist.
Flet ist eine batteriebetriebene Bibliothek, die keine SDKs benötigt und problemlos mit dem Flutter-SDK erweitert werden kann.
Hinweis: Es ist von Vorteil, ein grundlegendes Verständnis einiger Front-End-Konzepte zu haben, wie zum Beispiel das Box-Modell, Layoutstrukturen wie Flexbox und Grid und Positionierung. Auch wenn Sie ohne dieses Wissen weitermachen können, empfehle ich Ihnen dringend, sich mit diesen Konzepten vertraut zu machen.
Nachdem das nun geklärt ist, fangen wir an, unseren Rechner zu bauen!
EINRICHTEN DER UMGEBUNG
Bevor Sie in die Programmierung eintauchen, stellen Sie sicher, dass Python auf Ihrem Computer installiert ist. Befolgen Sie dann diese Schritte, um Ihre Umgebung für Flet einzurichten.
- Flet installieren: Sie können Flet mit pip installieren. Sie können einfach Ihr Terminal oder Ihre Eingabeaufforderung öffnen, diesen Befehl eingeben und ihn ausführen.
pip install flet
- Erstellen Sie eine neue Python-Datei: Öffnen Sie nach einer erfolgreichen Installation Ihren bevorzugten Code-Editor (z. B. VS-Code, Pycharm usw.) und erstellen Sie eine neue Python-Datei. Benennen Sie sie „main.py“ oder wie Sie es bevorzugen. Sind Sie aufgeregt? Ich wette, das bist du! Lassen Sie uns zunächst testen, ob unsere Installation mit dem beliebtesten Satz der Entwickler-Community funktioniert: „Hallo Welt!“
Geben Sie diesen Code in unsere Python-Datei ein
import flet as ft

def main(page: ft.Page):
    page.add(ft.Text(value="Hello, World!"))

ft.app(target=main)
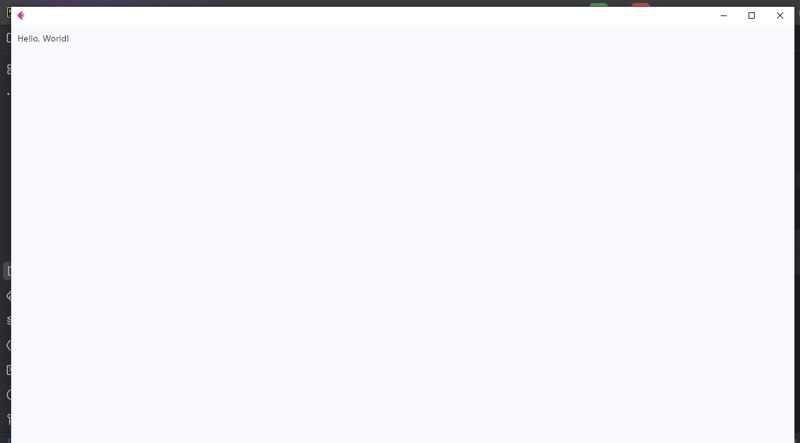
Führen Sie den Code aus, um zu sehen, ob alles funktioniert. Wenn Sie „Hallo, Welt!“ sehen. angezeigt wird, können Sie mit der Erstellung unseres Rechners fortfahren.
Ausgabe

ERSTELLEN DES LAYOUTS
In diesem Abschnitt konzentrieren wir uns auf die Struktur des Rechners; Hier verwenden wir das Spalten-Widget, um unsere Anzeige und Schaltflächen zu stapeln. Das Display zeigt die aktuelle Eingabe an und die Tasten ermöglichen eine Benutzerinteraktion. Das ist seltsam. Mir ist nie aufgefallen, dass UI eine Benutzeroberfläche zur Benutzerinteraktion bedeuten kann.
Schreiben Sie nun den folgenden Code wie folgt.
from flet import (
    app, Page, Container, Column, Row,
    TextField, colors, border_radius, ElevatedButton, TextAlign, TextStyle
)


def main(page: Page):
    page.title = "Calculator"
    result = TextField(
        hint_text='0', text_size=20,
        color='white', text_align=TextAlign.RIGHT,
        hint_style=TextStyle(
            color=colors.WHITE, size=20
        ),
        read_only=True
    )

    def button_click(e):
        pass

    button_row0 = Row(
        [
            ElevatedButton(text='C',  on_click=button_click),
            ElevatedButton(text='^',  on_click=button_click),
            ElevatedButton(text='%',  on_click=button_click),
            ElevatedButton(text='/',  on_click=button_click),
        ]
    )
    button_row1 = Row(
        [
            ElevatedButton(text='7',  on_click=button_click),
            ElevatedButton(text='8',  on_click=button_click),
            ElevatedButton(text='9',  on_click=button_click),
            ElevatedButton(text='*',  on_click=button_click),
        ]
    )
    button_row2 = Row(
        [
            ElevatedButton(text='4',  on_click=button_click),
            ElevatedButton(text='5',  on_click=button_click),
            ElevatedButton(text='6',  on_click=button_click),
            ElevatedButton(text='-',  on_click=button_click),
        ]
    )
    button_row3 = Row(
        [
            ElevatedButton(text='1',  on_click=button_click),
            ElevatedButton(text='2',  on_click=button_click),
            ElevatedButton(text='3',  on_click=button_click),
            ElevatedButton(text='+',  on_click=button_click),
        ]
    )
    button_row4 = Row(
        [
            ElevatedButton(text='0',  on_click=button_click),
            ElevatedButton(text='.',  on_click=button_click),
            ElevatedButton(text='=',  on_click=button_click),
        ]
    )
    container = Container(
        width=350, padding=20,
        bgcolor=colors. BLACK,
        content=Column(
            [
                result,
                button_row0, button_row1, button_row2,
                button_row3, button_row4
            ]
        )
    )
    page.add(container)


if __name__ == '__main__':
    app(target=main)
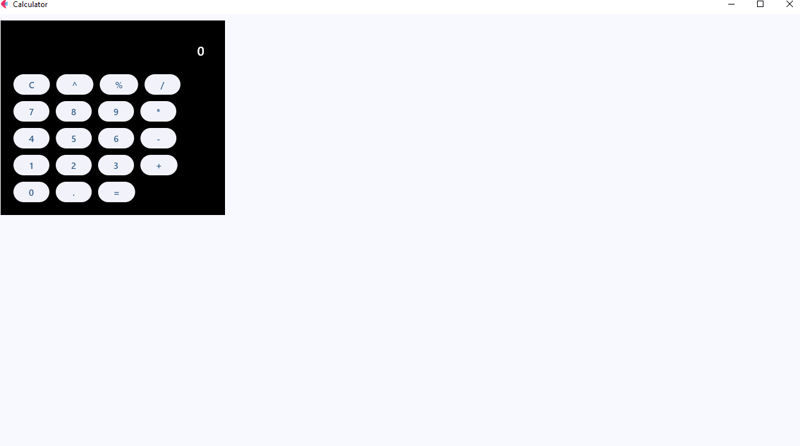
Nachdem Sie den obigen Code ausgeführt haben, sehen Sie die Ausgabe des Rechnerlayouts. Es sieht vielleicht nicht gut aus, aber das ist in Ordnung! Wir werden es verbessern, indem wir einige Abstände, einen Radius am Container und ein Thema hinzufügen, damit unser Rechner eleganter aussieht.
Ausgabe

CODE-ERKLÄRUNG
Okay, wir haben das Layout erstellt, oder? Nun ja, ich weiß trotzdem, dass einige von Ihnen nicht verstanden haben, was wir hier gerade getan haben. Setzen Sie sich einfach hin, keine Fragen, und lassen Sie mich erklären, was der Code bewirkt.
In the first line, we import our controls. Flet controls are widgets used to lay out our application into a meaningful User Interface. But here we have imported app, Page, Container, Column, Row,
TextField, colors, border_radius, ElevatedButton, TextAlign, TextStyle.
Even though some of them are not entire widgets, like app, colors, border_radius, TextAlign, and TextStyle. These are classes and methods that provide us with extra functionalities of our application, for example
The app, allows us to launch our app in a standalone mode targeting to the main instance of our application.* colors* allow us to style our controls that support the color and bgcolor attribute without us struggling to define their names and border_radius allows us to curve the corners of our containers.
In line 7 we define the main app instance to Page; a page is a container for View Controls. So here I won’t go deep into views since it’s beyond the scope of this tutorial, but you reference here.
We now give the title to our page, with the page.titleattribute, the title on the title bar of our app.
In lines 9-16 is the result control with its required attributes, though it has many, we are gonna use these ones for this project, as you can see we have add a place holder of 0, giving it a size of 20, color to white, align text to right, and the read-only to true so we don’t allow external of soft keyboards to work directly in it.
Line 18 we defined our event handler, button_click this is where we will apply the logic to function our application, eventually making it a working calculator, but for now I just used a pass statement as a placeholder.
From lines 21 – 59, we defined our rows using the Row Widget, the row widget is a control that displays its children in a horizontal array or layout from left to right, similar to the linear layout in Android development, or inline elements in CSS the row controls works in the same way as them, it lays out controls in a horizontal axis or linearly.
Then the ElevatedButton_will represent buttons on the calculator’s UI, but notice we have given it the text and _onclick attributes, the text defines the data that will be displayed on the results when clicked using the onclick attribute that will call for the function button_click to handle events accordingly.
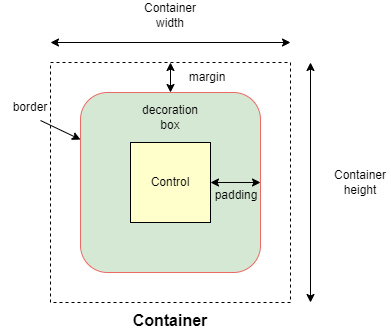
We have the container, the container is a control that will allow us to decorate a control with background color, spacing, applying borders and border radius, and position it with padding, margin, and alignment.
A container follows the box-model concept like the one for CSS as in the figure below,

The column control, like the Row control, this one displays its children in a vertical array or layout from top to bottom, this will allow us to vertically lay our buttons in the right order.
Now after defining our UI elements, we need to display them to our application and then call it. We do that by using the page.add() method which allows us to add and build our UI logically.
Then we have to call our app in the stand-alone mode, and that’s what lines 74-75 accomplished.
Adding functionality
Update your button click function to match this code below.
def button_click(e):
        if e.control.text == "=":
            try:
                result.value = str(eval(result.value))
            except Exception:
                result.value = "Error"
        elif e.control.text == "C":
            result.value = ""
        # elif e.control.text == "^":
        # logic for powers
        # pass
        else:
            result.value += e.control.text
        result.update()
CODE EXPLANATION
Okay, what does this code do under the hood; the button_click function is designed to handle various button click events within our calculator app.
Save to apply our current changes then run the calculator and see the results.
Here is a breakdown of how the code works
- Retrieving the button text: when a button is clicked, the function retrieves the button’s text (e.g., ‘1’, ‘2’, ‘+’, ‘-‘, ‘C’, ‘=’) through the e.control.text. this tells the functions which button the user has interacted with
- Clearing the display: when the user clicks the ‘C’ button, the calculator’s input is cleared. The result is set to an empty string (“”), and the display is reset to 0. This effectively clears the display making the calculator ready for a new input. Talk but a fresh number meal.
- Evaluating expressions: if the user clicks the “=” button, the calculator needs to evaluate the current mathematical expression, here we used the str() and eval() functions, and the str() function houses the eval() function so that the result is directly converted into a string and theeval() function will compute the result of the expression, then displayed as a string to our calculator’s display. Or else if the expression is invalid, an exception is caught, and the “Error” message will be displayed instead.
- For the rest of the buttons like numbers and operators: the function will append the button’s text to the display (which is initially “0” or when cleared), it replaces “0” with the button value, otherwise it adds button value to the end of the display.
- After processing the button click, the page is updated via page.update() method call to refresh the UI and show the updated input or result on the calculator's display. So every time you click the button and see the value on the display or a result, this is what the page.update() does.
NOTE: The eval() function is a quick way to evaluate expression but it can be risky with un-trusted input because it executes/evaluates any Python code. In a more secure app, you’d use a safer method for evaluating mathematical expressions.
Exercise: test your knowledge, of how would you handle the exponent ‘^’ expression so that if the user clicks the exponent button it returns the required output. For example, if the user inputs 2^2 the output will be 4, 5^5=25, and 3^4=81. You get the idea.
Let me know how you approached to this problem in the comments, okay, all done, let’s continue.
Improving our UI
Previously the user interface did not look that catchy and awesome, so let’s improve it, and update the buttons to match the following code.
button_row0 = Row(
    [
        ElevatedButton(text='C', expand=1, on_click=button_click,
                       bgcolor=colors.RED_ACCENT, color=colors.WHITE),
        ElevatedButton(text='^', expand=1, on_click=button_click,
                       bgcolor=colors.BLUE_ACCENT_100,
                       color=colors.RED_900
                       ),
        ElevatedButton(text='%', expand=1, on_click=button_click,
                       bgcolor=colors.BLUE_ACCENT_100,
                       color=colors.RED_900
                       ),
        ElevatedButton(text='/', expand=1, on_click=button_click,
                       bgcolor=colors.BLUE_ACCENT_100,
                       color=colors.RED_900
                       ),
    ]
)
button_row1 = Row(
    [
        ElevatedButton(text='7', expand=1, on_click=button_click),
        ElevatedButton(text='8', expand=1, on_click=button_click),
        ElevatedButton(text='9', expand=1, on_click=button_click),
        ElevatedButton(text='*', expand=1, on_click=button_click,
                       bgcolor=colors.BLUE_ACCENT_100,
                       color=colors.RED_900
                       ),
    ]
)
button_row2 = Row(
    [
        ElevatedButton(text='4', expand=1, on_click=button_click),
        ElevatedButton(text='5', expand=1, on_click=button_click),
        ElevatedButton(text='6', expand=1, on_click=button_click),
        ElevatedButton(text='-', expand=1, on_click=button_click,
                       bgcolor=colors.BLUE_ACCENT_100
                       ),
    ]
)
button_row3 = Row(
    [
        ElevatedButton(text='1', expand=1, on_click=button_click),
        ElevatedButton(text='2', expand=1, on_click=button_click),
        ElevatedButton(text='3', expand=1, on_click=button_click),
        ElevatedButton(text='+', expand=1, on_click=button_click,
                       bgcolor=colors.BLUE_ACCENT_100,
                       color=colors.RED_900),
    ]
)
button_row4 = Row(
    [
        ElevatedButton(text='0', expand=1, on_click=button_click),
        ElevatedButton(text='.', expand=1, on_click=button_click),
        ElevatedButton(
            text='=', expand=2, on_click=button_click,
            bgcolor=colors.GREEN_ACCENT, color=colors.AMBER
        ),
    ]
)
What have we changed exactly, hmm!
For the buttons, we could have used the width attribute but that won’t work as we want it would break the UI, feel free to test it.
But we have this expand attribute which allows only a Boolean and an int data type value.
For the normal buttons like the operators, numbers, and the clear button we expanded them to 1, and for the equals button, we expanded it by 2.
Now what does the expand attribute do, the expand attribute allows a control to fill the available space in a given container.
So the buttons with expand 1 will have an equal size of width and for the equals button it will expand 2, or in simple terms span two buttons or will equal two buttons in width.
Notice that we have added colors and background colors to some of our buttons to make them stand out from the numbers buttons.
Understand, great.
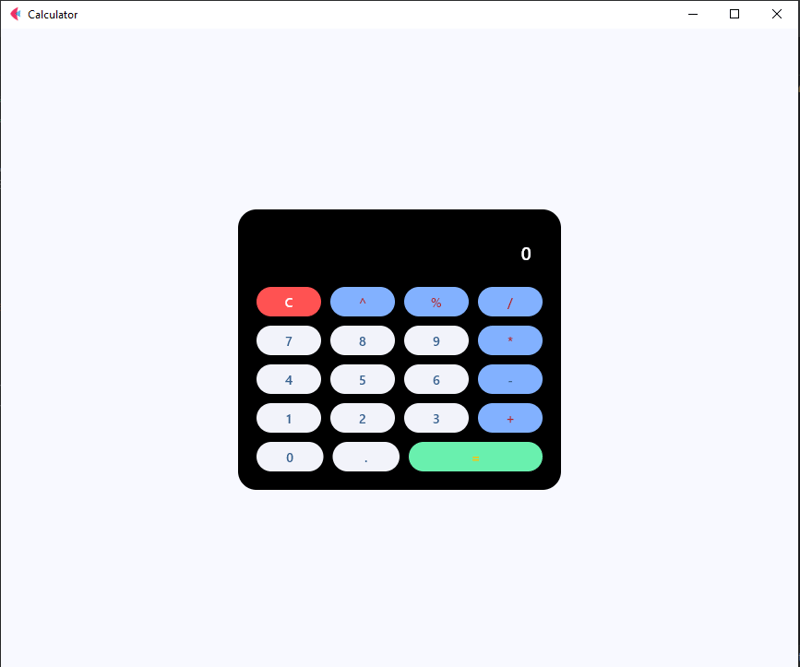
In the container add these attributes, just after the padding attribute to make it look more appealing and user friendly.
border_radius=border_radius.all(20),
Output

Now, you have a fully functional calculator built with Flet! Feel free to customize it to your liking or add more features. You can even package it as a standalone APK, AAB to launch on Google Play Store or Apple App Store
Here is the full code,
from flet import (
    app, Page, Container, Column, Row,
    TextField, colors, border_radius, ElevatedButton, TextAlign, TextStyle
)
from flet_core import ThemeMode


def main(page: Page):
    page.title = "Calculator"
    page.theme_mode = ThemeMode.DARK
    page.horizontal_alignment = page.vertical_alignment = 'center'
    result = TextField(
        hint_text='0', text_size=20,
        color='white', text_align=TextAlign.RIGHT,
        hint_style=TextStyle(
            color=colors.WHITE, size=20
        ),
        read_only=True
    )

    def button_click(e):
        if e.control.text == "=":
            try:
                result.value = str(eval(result.value))
            except Exception:
                result.value = "Error"
        elif e.control.text == "C":
            result.value = ""
        # elif e.control.text == "^":
        # logic for powers
        # pass
        else:
            result.value += e.control.text
        result.update()

    button_row0 = Row(
        [
            ElevatedButton(text='C', expand=1, on_click=button_click,
                           bgcolor=colors.RED_ACCENT, color=colors.WHITE),
            ElevatedButton(text='^', expand=1, on_click=button_click,
                           bgcolor=colors.BLUE_ACCENT_100,
                           color=colors.RED_900
                           ),
            ElevatedButton(text='%', expand=1, on_click=button_click,
                           bgcolor=colors.BLUE_ACCENT_100,
                           color=colors.RED_900
                           ),
            ElevatedButton(text='/', expand=1, on_click=button_click,
                           bgcolor=colors.BLUE_ACCENT_100,
                           color=colors.RED_900
                           ),
        ]
    )
    button_row1 = Row(
        [
            ElevatedButton(text='7', expand=1, on_click=button_click),
            ElevatedButton(text='8', expand=1, on_click=button_click),
            ElevatedButton(text='9', expand=1, on_click=button_click),
            ElevatedButton(text='*', expand=1, on_click=button_click,
                           bgcolor=colors.BLUE_ACCENT_100,
                           color=colors.RED_900
                           ),
        ]
    )
    button_row2 = Row(
        [
            ElevatedButton(text='4', expand=1, on_click=button_click),
            ElevatedButton(text='5', expand=1, on_click=button_click),
            ElevatedButton(text='6', expand=1, on_click=button_click),
            ElevatedButton(text='-', expand=1, on_click=button_click,
                           bgcolor=colors.BLUE_ACCENT_100
                           ),
        ]
    )
    button_row3 = Row(
        [
            ElevatedButton(text='1', expand=1, on_click=button_click),
            ElevatedButton(text='2', expand=1, on_click=button_click),
            ElevatedButton(text='3', expand=1, on_click=button_click),
            ElevatedButton(text='+', expand=1, on_click=button_click,
                           bgcolor=colors.BLUE_ACCENT_100,
                           color=colors.RED_900),
        ]
    )
    button_row4 = Row(
        [
            ElevatedButton(text='0', expand=1, on_click=button_click),
            ElevatedButton(text='.', expand=1, on_click=button_click),
            ElevatedButton(
                text='=', expand=2, on_click=button_click,
                bgcolor=colors.GREEN_ACCENT, color=colors.AMBER
            ),
        ]
    )
    container = Container(
        width=350, padding=20,
        bgcolor=colors.BLACK, border_radius=border_radius.all(20),
        content=Column(
            [
                result,
                button_row0, button_row1, button_row2,
                button_row3, button_row4
            ]
        )
    )
    page.add(container)


if __name__ == '__main__':
    app(target=main)
Conclusion
Building this calculator has been a fun experience for me and a learning experience for you, and I hope you enjoyed it too.
Let me know what kind of project you’d like to build using this framework or any other like PyQt, Kivy, or Tkinter. I’d be glad to make a tutorial on it. Or even web design and development tutorials, also are allowed.
Feel free to ask questions, I’ll do my best to answer them.
If you've read this far, thank you—I appreciate it!
Das obige ist der detaillierte Inhalt vonErstellen eines Taschenrechners mit Flet und Python. Für weitere Informationen folgen Sie bitte anderen verwandten Artikeln auf der PHP chinesischen Website!

