Heim >Java >javaLernprogramm >So generieren Sie Java WebSocket API-Dokumentation mit Smart-Doc
So generieren Sie Java WebSocket API-Dokumentation mit Smart-Doc
- 王林Original
- 2024-08-27 20:00:33702Durchsuche
Introduction
Smart-Doc is a powerful documentation generation tool that helps developers easily create clear and detailed API documentation for Java projects. With the growing popularity of WebSocket technology, Smart-Doc has added support for WebSocket interfaces starting from version 3.0.7. This article will detail how to use Smart-Doc to generate Java WebSocket interface documentation and provide a complete example of a WebSocket server.
Overview of WebSocket Technology
First, let's briefly understand WebSocket technology. The WebSocket protocol provides a full-duplex communication channel, making data exchange between the client and server simpler and more efficient. In Java, developers can easily implement WebSocket servers and clients using JSR 356: Java API for WebSocket.
WebSocket Annotations Overview
In Java WebSocket, the @ServerEndpoint annotation is used to define a POJO class as a WebSocket server endpoint. Methods marked with this annotation can be automatically called when WebSocket events (such as connection establishment, message reception, etc.) occur. Besides @ServerEndpoint, there are several other WebSocket-related annotations:
@OnOpen: This method is triggered when a client establishes a WebSocket connection with the server. It is usually used to initialize resources or send a welcome message.
@OnMessage: This method is triggered when the server receives a message from the client. It is responsible for processing the received message and performing the corresponding operations.
@OnClose: This method is triggered when the client closes the WebSocket connection. It is usually used to release resources or perform cleanup work.
@OnError: This method is triggered if an error occurs during WebSocket communication. It handles error situations, such as logging or notifying the user.
Introduction to Smart-Doc
Smart-Doc is a lightweight API documentation generation tool based on Java. It supports extracting interface information from source code and comments, automatically generating documentation in Markdown format. For WebSocket projects, this means you can directly extract documentation from your ServerEndpoint classes without manually writing tedious documentation descriptions.
https://github.com/TongchengOpenSource/smart-doc
Configuring Smart-Doc to Generate WebSocket Interface Documentation
Preparing the Environment
Ensure your development environment has the following components installed:
- Java 17 or higher
- Maven or Gradle as the build tool
- Latest version of Smart-Doc plugin
- WebSocket server implementation library, such as javax.websocket (usually included in Java SE)
Creating a WebSocket Server
Adding Plugin Dependency
Add the Smart-Doc dependency in the pom.xml file:
<plugins>
    <plugin>
        <groupId>com.ly.smart-doc</groupId>
        <artifactId>smart-doc-maven-plugin</artifactId>
        <version>[Latest version]</version>
        <configuration>
            <!--smart-doc-->
            <configFile>./src/main/resources/smart-doc.json</configFile>
        </configuration>
    </plugin>
</plugins>
Creating a WebSocket Server Endpoint
Define the message type (Message), a simple POJO representing the message received from the client.
public class Message {
    private String content;

    // getter and setter methods
}
Define the response type (SampleResponse), a simple POJO representing the response message to be sent back to the client.
public class SampleResponse {
    private String responseContent;
    // getter and setter methods
}
Implement the message decoder (MessageDecoder), responsible for converting the message sent by the client from JSON format to a Message object.
public class MessageDecoder implements Decoder.Text<Message> {

    private static final ObjectMapper objectMapper = new ObjectMapper();
    @Override
    public Message decode(String s) throws DecodeException {
        try {
            return objectMapper.readValue(s, Message.class);
        } catch (Exception e) {
            throw new DecodeException(s, "Unable to decode text to Message", e);
        }
    }
    @Override
    public boolean willDecode(String s) {
        return (s != null);
    }

    @Override
    public void init(EndpointConfig endpointConfig) {
    }
    @Override
    public void destroy() {
    }
}
Implement the response encoder (MessageResponseEncoder).
public class MessageResponseEncoder implements Encoder.Text<SampleResponse> {

    private static final ObjectMapper objectMapper = new ObjectMapper();

    @Override
    public String encode(SampleResponse response) {
        try {
            return objectMapper.writeValueAsString(response);
        } catch (Exception e) {
            throw new RuntimeException("Unable to encode SampleResponse", e);
        }
    }

    @Override
    public void init(EndpointConfig endpointConfig) {
    }

    @Override
    public void destroy() {
    }
}
Use the ServerEndpoint annotation to create a simple WebSocket server.
/**
 * WebSocket server endpoint example.
 */
@Component
@ServerEndpoint(value = "/ws/chat/{userId}",
        decoders = {MessageDecoder.class},
        encoders = {MessageResponseEncoder.class})
public class ChatEndpoint {

    /**
     * Called when a new connection is established.
     *
     * @param session the client session
     * @param userId  the user ID
     */
    @OnOpen
    public void onOpen(Session session, @PathParam("userId") String userId) {
        System.out.println("Connected: " + session.getId() + ", User ID: " + userId);
    }

    /**
     * Called when a message is received from the client.
     *
     * @param message the message sent by the client
     * @param session the client session
     * @return the response message
     */
    @OnMessage
    public SampleResponse receiveMessage(Message message, Session session) {
        System.out.println("Received message: " + message);
        return new SampleResponse(message.getContent());
    }

    /**
     * Called when the connection is closed.
     *
     * @param session the client session
     */
    @OnClose
    public void onClose(Session session) {
        System.out.println("Disconnected: " + session.getId());
    }

    /**
     * Called when an error occurs.
     *
     * @param session   the client session
     * @param throwable the error
     */
    @OnError
    public void onError(Session session, Throwable throwable) {
        throwable.printStackTrace();
    }
}
Configuring Smart-Doc
Create a smart-doc.json configuration file to let Smart-Doc know how to generate documentation.
{
  "serverUrl": "http://smart-doc-demo:8080", // Set the server address, not required
  "outPath": "src/main/resources/static/doc" // Specify the output path of the document
}
Generating Documentation
Run the following command in the command line to generate documentation:
mvn smart-doc:websocket-html
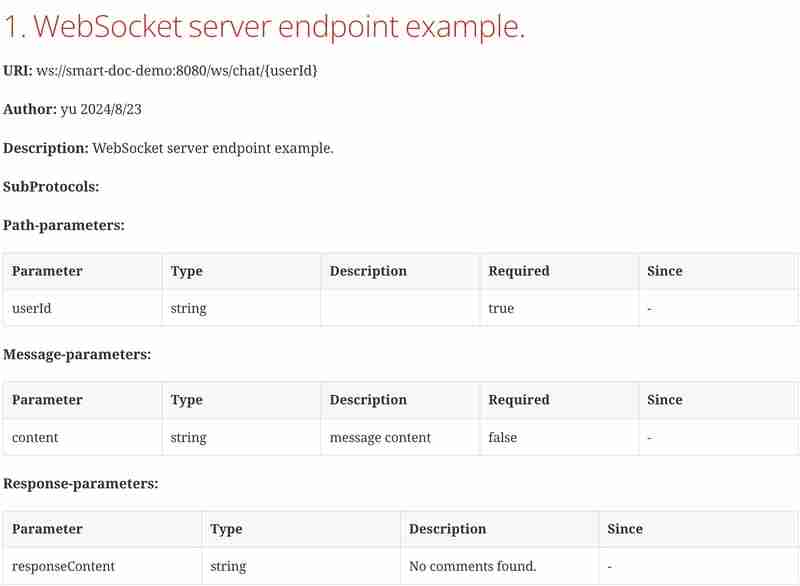
Viewing the Documentation
After the documentation is generated, you can find it in the src/main/resources/static/doc/websocket directory. Open the websocket-index.html file in a browser to view the WebSocket API documentation.

Conclusion
Automatically generating Java WebSocket interface documentation with Smart-Doc not only saves a lot of manual documentation writing time but also ensures the accuracy and timely updates of the documentation. It has been proven that a good documentation management strategy can significantly improve development efficiency and code quality. With tools like Smart-Doc, you can focus more on the development of WebSocket applications without worrying about documentation maintenance issues.
Das obige ist der detaillierte Inhalt vonSo generieren Sie Java WebSocket API-Dokumentation mit Smart-Doc. Für weitere Informationen folgen Sie bitte anderen verwandten Artikeln auf der PHP chinesischen Website!

