Heim >Web-Frontend >js-Tutorial >Lesen Sie Telefonkontakte mit JavaScript
Lesen Sie Telefonkontakte mit JavaScript
- WBOYWBOYWBOYWBOYWBOYWBOYWBOYWBOYWBOYWBOYWBOYWBOYWBOriginal
- 2024-08-19 18:33:251023Durchsuche
Anmerkung des Autors: Die in diesem Artikel beschriebenen Technologien und Prozesse sind experimentell und funktionieren nur in einigen wenigen Browsern. Zum Zeitpunkt des Schreibens wurde die Contact Picker API nur von Android Chrome (ab Version 80) und iOS Safari (ab Version 14.5, allerdings nur hinter einer Flagge) unterstützt. Wenn Sie die Funktionalität überprüfen möchten, können Sie sich eine laufende Demo auf meiner Website ansehen.
Das Lesen von Einträgen aus der Kontaktliste auf einem Telefon oder Tablet war traditionell auf native Apps beschränkt. Aber mit der Contact Picker API können wir genau das mithilfe von JavaScript tun.
Diese Funktion kann in Apps interessant sein, die Kontaktinformationen wie Telefonnummern oder VoIP benötigen, in sozialen Netzwerken, in denen wir bekannte Personen entdecken möchten, oder in Apps, die das Ausfüllen von Formularinformationen erfordern, ohne Anwendungen auszutauschen, um die Daten anzuzeigen.
Die API und das Gerät schränken die verfügbaren Eigenschaften ein. Es gibt fünf Standardoptionen, die Entwickler auswählen können:
- Namen
- Telefone
- E-Mails
- Adressen
- Symbole
Die Pluralformen sind hier wichtig, da ein Kontakt mehr als eine Telefonnummer, E-Mail-Adresse oder mehrere Adressen haben kann. Die zurückgegebenen Daten befinden sich aus Konsistenzgründen immer in Arrays, auch wenn es sich um einen einzelnen Wert handelt. Mehr dazu später.
Datenschutz und Sicherheit
Die auf einem Telefon gespeicherten Kontaktinformationen können vertrauliche Informationen enthalten, die wir sorgfältig behandeln müssen. Aus diesem Grund müssen wir Datenschutz- und Sicherheitsaspekte berücksichtigen:
- Der Contact Picker-API-Code muss im Browserkontext der obersten Ebene ausgeführt werden. Es verhindert, dass externer Code wie Anzeigen oder Plugins von Drittanbietern die Kontaktliste auf Ihrem Telefon liest.
- Der Contact Picker-API-Code kann nur nach einer Benutzergeste ausgeführt werden. Daher können Entwickler den Prozess nicht vollständig automatisieren. Der Benutzer muss handeln, um die Kontaktablesung auszulösen.
- Die Person muss den Zugriff auf die Kontaktliste erlauben. Diese Einschränkung wird vom Telefon und nicht von JS auferlegt. Der Benutzer muss dem Browser die Berechtigung erteilen, auf die Kontakte zuzugreifen (sofern er diese nicht bereits hat).
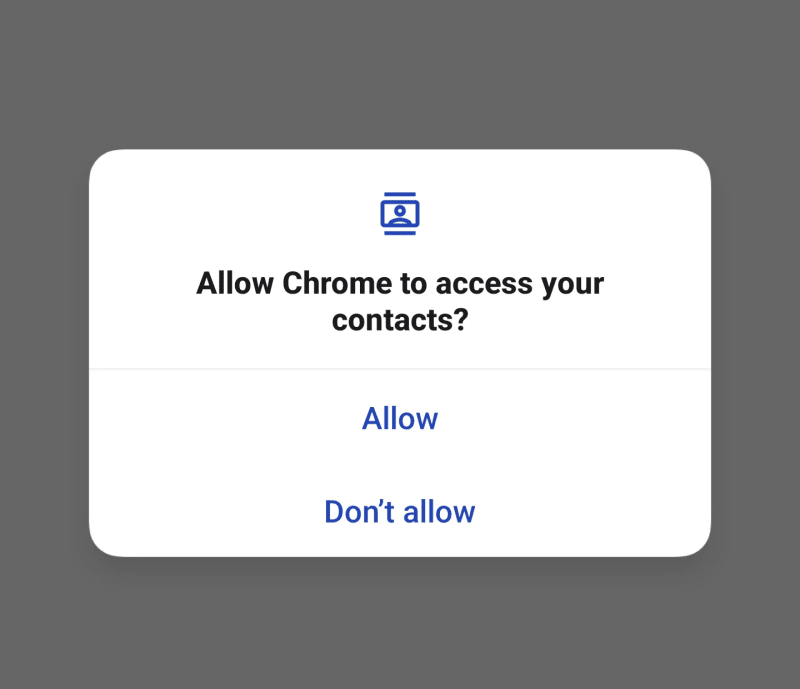
Wenn sie zum ersten Mal eine Website verwenden, die die Contact Picker API verwendet, erhalten sie möglicherweise eine Meldung wie diese:

Das Telefon zeigt dieses Popup jedes Mal an, bis der Benutzer auf „Zulassen“ tippt. Die Contact Picker-API wird erst ausgeführt, wenn dies geschieht. Was gut ist; Wir möchten sicherstellen, dass Benutzer die richtigen Berechtigungen erteilen. Es ist auch gut, dass es eine einmalige Sache ist; Die Erteilung einer Autorisierung jedes Mal, wenn die Seite den Contact Picker-API-Code ausführt, wäre nervig.
Die API und der Code
Die Contact Picker API definiert nur zwei Methoden:
- getProperties(): gibt eine Liste der Eigenschaften zurück, die auf dem Gerät zum Lesen verfügbar sind. In der Definition gibt es nur fünf: „Adresse“, „E-Mail“, „Symbol“ (dies ist möglicherweise nicht das Kontaktbild), „Name“, „Tel“ (Telefon), aber das Gerät ermöglicht möglicherweise nicht allen den Zugriff von ihnen.
- select(): öffnet das Kontakt-Popup und gibt die Auswahl zurück, sobald der Benutzer die Aktion abgeschlossen hat. Es benötigt zwei Parameter: eine Liste der zu lesenden Eigenschaften und ein optionales Objekt mit Optionen.
Beide Methoden geben Versprechen zurück, aber wenn man bedenkt, dass die Aktionen, die sie auslösen, den regulären Fluss der App blockieren, sollten wir bei der Verarbeitung sie async/await verwenden.
Es kann verlockend sein, getProperties() zu ignorieren und alle Eigenschaften direkt anzufordern. Aber seien Sie vorsichtig, wenn Sie das tun: Es wird wahrscheinlich funktionieren, aber wenn eine der angegebenen Eigenschaften nicht verfügbar ist, löst die Methode select() eine Ausnahme aus.
Beispiel
Eine Demo der Contact Picker API ist in Aktion (führen Sie sie hier online aus oder schauen Sie sich dieses Video an). Wenn die API unterstützt wird, wird eine Schaltfläche angezeigt, die die Telefonnummer, den Namen und die E-Mail-Adresse des Kontakts liest, um sie anzuzeigen.
Zuerst brauchen wir den Knopf. Wie weiter oben im Abschnitt „Datenschutz und Sicherheit“ beschrieben, ist eine Benutzeraktion erforderlich, bevor wir die API aufrufen können, sodass wir ohne Benutzerinteraktion nichts auslösen können:
<button onclick="getContactData()">Show contact data</button>
Der Hauptcode befindet sich in der Funktion getContactData(). Aber welchen Sinn hätte es vorher, die Schaltfläche anzuzeigen, wenn die Contact Picker-API nicht verfügbar ist? Lassen Sie uns die Schaltfläche ausblenden, wenn sie nicht verfügbar ist. Oder noch besser: Lassen Sie uns die Schaltfläche standardmäßig ausblenden (durch Hinzufügen des ausgeblendeten Attributs) und nur anzeigen, wenn die API verfügbar ist.
// only show the button if browser supports Contact Picker API
if ("contacts" in navigator) {
  document.querySelector("button").removeAttribute("hidden");
}
Da nun die Schaltflächenlogik eingerichtet ist, konzentrieren wir uns auf getContactData(). Hier ist eine kommentierte Version der Funktion:
// it is asynchronous because we'll wait for the modal selection
async function getContactData() {
  // indicate what contact values will be read
  const props = ["tel", "name", "email"];

  // wrap everything in a try...catch, just in case
  try {
    // open the native contact selector (after permission is granted)
    const contacts = await navigator.contacts.select(props);

    // this will execute after the native contact selector is closed
    if (contacts.length) {
      // if there's data, show it
      alert("Selected data: " + JSON.stringify(contacts));
    } else {
      // ...if not, indicate nothing was selected
      alert("No selection done");
    }
  } catch (ex) {
    // if something fails, show the error message
    alert(ex.message)
  }
}
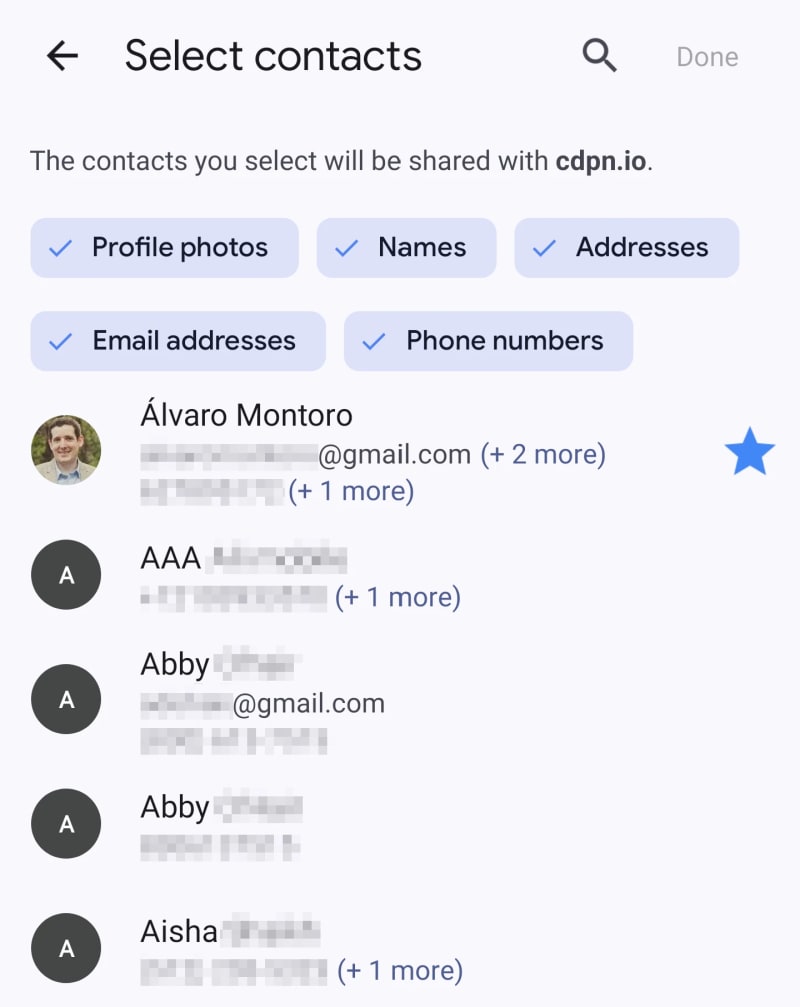
Once the button triggers this function, and if the browser has permissions (see screenshot in the previous section), the contact modal will show up, indicating essential information: the URL reading the data, what data it will return, and the list of contacts to pick from.

After closing the modal, the contacts variable will store the data in JSON as an array with an object containing the information requested (it may be empty if it is not available in the contact card).
For example, this is the result after selecting myself as a contact (fake data):
[
  {
    "address": [],
    "email": [ "alvarosemail@gmail.com" ],
    "icon": [],
    "name": [ "Alvaro Montoro" ],
    "tel": [ "555-555-5555", "555-123-4567" ]
  }
]
If the data includes an icon, it will be a blob with the image. If the data includes an address, it will be a more complex object with street, city, country, ZIP code, etc. You can check the returned values in the specification.
But why an array if we only selected one contact? Because there's an option to choose more than one contact!
Selecting Multiple Contacts
It is possible to select more than one contact. If we want to do that, we need to pass a second parameter to the navigator.contacts.select() method indicating this option.
const props = ["tel", "address", "icon", "name", "email"];
// only one option available: read multiple or only one (default)
const options = { multiple: true };

try {
  const contacts = await navigator.contacts.select(props, options);
  // ...
The result is an array of contacts, so the rest of the code could remain the same for this example.
The code above can be intimidating, mainly because of all the comments I added. Here's a lightly commented version of the code above. As you may notice, it is pretty simple:
async function getContactData() {
  if ("contacts" in navigator) {
    const props = await navigator.contacts.getProperties();
    const options = { multiple: true };

    try {
      const contacts = await navigator.contacts.select(props, options);

      if (contacts.length) {
        // code managing the selected data
      } else {
        // code when nothing was selected
      }
    } catch (ex) {
      // code if there was an error
    }
  }
}
You can check out a running demo on my website. Don't worry, I don't do any with the contact information beyond writing it on the screen. But review the code before if you don't trust me.
Conclusion: Privacy Over Piracy
Contact information is PII (Personally Identifiable Information), and we must treat it with all the care and security that sensitive data requires.
Apart from possible legal requirements that I am not going to go through (because I don't know them, and they change from country to country), here are some basic guidelines when dealing with sensitive data:
- Respect people's privacy. Don't force them to share information they don't want to share.
- Treat the data with care and in a safe way. Would you be comfortable if the data you are processing were yours?
- Don't store data if you don't need to. Read it, use it, forget it. Don't store data that you are not using.
- Only get the data that you need. Don't be sneaky or shady. Get just what's required to build credibility and trust.
Suppose a web app tries to read addresses, names, or emails while selecting a phone number. If that happened to me, I would automatically reject the permission and leave the website.
So, explore JavaScript and the Contact Picker API, but always remember that there's a person behind the screen and that the data they share could be risky if it falls into the wrong hands. Don't be reckless.
If you enjoyed this article about JavaScript and like to test Web APIs and different things with JS, check out this other article:
Develop a Rock Band game with HTML and JavaScript
Das obige ist der detaillierte Inhalt vonLesen Sie Telefonkontakte mit JavaScript. Für weitere Informationen folgen Sie bitte anderen verwandten Artikeln auf der PHP chinesischen Website!
In Verbindung stehende Artikel
Mehr sehen- Eine eingehende Analyse der Bootstrap-Listengruppenkomponente
- Detaillierte Erläuterung des JavaScript-Funktions-Curryings
- Vollständiges Beispiel für die Generierung von JS-Passwörtern und die Erkennung der Stärke (mit Download des Demo-Quellcodes)
- Angularjs integriert WeChat UI (weui)
- Wie man mit JavaScript schnell zwischen traditionellem Chinesisch und vereinfachtem Chinesisch wechselt und wie Websites den Wechsel zwischen vereinfachtem und traditionellem Chinesisch unterstützen – Javascript-Kenntnisse

