
Heim >Java >javaLernprogramm >Im Spring MVC-Interview gestellte Fragen
Im Spring MVC-Interview gestellte Fragen

- 王林Original
- 2024-07-16 17:15:18419Durchsuche
1. Was ist Modell-1-Architektur?
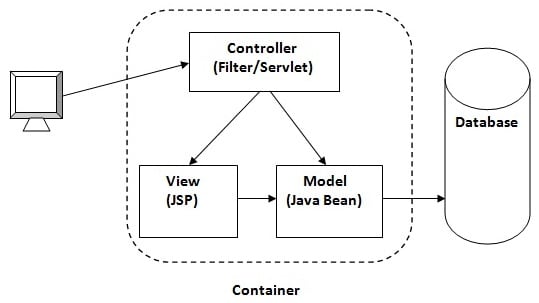
Modell-1-Architektur ist ein frühes Entwurfsmuster für die Entwicklung von Webanwendungen. In dieser Architektur spielt JSP (JavaServer Pages) eine zentrale Rolle und übernimmt sowohl die Präsentation als auch die Geschäftslogik.

Wie Sie in der obigen Abbildung sehen können, gibt es ein Bild, das den Ablauf der Model1-Architektur zeigt.
- Browser sendet Anfrage für die JSP-Seite
- JSP greift auf Java Bean zu und ruft Geschäftslogik auf
- Java Bean stellt eine Verbindung zur Datenbank her und ruft/speichert Daten
- Antwort wird an den Browser gesendet, der von JSP generiert wird
-
Fluss:
- Kundenanfragen werden direkt an JSP-Seiten gesendet.
- JSP-Seiten verarbeiten die Anfrage, interagieren mit dem Modell (Daten) und generieren eine Antwort.
-
Eigenschaften:
- Einfach und unkompliziert für kleine Anwendungen.
- JSP-Seiten kombinieren Präsentationslogik (HTML) mit Geschäftslogik (Java-Code).
- Eingeschränkte Trennung der Belange.
-
Nachteile:
- Schwer zu warten und zu skalieren.
- Eine Vermischung von Präsentation und Geschäftslogik kann zu Spaghetti-Code führen.
2. Was ist Modell-2-Architektur?
Modell-2-Architektur ist ein erweitertes Entwurfsmuster für die Entwicklung von Webanwendungen, allgemein bekannt als MVC-Architektur (Model-View-Controller). Es unterteilt die Anwendungslogik in drei Hauptkomponenten: Modell, Ansicht und Controller.
-
Fluss:
- Client-Anfragen werden an einen Controller gesendet.
- Der Controller verarbeitet die Anfrage, interagiert mit dem Modell und leitet die Antwort an eine Ansicht weiter.
- Die Ansicht gibt die Antwort an den Client weiter.
-
Komponenten:
- Modell: Stellt die Daten und Geschäftslogik der Anwendung dar.
- Ansicht: Stellt die Präsentationsschicht dar (typischerweise JSP oder andere Template-Engines).
- Controller: Verarbeitet Benutzeranfragen und steuert den Ablauf der Anwendung.
-
Eigenschaften:
- Klare Trennung der Belange.
- Einfacher zu warten und zu erweitern.
- Skalierbarer für größere Anwendungen.
3. Was ist die Front-Controller-Architektur des Modells 2?
Model 2 Front Controller Architecture ist eine Weiterentwicklung der Model 2 (MVC)-Architektur, bei der ein einzelner Controller, der sogenannte Front Controller, alle eingehenden Anfragen verarbeitet. Dieses Muster entkoppelt die Anforderungsverarbeitungslogik weiter von der Geschäftslogik und dem View-Rendering.
-
Fluss:
- Client-Anfragen werden an einen einzigen Front-Controller gesendet.
- Der Front-Controller delegiert die Anfrage an bestimmte Handler oder Controller.
- Diese Handler interagieren mit dem Modell und leiten die Antwort an die entsprechende Ansicht weiter.
-
Komponenten:
- Front Controller: Ein zentraler Controller, der alle eingehenden Anfragen verarbeitet und sie an entsprechende Handler weiterleitet.
- Handler/Controller: Spezifische Controller, die einzelne Anfragen und Geschäftslogik verarbeiten.
- Modell: Stellt die Daten und Geschäftslogik der Anwendung dar.
- Ansicht: Stellt die Präsentationsschicht dar (typischerweise JSP oder andere Template-Engines).
-
Eigenschaften:
- Zentrale Steuerung der Anfragebearbeitung.
- Vereinfachte Konfiguration und Verwaltung des Anwendungsflusses.
- Erweiterte Sicherheits- und Vorverarbeitungsfunktionen (z. B. Authentifizierung, Protokollierung).
- Einfachere Implementierung allgemeiner Funktionen wie Authentifizierung, Protokollierung und Ausnahmebehandlung.
Können Sie eine Beispiel-Controller-Methode in Spring MVC zeigen?
@Controller
public class MyController {

    @RequestMapping("/hello")
    public String sayHello(Model model) {
        model.addAttribute("message", "Hello, World!");
        return "helloView";
    }
}
Zusammenfassung: Das obige Beispiel zeigt eine einfache Controller-Methode in Spring MVC, die eine /hello-Anfrage der sayHello-Methode zuordnet. Die Methode fügt dem Modell eine Nachricht hinzu und gibt einen Ansichtsnamen (helloView) zurück.
Can you explain a simple flow in Spring MVC?
- Client Request: A user sends an HTTP request to a URL mapped to a Spring MVC controller.
- DispatcherServlet: The request is received by the DispatcherServlet, the front controller in Spring MVC.
- Handler Mapping: The DispatcherServlet consults the HandlerMapping to determine the appropriate controller to handle the request.
- Controller: The controller processes the request. In the example above, MyController's sayHello method handles the request.
- Model: The controller interacts with the model to retrieve or update data. It adds data to the model to be used in the view.
- View Name: The controller returns the view name (e.g., helloView).
- ViewResolver: The ViewResolver resolves the logical view name to a physical view (e.g., helloView.jsp).
- Render View: The view (e.g., JSP, Thymeleaf) is rendered and returned to the client.
Summary: A Spring MVC request flow starts with a client request and goes through the DispatcherServlet, HandlerMapping, and controller. The controller interacts with the model, returns a view name, and the ViewResolver resolves it to a physical view which is then rendered and returned to the client.
What is a ViewResolver?
A ViewResolver is a component in Spring MVC that resolves view names to actual view files. It maps the logical view name returned by the controller to a specific view implementation (e.g., JSP file, Thymeleaf template).
Example:
@Bean
public InternalResourceViewResolver viewResolver() {
    InternalResourceViewResolver resolver = new InternalResourceViewResolver();
    resolver.setPrefix("/WEB-INF/views/");
    resolver.setSuffix(".jsp");
    return resolver;
}
Summary: A ViewResolver in Spring MVC maps logical view names to physical view files, enabling the separation of view names in controllers from the actual view files.
What is a Model?
A Model in Spring MVC is an interface that provides a way to pass attributes to the view for rendering. It acts as a container for the data to be displayed in the view.
Example:
@Controller
public class MyController {

    @RequestMapping("/hello")
    public String sayHello(Model model) {
        model.addAttribute("message", "Hello, World!");
        return "helloView";
    }
}
Summary: The Model in Spring MVC is used to pass data from the controller to the view. It allows adding attributes that will be available in the view for rendering.
What is ModelAndView?
ModelAndView is a holder for both the model and the view in Spring MVC. It encapsulates the data (model) and the view name or view object in one object.
Example:
@Controller
public class MyController {

    @RequestMapping("/greeting")
    public ModelAndView greeting() {
        ModelAndView modelAndView = new ModelAndView();
        modelAndView.setViewName("greetingView");
        modelAndView.addObject("message", "Hello, Spring MVC!");
        return modelAndView;
    }
}
Summary: ModelAndView in Spring MVC combines both the model data and the view name into one object, simplifying the return type from controllers when both model and view need to be specified.
What is a RequestMapping?
@RequestMapping is an annotation used to map HTTP requests to handler methods of MVC and REST controllers. It can map requests based on URL, HTTP method, request parameters, headers, and media types.
Example:
@Controller
@RequestMapping("/home")
public class HomeController {

    @RequestMapping(value = "/welcome", method = RequestMethod.GET)
    public String welcome(Model model) {
        model.addAttribute("message", "Welcome to Spring MVC!");
        return "welcomeView";
    }
}
Summary: @RequestMapping is an annotation in Spring MVC that maps HTTP requests to specific controller methods based on URL patterns, HTTP methods, and other parameters, allowing precise routing of requests.
Summary of All Concepts with Examples
-
Controller Method:
- Handles HTTP requests and returns a view name or ModelAndView.
- Example: @RequestMapping("/hello") public String sayHello(Model model)
-
Flow in Spring MVC:
- Client request → DispatcherServlet → HandlerMapping → Controller → Model → View name → ViewResolver → Render view → Response to client.
- Example: MyController's sayHello method.
-
ViewResolver:
- Maps logical view names to actual view files.
- Example: InternalResourceViewResolver mapping helloView to helloView.jsp.
-
Model:
- Passes data from the controller to the view.
- Example: model.addAttribute("message", "Hello, World!")
-
ModelAndView:
- Encapsulates both model data and view name.
- Example: ModelAndView modelAndView = new ModelAndView("greetingView"); modelAndView.addObject("message", "Hello, Spring MVC!");
-
RequestMapping:
- Maps HTTP requests to controller methods.
- Example: @RequestMapping(value = "/welcome", method = RequestMethod.GET)
What is Dispatcher Servlet?
The DispatcherServlet is the central dispatcher for HTTP request handlers/controllers in a Spring MVC application. It is responsible for routing incoming web requests to appropriate controller methods, handling the lifecycle of a request, and returning the appropriate response.
How do you set up Dispatcher Servlet?
In a traditional Spring MVC application, you set up the DispatcherServlet in the web.xml configuration file or via Java configuration.
Using web.xml:
8459cedd22f378aa35db2cd2b63decac
    46309ed845064fdb06e746051efff9e0
        700b5f17c4d842e4bd410f680f40946bdispatcher72eca723e64ddd01187c8b4d58572fcb
        b472d9135dbff3dd7fcc77f5995c97d0org.springframework.web.servlet.DispatcherServlet4f01b97d64aea37f699ead4eb7bd2bbd
        380fae52cc7d04565d26dd4bbf4b5460
            c13d9669d2c8f87a36a39c8f95f41552contextConfigLocation02b9ad8b27bc78bd91c18db845cdde4a
            f226acac8cb0e4a9d59fcba58b57a899/WEB-INF/spring/dispatcher-config.xml22c8aeb51b7638a9da01bd5a66154ac1
        8f161518881ffd7712eaaadc573a3556
        4781e2cbaa93c386271b418d3a01af0813065abc64b27fbca30c0905ab93e8ea0
    20d42bb762ac7d7e594da3a264e47fcc

    870ae7edaa11700bcea972d006efb06e
        700b5f17c4d842e4bd410f680f40946bdispatcher72eca723e64ddd01187c8b4d58572fcb
        66e1775cbd9d5002635ae3285442ba88/3ec4a5583206d351b61ed79c1a0f9c66
    cb808b0e21d3ee32c89fe10adc3f12ec
9ec23d40699efb4cb39a61797a06a5a1
Using Java Configuration:
import org.springframework.web.servlet.support.AbstractAnnotationConfigDispatcherServletInitializer;

public class MyWebAppInitializer extends AbstractAnnotationConfigDispatcherServletInitializer {

    @Override
    protected Class6b3d0130bba23ae47fe2b8e8cddf0195[] getRootConfigClasses() {
        return new Class[] { RootConfig.class };
    }

    @Override
    protected Class6b3d0130bba23ae47fe2b8e8cddf0195[] getServletConfigClasses() {
        return new Class[] { WebConfig.class };
    }

    @Override
    protected String[] getServletMappings() {
        return new String[] { "/" };
    }
}
In this setup, RootConfig and WebConfig are configuration classes annotated with @Configuration.
Do we need to set up Dispatcher Servlet in Spring Boot?
No, in Spring Boot, you do not need to explicitly set up the DispatcherServlet. Spring Boot automatically configures the DispatcherServlet for you. By default, it is mapped to the root URL pattern (/), and Spring Boot will scan your classpath for @Controller and other related annotations.
Spring Boot Application Class:
import org.springframework.boot.SpringApplication;
import org.springframework.boot.autoconfigure.SpringBootApplication;

@SpringBootApplication
public class MySpringBootApplication {
    public static void main(String[] args) {
        SpringApplication.run(MySpringBootApplication.class, args);
    }
}
In this setup, Spring Boot handles the DispatcherServlet setup internally, allowing you to focus on your application's logic without worrying about the boilerplate configuration.
Summary
- DispatcherServlet: The core of Spring MVC that routes requests to appropriate handlers.
- Traditional Setup: Configured via web.xml or Java configuration.
- Spring Boot: Automatically configured, no explicit setup required.
What is a Form Backing Object?
A form backing object in Spring MVC is a Java object that is used to capture form input data. It acts as a data holder for form fields, facilitating the transfer of form data between the view and the controller. The form backing object is typically a POJO (Plain Old Java Object) with properties that correspond to the form fields.
Example:
public class User {
    private String name;
    private String email;
    // Getters and setters
}
How is Validation Done Using Spring MVC?
Validation in Spring MVC is typically done using JSR-303/JSR-380 (Bean Validation API) annotations and a validator implementation. Spring provides support for validating form backing objects using these annotations and the @Valid or @Validated annotation in controller methods.
Example:
-
Form Backing Object with validation annotations:
import javax.validation.constraints.Email; import javax.validation.constraints.NotEmpty; public class User { @NotEmpty(message = "Name is required") private String name; @Email(message = "Email should be valid") @NotEmpty(message = "Email is required") private String email; // Getters and setters } -
Controller method with @Valid:
import org.springframework.stereotype.Controller;
import org.springframework.ui.Model;
import org.springframework.validation.BindingResult;
import org.springframework.web.bind.annotation.GetMapping;
import org.springframework.web.bind.annotation.ModelAttribute;
import org.springframework.web.bind.annotation.PostMapping;

import javax.validation.Valid;

@Controller
public class UserController {

    @GetMapping("/userForm")
    public String showForm(Model model) {
        model.addAttribute("user", new User());
        return "userForm";
    }

    @PostMapping("/userForm")
    public String submitForm(@Valid @ModelAttribute("user") User user, BindingResult result) {
        if (result.hasErrors()) {
            return "userForm";
        }
        // Process the form submission
        return "success";
    }
}
What is BindingResult?
BindingResult is an interface provided by Spring that holds the results of the validation and binding of form backing objects. It contains information about validation errors and can be used to determine whether the form submission is valid.
Example:
@PostMapping("/userForm")
public String submitForm(@Valid @ModelAttribute("user") User user, BindingResult result) {
    if (result.hasErrors()) {
        return "userForm";
    }
    // Process the form submission
    return "success";
}
How Do You Map Validation Results to Your View?
Validation results are automatically mapped to the view using the BindingResult object. The view can then access the error messages through the Spring form tags.
Example (JSP):
827d3670d5706a3274268d17a349d7a8
    e6f152194454d5f6a4f7b72bcf6a7290
    dc6dce4a544fdca2df29d5ac0ea9906b
        4e111bab785558b3f5bad2063cfcd34fName:78bb8645f10b3cdc5627dce8e0a840b2
        645f78a4f07731f0e08fced4f7fbfd4d
        4b4217ffcc16c33d32eadf706bec9bcc
    16b28748ea4df4d9c2150843fecfba68
    dc6dce4a544fdca2df29d5ac0ea9906b
        46cc296dd326cd551eec8b1db4228c0cEmail:78bb8645f10b3cdc5627dce8e0a840b2
        6ffd47e9b3eb77e64d1796d59265b0de
        25f92b6bc20931b0c2fb3d9ce33b380b
    16b28748ea4df4d9c2150843fecfba68
    92e8cbd9feac6a729893ae422743759e
b3d8064addd00f70ff6d40ba545c2152
What are Spring Form Tags?
Spring form tags are a set of JSP tags provided by the Spring Framework to simplify the development of web forms. These tags bind form fields to form backing objects, making it easier to handle form data and validation errors.
Common Spring Form Tags:
- dcf692f613adb8b674dc86af9f9f4fe0: Represents the form element.
- edbe0430c2c23d305d65c44cfff25426: Creates an input field.
- 1ae61cc4c078a3f2f0618a56cc99dd72: Creates a label for a field.
- 80543485fa06b6a65fd658188cbea065: Displays validation errors.
- 454c74e113e2aa887607892c89ffa753: Creates a select (dropdown) field.
- 3efe6714a6a9d0e21544aad8d7bf71f2: Represents an option in a dropdown field.
- 0f292309ceecf409176aee12902b0178: Creates a checkbox input.
- 6846bfb670dad571214c9b31a7ad5185: Creates a radio button input.
- 9700c5517386e563546737a8cd3ad043: Creates a hidden input field.
Example:
5654ff87869dae75ebfdcd74e0ec1acd
100db36a723c770d327fc0aef2ce13b1
6c04bd5ca3fcae76e30b72ad730ca86d
    c1a436a314ed609750bd7c7d319db4daUser Form2e9b454fa8428549ca2e64dfac4625cd
    827d3670d5706a3274268d17a349d7a8
        dc6dce4a544fdca2df29d5ac0ea9906b
            4e111bab785558b3f5bad2063cfcd34fName:78bb8645f10b3cdc5627dce8e0a840b2
            645f78a4f07731f0e08fced4f7fbfd4d
            4b4217ffcc16c33d32eadf706bec9bcc
        16b28748ea4df4d9c2150843fecfba68
        dc6dce4a544fdca2df29d5ac0ea9906b
            46cc296dd326cd551eec8b1db4228c0cEmail:78bb8645f10b3cdc5627dce8e0a840b2
            6ffd47e9b3eb77e64d1796d59265b0de
            25f92b6bc20931b0c2fb3d9ce33b380b
        16b28748ea4df4d9c2150843fecfba68
        92e8cbd9feac6a729893ae422743759e
    b3d8064addd00f70ff6d40ba545c2152
36cc49f0c466276486e50c850b7e4956
73a6ac4ed44ffec12cee46588e518a5e
Summary:
- Form Backing Object: A Java object that holds form data.
- Validation in Spring MVC: Done using JSR-303/JSR-380 annotations and the @Valid annotation in controllers.
- BindingResult: Holds validation and binding results.
- Mapping Validation Results: Done via the BindingResult object and Spring form tags.
- Spring Form Tags: JSP tags for simplifying form handling and validation in views.
What is a Path Variable?
A Path Variable in Spring MVC is used to extract values from the URI of a web request. It allows you to capture dynamic values from the URI and use them in your controller methods.
Example:
import org.springframework.stereotype.Controller;
import org.springframework.web.bind.annotation.PathVariable;
import org.springframework.web.bind.annotation.RequestMapping;
import org.springframework.web.bind.annotation.RequestMethod;
import org.springframework.web.bind.annotation.ResponseBody;

@Controller
public class MyController {

    @RequestMapping(value = "/user/{id}", method = RequestMethod.GET)
    @ResponseBody
    public String getUserById(@PathVariable("id") String userId) {
        return "User ID: " + userId;
    }
}
In this example, if a request is made to /user/123, the method getUserById will capture 123 as the userId parameter.
What is a Model Attribute?
A Model Attribute in Spring MVC is used to bind a method parameter or a return value to a named model attribute, which can be accessed in the view. It is typically used to prepare data for rendering in the view.
Example:
import org.springframework.stereotype.Controller;
import org.springframework.ui.Model;
import org.springframework.web.bind.annotation.ModelAttribute;
import org.springframework.web.bind.annotation.RequestMapping;
import org.springframework.web.bind.annotation.RequestMethod;

@Controller
public class MyController {

    @RequestMapping(value = "/form", method = RequestMethod.GET)
    public String showForm(Model model) {
        model.addAttribute("user", new User());
        return "userForm";
    }

    @RequestMapping(value = "/form", method = RequestMethod.POST)
    public String submitForm(@ModelAttribute User user) {
        // Process form submission
        return "result";
    }
}
In this example, the User object is added to the model and made available to the view (userForm.jsp). When the form is submitted, the User object is populated with the form data and processed in the submitForm method.
What is a Session Attribute?
A Session Attribute in Spring MVC is used to store model attributes in the HTTP session, allowing them to persist across multiple requests. This is useful for maintaining state between requests.
Example:
import org.springframework.stereotype.Controller;
import org.springframework.web.bind.annotation.ModelAttribute;
import org.springframework.web.bind.annotation.RequestMapping;
import org.springframework.web.bind.annotation.RequestMethod;
import org.springframework.web.bind.annotation.SessionAttributes;

@Controller
@SessionAttributes("user")
public class MyController {

    @RequestMapping(value = "/form", method = RequestMethod.GET)
    public String showForm(Model model) {
        model.addAttribute("user", new User());
        return "userForm";
    }

    @RequestMapping(value = "/form", method = RequestMethod.POST)
    public String submitForm(@ModelAttribute User user) {
        // Process form submission
        return "result";
    }

    @RequestMapping(value = "/clearSession", method = RequestMethod.GET)
    public String clearSession(SessionStatus status) {
        status.setComplete();
        return "sessionCleared";
    }
}
In this example, the User object is stored in the session and can be accessed across multiple requests. The clearSession method can be used to clear the session attributes.
Summary:
- Path Variable: Extracts values from the URI to use in controller methods.
- Model Attribute: Binds method parameters or return values to model attributes, making them accessible in views.
- Session Attribute: Stores model attributes in the HTTP session to maintain state across multiple requests.
What is an Init Binder?
An Init Binder in Spring MVC is a mechanism that allows you to customize the way data is bound to the form backing objects. It is used to initialize WebDataBinder, which performs data binding from web request parameters to JavaBean objects. @InitBinder methods are used to register custom editors, formatters, and validators for specific form fields or types.
Key Uses of Init Binder:
- Register Custom Property Editors: To convert form field values to specific types.
- Register Custom Formatters: To format the input/output of date, number, or other complex types.
- Add Validators: To perform custom validation logic.
Example of Init Binder
Scenario: You have a form that includes a date field and you want to use a specific date format.
Step 1: Define a form backing object
public class User {
    private String name;
    private Date birthDate;

    // Getters and setters
}
Step 2: Define a controller with an @InitBinder method
import org.springframework.stereotype.Controller;
import org.springframework.web.bind.WebDataBinder;
import org.springframework.web.bind.annotation.InitBinder;
import org.springframework.web.bind.annotation.ModelAttribute;
import org.springframework.web.bind.annotation.RequestMapping;
import org.springframework.web.bind.annotation.RequestMethod;
import org.springframework.web.bind.annotation.ResponseBody;

import java.text.SimpleDateFormat;
import java.util.Date;

@Controller
public class UserController {

    @InitBinder
    public void initBinder(WebDataBinder binder) {
        SimpleDateFormat dateFormat = new SimpleDateFormat("yyyy-MM-dd");
        dateFormat.setLenient(false);
        binder.registerCustomEditor(Date.class, new CustomDateEditor(dateFormat, false));
    }

    @RequestMapping(value = "/form", method = RequestMethod.GET)
    public String showForm(Model model) {
        model.addAttribute("user", new User());
        return "userForm";
    }

    @RequestMapping(value = "/form", method = RequestMethod.POST)
    @ResponseBody
    public String submitForm(@ModelAttribute User user) {
        // Process form submission
        return "Name: " + user.getName() + ", Birth Date: " + user.getBirthDate();
    }
}
Explanation:
- Form Backing Object: User class with name and birthDate fields.
-
Controller:
- The @InitBinder method initBinder is defined to customize the data binding process.
- WebDataBinder is used to register a custom editor (CustomDateEditor) for Date class.
- CustomDateEditor uses a SimpleDateFormat to parse and format dates in the "yyyy-MM-dd" format.
- The showForm method adds a new User object to the model and returns the view name userForm.
- The submitForm method processes the form submission and returns a response with the user's name and birth date.
Step 3: Define the form view (JSP example)
5654ff87869dae75ebfdcd74e0ec1acd
100db36a723c770d327fc0aef2ce13b1
6c04bd5ca3fcae76e30b72ad730ca86d
    c1a436a314ed609750bd7c7d319db4daUser Form2e9b454fa8428549ca2e64dfac4625cd
    827d3670d5706a3274268d17a349d7a8
        dc6dce4a544fdca2df29d5ac0ea9906b
            4e111bab785558b3f5bad2063cfcd34fName:78bb8645f10b3cdc5627dce8e0a840b2
            645f78a4f07731f0e08fced4f7fbfd4d
        16b28748ea4df4d9c2150843fecfba68
        dc6dce4a544fdca2df29d5ac0ea9906b
            bbebaf0d3a6f2e9a8e739b888f79ba80Birth Date (yyyy-MM-dd):78bb8645f10b3cdc5627dce8e0a840b2
            5794c60043d3c0fa7f0030f373269310
        16b28748ea4df4d9c2150843fecfba68
        92e8cbd9feac6a729893ae422743759e
    b3d8064addd00f70ff6d40ba545c2152
36cc49f0c466276486e50c850b7e4956
73a6ac4ed44ffec12cee46588e518a5e
Summary:
- Init Binder: A method annotated with @InitBinder in a Spring MVC controller that customizes data binding.
-
Key Uses:
- Register custom property editors.
- Register custom formatters.
- Add validators.
-
Example:
- Custom date formatting using CustomDateEditor.
- Binding form data to a User object with a birthDate field formatted as "yyyy-MM-dd".
This customization allows precise control over how form data is converted and validated before it is bound to the controller's method parameters.
To set a default date format in a Spring application, you typically use an @InitBinder method in your controller to register a custom date editor. This approach allows you to specify the date format that should be used for all date fields in your form backing objects.
Here is a detailed example:
Step-by-Step Guide to Setting a Default Date Format
1. Define the Form Backing Object
Create a simple Java class to represent your form data.
public class User {
    private String name;
    private Date birthDate;

    // Getters and setters
    public String getName() {
        return name;
    }

    public void setName(String name) {
        this.name = name;
    }

    public Date getBirthDate() {
        return birthDate;
    }

    public void setBirthDate(Date birthDate) {
        this.birthDate = birthDate;
    }
}
2. Define the Controller
Create a Spring MVC controller with an @InitBinder method to register the custom date editor.
import org.springframework.beans.propertyeditors.CustomDateEditor;
import org.springframework.stereotype.Controller;
import org.springframework.ui.Model;
import org.springframework.web.bind.WebDataBinder;
import org.springframework.web.bind.annotation.InitBinder;
import org.springframework.web.bind.annotation.ModelAttribute;
import org.springframework.web.bind.annotation.RequestMapping;
import org.springframework.web.bind.annotation.RequestMethod;

import java.text.SimpleDateFormat;
import java.util.Date;

@Controller
public class UserController {

    @InitBinder
    public void initBinder(WebDataBinder binder) {
        SimpleDateFormat dateFormat = new SimpleDateFormat("yyyy-MM-dd");
        dateFormat.setLenient(false);
        binder.registerCustomEditor(Date.class, new CustomDateEditor(dateFormat, false));
    }

    @RequestMapping(value = "/form", method = RequestMethod.GET)
    public String showForm(Model model) {
        model.addAttribute("user", new User());
        return "userForm";
    }

    @RequestMapping(value = "/form", method = RequestMethod.POST)
    public String submitForm(@ModelAttribute User user, Model model) {
        // Process form submission
        model.addAttribute("user", user);
        return "result";
    }
}
3. Define the View (JSP Example)
Create a JSP file for the form (e.g., userForm.jsp).
5654ff87869dae75ebfdcd74e0ec1acd
100db36a723c770d327fc0aef2ce13b1
6c04bd5ca3fcae76e30b72ad730ca86d
    c1a436a314ed609750bd7c7d319db4daUser Form2e9b454fa8428549ca2e64dfac4625cd
    827d3670d5706a3274268d17a349d7a8
        dc6dce4a544fdca2df29d5ac0ea9906b
            4e111bab785558b3f5bad2063cfcd34fName:78bb8645f10b3cdc5627dce8e0a840b2
            645f78a4f07731f0e08fced4f7fbfd4d
        16b28748ea4df4d9c2150843fecfba68
        dc6dce4a544fdca2df29d5ac0ea9906b
            bbebaf0d3a6f2e9a8e739b888f79ba80Birth Date (yyyy-MM-dd):78bb8645f10b3cdc5627dce8e0a840b2
            5794c60043d3c0fa7f0030f373269310
        16b28748ea4df4d9c2150843fecfba68
        92e8cbd9feac6a729893ae422743759e
    b3d8064addd00f70ff6d40ba545c2152
36cc49f0c466276486e50c850b7e4956
73a6ac4ed44ffec12cee46588e518a5e
Create another JSP file to display the result (e.g., result.jsp).
100db36a723c770d327fc0aef2ce13b1
6c04bd5ca3fcae76e30b72ad730ca86d
    c1a436a314ed609750bd7c7d319db4daForm Submitted2e9b454fa8428549ca2e64dfac4625cd
    e388a4556c0f65e1904146cc1a846beeName: ${user.name}94b3e26ee717c64999d7867364b1b4a3
    e388a4556c0f65e1904146cc1a846beeBirth Date: ${user.birthDate}94b3e26ee717c64999d7867364b1b4a3
36cc49f0c466276486e50c850b7e4956
73a6ac4ed44ffec12cee46588e518a5e
Summary
- Form Backing Object: Define a class (e.g., User) with a date field.
-
Controller:
- Use @InitBinder to register a CustomDateEditor with a specific date format.
- Handle form display and submission.
- Views: Create JSP files for the form and the result display.
This approach ensures that all date fields in your form backing objects use the specified date format ("yyyy-MM-dd" in this example), simplifying date handling and validation in your Spring application.
Exception Handling in Spring MVC
Exception handling in Spring MVC can be done in various ways, from using traditional try-catch blocks to leveraging Spring's @ExceptionHandler and @ControllerAdvice annotations for a more centralized and sophisticated approach.
1. Using @ExceptionHandler in Controllers
You can handle exceptions locally within a controller by using the @ExceptionHandler annotation. This annotation is used to define a method that will handle exceptions thrown by request handling methods in the same controller.
Example:
import org.springframework.stereotype.Controller;
import org.springframework.web.bind.annotation.ExceptionHandler;
import org.springframework.web.bind.annotation.RequestMapping;
import org.springframework.web.bind.annotation.RequestMethod;
import org.springframework.web.bind.annotation.ResponseBody;

@Controller
public class MyController {

    @RequestMapping(value = "/test", method = RequestMethod.GET)
    public String test() {
        if (true) {
            throw new RuntimeException("Test exception");
        }
        return "test";
    }

    @ExceptionHandler(RuntimeException.class)
    @ResponseBody
    public String handleRuntimeException(RuntimeException ex) {
        return "Handled RuntimeException: " + ex.getMessage();
    }
}
2. Using @ControllerAdvice
For a more global approach to exception handling, you can use @ControllerAdvice. This annotation allows you to define a class that will handle exceptions for all controllers or specific controllers.
Example:
import org.springframework.web.bind.annotation.ControllerAdvice;
import org.springframework.web.bind.annotation.ExceptionHandler;
import org.springframework.web.bind.annotation.ResponseBody;
import org.springframework.web.servlet.ModelAndView;

@ControllerAdvice
public class GlobalExceptionHandler {

    @ExceptionHandler(RuntimeException.class)
    @ResponseBody
    public String handleRuntimeException(RuntimeException ex) {
        return "Handled by GlobalExceptionHandler: " + ex.getMessage();
    }

    @ExceptionHandler(Exception.class)
    public ModelAndView handleException(Exception ex) {
        ModelAndView mav = new ModelAndView("error");
        mav.addObject("message", ex.getMessage());
        return mav;
    }
}
In this example, GlobalExceptionHandler will handle RuntimeException and Exception globally for all controllers in the application.
Summary
-
Local Exception Handling:
- Use @ExceptionHandler in a controller to handle exceptions thrown by methods in the same controller.
-
Global Exception Handling:
- Use @ControllerAdvice to create a global exception handler that applies to multiple controllers.
- @ExceptionHandler methods within @ControllerAdvice can handle specific exceptions or a range of exceptions.
Detailed Example with Controller Advice
Step 1: Create a Controller
import org.springframework.stereotype.Controller;
import org.springframework.web.bind.annotation.GetMapping;
import org.springframework.web.bind.annotation.RequestMapping;
import org.springframework.web.bind.annotation.ResponseBody;

@Controller
@RequestMapping("/api")
public class MyApiController {

    @GetMapping("/test")
    @ResponseBody
    public String test() {
        if (true) {
            throw new RuntimeException("Test exception in API");
        }
        return "test";
    }
}
Step 2: Create a Global Exception Handler with @ControllerAdvice
import org.springframework.web.bind.annotation.ControllerAdvice;
import org.springframework.web.bind.annotation.ExceptionHandler;
import org.springframework.web.bind.annotation.ResponseBody;
import org.springframework.web.servlet.ModelAndView;

@ControllerAdvice
public class GlobalExceptionHandler {

    @ExceptionHandler(RuntimeException.class)
    @ResponseBody
    public String handleRuntimeException(RuntimeException ex) {
        return "Handled by GlobalExceptionHandler: " + ex.getMessage();
    }

    @ExceptionHandler(Exception.class)
    public ModelAndView handleException(Exception ex) {
        ModelAndView mav = new ModelAndView("error");
        mav.addObject("message", ex.getMessage());
        return mav;
    }
}
In this setup:
- Any RuntimeException thrown by any controller will be handled by the handleRuntimeException method in GlobalExceptionHandler.
- Any general Exception will be handled by the handleException method, returning a view named error with an error message.
Summary Points
-
Exception Handling in Controllers:
- @ExceptionHandler methods handle exceptions within the same controller.
-
Global Exception Handling with @ControllerAdvice:
- Centralized exception handling for all controllers.
- Can handle specific exceptions and provide common handling logic across the application.
- Simplifies maintenance by separating exception handling from business logic.
-
Use Cases:
- Lokale Behandlung: Für spezifische Ausnahmebehandlungsanforderungen innerhalb eines einzelnen Controllers.
- Globale Behandlung: Für eine konsistente und wiederverwendbare Ausnahmebehandlungsstrategie in der gesamten Anwendung.
Warum ist Spring MVC so beliebt?
Spring MVC ist aus mehreren Gründen beliebt:
Einfachheit: Spring MVC bietet einen einfachen Ansatz zum Erstellen von Webanwendungen mit minimalem Konfigurationsaufwand.
Modularität: Es ermöglicht einen modularen Entwurfsansatz, der die Wartung und Aktualisierung des Codes erleichtert.
Integration: Spring MVC kann problemlos in andere beliebte Java-Frameworks wie Hibernate, JPA usw. integriert werden.
Testbarkeit: Es bietet eine hervorragende Unterstützung beim Testen, was es einfacher macht, die Qualität der Anwendung sicherzustellen.
Community-Unterstützung: Es gibt eine große und aktive Community, was bedeutet, dass Hilfe jederzeit verfügbar ist.
Vielseitigkeit: Es kann zur Entwicklung einer breiten Palette von Anwendungen verwendet werden, von einfachen Websites bis hin zu komplexen Unternehmensanwendungen.
Dokumentation: Es verfügt über eine umfangreiche und detaillierte Dokumentation, die das Erlernen und Verwenden erleichtert.
Das obige ist der detaillierte Inhalt vonIm Spring MVC-Interview gestellte Fragen. Für weitere Informationen folgen Sie bitte anderen verwandten Artikeln auf der PHP chinesischen Website!