Heim >Backend-Entwicklung >Python-Tutorial >将Emacs打造成强大的Python代码编辑工具
将Emacs打造成强大的Python代码编辑工具
- WBOYOriginal
- 2016-06-10 15:07:151860Durchsuche
基本配置
Emacs本身提供了python-mode,输入M-x python-mode,就可以进入python模式。相应地,会在菜单栏出现Python菜单。当然,一般来讲,如果是.py文件打开的话,也会自动进入该模式。
不过,默认的python模式功能上面用起来还是有点弱,而且许多地方做的并不好,最好下载第三方的python模式。python-mode是一个开源项目,可以在https://launchpad.net/python-mode进行下载。
1.安装
1).安装prog-modes:
aptitude install prolog-el
2).下载python-mode.el文件在项目主页上面。
3).编译:
C-x C-f /path/to/python-mode.el RET
        M-x byte-compile-file RET
4).在.emacs中加入python-mode.el路径:
(setq load-path (cons "/dir/of/python-mode/" load-path))
检测扩展是否加载路径,测试方法:M-x locate-library RET python-mode RET
2.配置.emacs文件
(setq auto-mode-alist

 (cons '("//.py$" . python-mode) auto-mode-alist))

(setq interpreter-mode-alist

 (cons '("python" . python-mode)

 interpreter-mode-alist))

(autoload 'python-mode "python-mode" "Python editing mode." t)

;;; add these lines if you like color-based syntax highlighting

(global-font-lock-mode t)

(setq font-lock-maximum-decoration t)

(set-language-environment 'Chinese-GB)

(set-keyboard-coding-system 'euc-cn)

(set-clipboard-coding-system 'euc-cn)

(set-terminal-coding-system 'euc-cn)

(set-buffer-file-coding-system 'euc-cn)

(set-selection-coding-system 'euc-cn)

(modify-coding-system-alist 'process "*" 'euc-cn)

(setq default-process-coding-system

 '(euc-cn . euc-cn))

(setq-default pathname-coding-system 'euc-cn)
3.操作
1).执行:C-c C-c,这样会在新的窗口及缓冲区执行脚本;
2).C-j:以相同的缩进插入新的一行;
3).C-M-a:跳至函数或类首;
4).C-M-e:跳至函数或类尾;
5).C-c C-w:运行PyChecker进行代码检测;
大体的使用方式就是这样的了,另外,还有许多类或函数的模板可以通过快捷键进行,在今后常用的时候会加强了解的。感谢你能看到这里!
安装扩展
在Emacs中,通过各种扩展,打造强大的Python IDE环境,包括Snippet工具,智能提示,自动补全,重构工具,调试以及GAE的调试,等等。以下各工具的安装前提是你对Emacs的配置文件有一定的了解,所有相关的el文件都必须放在load_path能够加载的地方。
1. YASnippet
snippet工具,可自定义一些模板,必不可少的好东西!看了下面这个很酷的演示动画就明白了:
http://yasnippet.googlecode.com/files/yasnippet.avi
安装方法:
(require 'yasnippet)
(yas/initialize)
(yas/load-directory "~/.emacs.d/plugins/yasnippet-0.6.1c/snippets")
2. AutoComplete
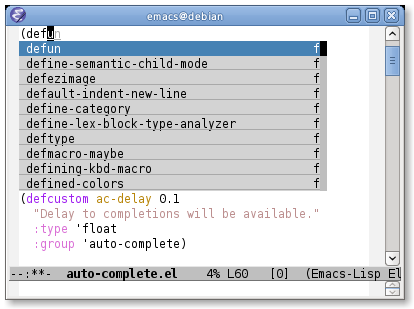
自动完成工具,会像VS里一样,弹出一个列表框让你去选择。

安装方法:
Code highlighting produced by Actipro CodeHighlighter (freeware)http://www.CodeHighlighter.com/-->(require 'auto-complete)
(require 'auto-complete-config)
(global-auto-complete-mode t)
(setq-default ac-sources '(ac-source-words-in-same-mode-buffers))
(add-hook 'emacs-lisp-mode-hook (lambda () (add-to-list 'ac-sources 'ac-source-symbols)))
(add-hook 'auto-complete-mode-hook (lambda () (add-to-list 'ac-sources 'ac-source-filename)))
(set-face-background 'ac-candidate-face "lightgray")
(set-face-underline 'ac-candidate-face "darkgray")
(set-face-background 'ac-selection-face "steelblue") ;;; 设置比上面截图中更好看的背景颜色
(define-key ac-completing-map "\M-n" 'ac-next) ;;; 列表中通过按M-n来向下移动
(define-key ac-completing-map "\M-p" 'ac-previous)
(setq ac-auto-start 2)
(setq ac-dwim t)
(define-key ac-mode-map (kbd "M-TAB") 'auto-complete)
3. Rope and Ropemacs
非常棒的重构工具,比如rename,move,extract method等等。还有非常好用的goto difinition(跳到定义),show documents(显示文档)等等。安装Ropemacs前,必须先安装rope和pymacs 。
rope的安装方法:
python setup.py install
pymacs的安装方法:
python setup.py install
.emacs中:
(autoload 'pymacs-apply "pymacs")
(autoload 'pymacs-call "pymacs")
(autoload 'pymacs-eval "pymacs" nil t)
(autoload 'pymacs-exec "pymacs" nil t)
(autoload 'pymacs-load "pymacs" nil t)
Ropmacs的安装方法:
python setup.py install
.emacs中:
(pymacs-load "ropemacs" "rope-")
(setq ropemacs-enable-autoimport t)
4. pycomplete
一个更加强大的智能提示工具,比如,输入time.cl 然后按TAB键,会列出time模块所有cl开头的函数名。在调用函数时,还会在mini buffer中提示函数的参数类型。这个东西需要先安装pymacs。
安装方法:
1. 拷贝 python-mode.el and pycomplete.el 到Emacs的load_path中。
2. 拷贝 pycomplete.py 到PYTHONPATH (比如: c:/python25/Lib/site-packages)
3. .emacs中添加:
(require 'pycomplete)
(setq auto-mode-alist (cons '("\\.py$" . python-mode) auto-mode-alist))
(autoload 'python-mode "python-mode" "Python editing mode." t)
(setq interpreter-mode-alist(cons '("python" . python-mode)
              interpreter-mode-alist))
5. pdb调试
在Emacs中,通过M-x pdb可调出pdb对python代码进行调试。但是发现在Windows系统中,总进入不了调试模式。主要原因有:
(1). windows中,找不到pdb.py位置。需自己制定pdb的路径。可以通过下面的方法设置pdb的路径:
Code highlighting produced by Actipro CodeHighlighter (freeware)http://www.CodeHighlighter.com/-->;; pdb setup, note the python version
(setq pdb-path 'c:/python25/Lib/pdb.py
    gud-pdb-command-name (symbol-name pdb-path))
 (defadvice pdb (before gud-query-cmdline activate)
  "Provide a better default command line when called interactively."
  (interactive
  (list (gud-query-cmdline pdb-path
         (file-name-nondirectory buffer-file-name)))))
(2). windows中,调用pdb时,未使用python -i 参数。
针对上面两个问题,我的解决办法是,不设置pdb具体路径,M-x pdb 回车后,出现下面命令:
Run pdb (like this): pdb
然后手动修改一下:
Run pdb (like this): python -i -m pdb test.py
这样就搞定了。
6. 如何调试GAE程序
GAE是一个Web应用,需要跨线程进行调试,而pdb本身对线程调试支持不好。使用pdb进行线程调试时,只有在需要调试的地方插入下面代码:
import pdb
pdb.set_trace()
然后直接运行被调试代码,而不是通过python pdb来执行,就可以多线程代码进行调试了。
但是Google App Engine这样的Web应用,使用这个方法还是不能调试,和stdin和stdout有关,最后找到一个很好的解决方法:
def set_trace():
  import pdb, sys
  debugger = pdb.Pdb(stdin=sys.__stdin__,
    stdout=sys.__stdout__)
  debugger.set_trace(sys._getframe().f_back)
在任何需要调试的地方,调用上面的set_trace()函数。

