
Heim >Backend-Entwicklung >Python-Tutorial >使用Python的Django框架结合jQuery实现AJAX购物车页面
使用Python的Django框架结合jQuery实现AJAX购物车页面

- WBOYWBOYWBOYWBOYWBOYWBOYWBOYWBOYWBOYWBOYWBOYWBOYWBOriginal
- 2016-06-10 15:05:221605Durchsuche
Django中集成jquery
首先,静态的资源通常放入static文件夹中:
static/
  css/
    djquery.css
    samples/
      hello.css
  js/
    jquery-1.7.1.min.js
    samples/
      hello.js
其中css和js都按照应用名称(这里是samples)划分文件夹,如果文件较多,还可以再划分子文件夹。
Django通常使用模板来展现html,而且我们通常使用继承的模板,所以需要将共用的元素,比如全局的css,对jquery.js的引入等,写到base模板中,而将具体页面的元素放到具体的模板中。这就牵涉到如何嵌套的问题。看下面的例子:
base.html
<html>
 <head>
  <meta charset="utf-8">
  <meta http-equiv="Content-Type" content="text/html; charset=UTF-8" />
  <title>{% block title %} 标题 {% endblock %}</title>
  <link href="css/djquery.css" rel="stylesheet">
{% block styles %}<!--custom styles-->{% endblock %}
 </head>
 <body>
  <div id="container">
{% block content %}内容{% endblock %}
  </div>
</body>
<script language="JavaScript" type="text/javascript" src="/static/js/jquery-1.7.1.min.js"></script>
{% block scripts %}
<!--custom scripts-->
{% endblock %}
</html>
samples/hello.html
{% extends "base.html" %}

{% block title %}
hello, djquery!
{% endblock %}

{% block styles %}
{% endblock %}

{% block content %}
<div><input type="button" id="myField" value="Click me!"/></div>
{% endblock %}

{% block scripts %}
<script language="JavaScript" type="text/javascript" src="/static/js/djquery/hello.js"></script>
{% endblock %}
Hello, Djquery!
有了上述的“框架”,我们就可以很容易的验证一下我们的想法,比如这个“Hello Djquery”。只需要在urls.py中配置一下:
(r'hello/$', 'django.views.generic.simple.direct_to_template', {'template':'samples/hello.html'}),
其中direct_to_template是django提供的一个通用视图。
AJAX实现示例
我们来看一个购物车的例子。假设现在我们有一个使用json格式的RESTful API,可以实现这样的功能了:为了避免在产品列表和购物车之间来回切换,需要在产品列表界面显示购物车,并且通过ajax的方式不刷新界面就更新购物车的显示内容,利用我们上面在Django中集成的jQuery。
1.嵌入购物车界面
为了实现如下图所示的嵌入购物车的产品目录界面,我们需要做两件事情:
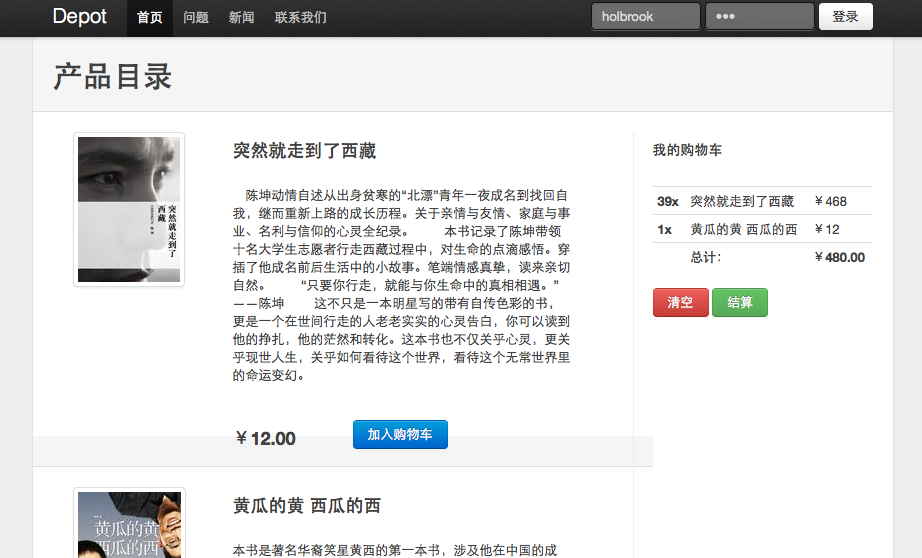
(1)修改模板:
depot/templates/depotapp/store.html:
  {% extends "base.html" %}

  {% block title %} 产品目录 {% endblock %}
  {% block pagename %} 产品目录 {% endblock %}

  {% block content %}
  <div class="row">
    <div class="span10">
  {% for item in products %}
  <div class="row" style="padding-top:10">
    <div class="span3 media-grid">
      <a href="#">
      <img class="thumbnail lazy"  src="/static/imghwm/default1.png"  data-src="{{item.image_url}}"  alt="">
      </a>
    </div>
    <div class="span6">
      <h3>{{item.title}}</h3>
      <br/>
      {{item.description}}
      <br/>
      <br/>
      <br/>
      <div class="row">
        <div class="span2"><h3>¥{{item.price|floatformat:"2"}}</h3></div>
        <div class="span"><a class="btn primary" href="{% url depotapp.views.add_to_cart item.id %}">加入购物车</a></div>
      </div>
    </div>

  </div>
  <div class="page-header">
  </div>
  {% endfor %}
    </div><!--span10-->
   <div class="span4">
    <h5>我的购物车</h5><br/>
      <table class="condensed-table">
       <tbody>
       {% for item in cart.items %}
        <tr>
         <th>{{item.quantity}}x</th>
         <td>{{item.product.title}}</td>
         <td>¥{% widthratio item.quantity 1 item.unit_price %} </td>
        </tr>
       {% endfor %}
        <tr>
         <td></td>
         <th>总计:</th>
         <th>¥{{cart.total_price|floatformat:"2"}}</th>
        </tr>
       </tbody>
      </table>

      <a class="btn danger" href="{% url depotapp.views.clean_cart %}">清空</a>
      <a class="btn success" href="#">结算</a>
    </div><!--span4-->
  {% endblock %}
(2)在depotapp/views.py中的store_view视图函数中增加一行:
cart = request.session.get("cart",None)
就可以显示出如上的界面了。
2.编写javascript实现ajax
现在让我们来通过ajax请求后台服务。当然首选要实现后台服务。关于“加入购物车”,我们需要的服务是这样定义的:
url: http://localhost:8000/depotapp/API/cart/items/post
post数据: product = product_id
处理过程: 根据product_id,将product加入购物车
返回:购物车中的所有条目
这个API的定义似乎不那么RESTful,但是暂且不去管它。实现这个服务需要为RESTful web service(depotapp/views.py中的RESTforCart类)增加一个方法:
def post(self, request, *args, **kwargs):
print request.POST['product']
product = Product.objects.get(id=request.POST['product'])
cart = request.session['cart']
cart.add_product(product)
request.session['cart'] = cart
return request.session['cart'].items
可以通过http://localhost:8000/depotapp/API/cart/items/post来测试服务接口(使用Firebug调试是非常方便的办法):

如同你看到的那样,我们的接口定义不是完全RESTful,在生成的表单中,我们只需要选择Product,不用管另外的两个表单项,POST之后就可以从之前实现的购物车界面中看到新增加的产品项了。
服务接口测试通过,就可以在界面中通过ajax调用了。jquery对ajax提供了丰富的支持,为了方便使用jquery的selector,先要对html进行改造。将上面实现的depot/templates/depotapp/store.html中,迭代产品的部分改成如下的样子:
{% for item in products %}
<divclass="row"style="padding-top:10">
<divclass="span3 media-grid">
<ahref="#">
<img class="thumbnail lazy"  src="/static/imghwm/default1.png"  data-src="{{item.image_url}}" alt="">
</a>
</div>
<divclass="span6">
<h3>{{item.title}}</h3>
<br/>
{{item.description}}
<br/>
<br/>
<br/>
<divclass="row">
<divclass="span2"><h3>¥{{item.price|floatformat:"2"}}</h3></div>
<divclass="span"><aclass="btn primary"productid="{{item.id}}"href="#">加入购物车</a></div>
</div>
</div>
</div>
<divclass="page-header">
</div>
{% endfor %}
其中主要更改了“加入购物车”的标签,增加productid属性,并将href改为“#”。这样我们就可以很方便的为其添加事件:
//store.html on ready
$('a.btn[productid]').bind("click",function(){
alert($(this).attr("productid"));
}
);
这段代码实现的功能是:对于所有的标签,如果class包括“btn”,并且拥有“productid”属性的元素,添加click事件,弹出对话框显示其“productid”属性值。
打开产品清单界面测试一下,能够正确弹出产品ID,然后就可以编写ajax的处理了。在这里我们使用jquery.post()方法,jquery.post()是jquery.ajax的简化写法,如下:
//store.html on ready
$('a.btn[productid]').bind("click",function(){
var product_id=$(this).attr("productid");
//alert(product_id);
$.post("/depotapp/API/cart/items/post",
{product:product_id},
function(data){
alert(data);
}
);
}
);
弹出对话框显示的data就是前面定义的API接口的返回值,即现有购物车中的条目列表。
最后,要根据返回的数据更改界面上的购物车显示。这里为了方便也对html进行了改造。整个完成的depot/templates/depotapp/store.html如下:
{% extends "base.html" %}
{% block title %} 产品目录 {% endblock %}
{% block pagename %} 产品目录 {% endblock %}
{% block content %}


{% for item in products %}
<divclass="row"style="padding-top:10">
<divclass="span3 media-grid">
<ahref="#">
<img class="thumbnail lazy"  src="/static/imghwm/default1.png"  data-src="{{item.image_url}}" alt="">
</a>
</div>
<divclass="span6">
<h3>{{item.title}}</h3>
<br/>
{{item.description}}
<br/>
<br/>
<br/>
<divclass="row">
<divclass="span2"><h3>¥{{item.price|floatformat:"2"}}</h3></div>
<divclass="span"><aclass="btn primary"productid="{{item.id}}"href="#">加入购物车</a></div>
</div>
</div>
</div>
<divclass="page-header">
</div>
{% endfor %}
我的购物车
定义了一个refreshCart函数,根据参数”重绘“购物车界面。在$(document).ready部分,首先调用前面实现的API显示购物车,这样我们在模板中就可以去掉原来实现的”购物车“,改成javascript的方式。
然后为每个”加入购物车“按钮添加点击事件,调用本节开始部分实现的接口,根据返回的最新条目数据调用refreshCart函数重绘购物车。
上面的模板中,javascript的部分划分成了两个block:{% block js %}用于嵌入具体页面(相对应父模板)的js函数;{% block on_ready %}用于嵌入具体页面的$(document).ready处理。结合base.html中定义的block,可以使组合在一起的具体页面和模板页面符合Unobtrusive JavaScript 。这样做应该是Django+jquery实现ajax的最佳实践。