Heim >Web-Frontend >js-Tutorial >jQuery jcrop插件截图使用方法_jquery
jQuery jcrop插件截图使用方法_jquery
- WBOYOriginal
- 2016-05-16 17:13:382166Durchsuche
在后台来进行图片切割。
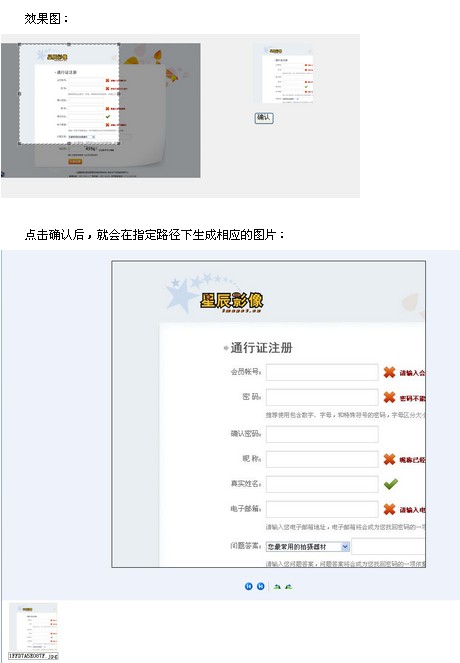
头像截取的原理:在前台使用jcrop获取切面的x轴坐标、y轴坐标、切面高度、切面宽度,然后将这四个值传给后
台。在后台要进行放大处理:将切面放大N倍,N=原图/前台展示的头像。即X = X*原图宽/前图宽,Y = Y*原图高/前
图高,W = W*原图宽/前图宽,H = H*原图高/前图高。
实例:
JSP:
复制代码 代码如下:
样式:大图、小图展示都需要固定高度、宽度,因为后台需要进行放大处理。即:
然后是使用jcrop了。在使用jcrop前我们需要下载jcrop:http://deepliquid.com/content/Jcrop.html。
将下载的压缩包解压后可以看到三个文件夹及一个index.html文件,/ css下放置的是Jcorp的样式文件,/demo下放置的是几个简单的例子(index.html中引用的链接就是放置在这个文件夹下),/js下放置的是Jcorp中最重要的脚本文件。我们只需要使用三个文件即可:jquery.Jcrop.css、jquery.Jcrop.js、JQuery.js
使用方法:
复制代码 代码如下:
//裁剪图像
function cutImage(){
$("#srcImg").Jcrop( {
aspectRatio : 1,
onChange : showCoords,
onSelect : showCoords,
minSize :[200,200]
});
//简单的事件处理程序,响应自onChange,onSelect事件,按照上面的Jcrop调用
function showCoords(obj) {
$("#x").val(obj.x);
$("#y").val(obj.y);
$("#w").val(obj.w);
$("#h").val(obj.h);
if (parseInt(obj.w) > 0) {
//计算预览区域图片缩放的比例,通过计算显示区域的宽度(与高度)与剪裁的宽度(与高度)之比得到
var rx = $("#preview_box").width() / obj.w;
var ry = $("#preview_box").height() / obj.h;
//通过比例值控制图片的样式与显示
$("#previewImg").css( {
width : Math.round(rx * $("#srcImg").width()) + "px", //预览图片宽度为计算比例值与原图片宽度的乘积
height : Math.round(rx * $("#srcImg").height()) + "px", //预览图片高度为计算比例值与原图片高度的乘积
marginLeft : "-" + Math.round(rx * obj.x) + "px",
marginTop : "-" + Math.round(ry * obj.y) + "px"
});
}
}
}
在使用jcrop前一定要先将$(“”).jcrop();进行预初始化,否则没有效果。
还有一种调用的方法,
复制代码 代码如下:
var api = $.Jcrop('#cropbox',{
onChange: showPreview,
onSelect: showPreview,
aspectRatio: 1
});
这种方法是将Jcrop生成的对象赋给一个全局变量,这样操作就会比较方便。
通过上面的js,就将X轴坐标、Y轴坐标、高度H、宽度W这个四个值传递给后台了,后台就只需要根据这四个值
进行放大处理,然后切割即可。
Action
复制代码 代码如下:
/**
* 裁剪头像
*/
public String cutImage(){
/*
* 获取参数
* x,y,w,h,bigImage
*/
HttpServletRequest request = (HttpServletRequest) ActionContext.getContext().get(ServletActionContext.HTTP_REQUEST);
int x = Integer.valueOf(request.getParameter("x"));
int y = Integer.valueOf(request.getParameter("y"));
int w = Integer.valueOf(request.getParameter("w"));
int h = Integer.valueOf(request.getParameter("h"));
String bigImage = request.getParameter("bigImage");
//获取文件真实路径
//获取文件名
String[] imageNameS = bigImage.split("/");
String imageName = imageNameS[imageNameS.length-1];
//文件正式路径
String imagePath = getSavePath()+"\\"+imageName;
//切割图片
ImageCut imageCut = new ImageCut();
imageCut.cutImage(imagePath, x, y, w, h);
//头像裁剪完成后,将图片路径保存到用户
UserBean userBean = (UserBean) request.getSession().getAttribute("userBean");
userBean.setUserPhoto(bigImage);
//保存头像
UserCenterService centerService = new UserCenterService();
centerService.updatePhoto(userBean);
//将修改后的用户保存到session中
request.getSession().setAttribute("userBean", userBean);
return "updatePhoto";
}
}
裁剪图片工具类:ImageCut.java
复制代码 代码如下:
public class ImageCut {
/**
* 图片切割
* @param imagePath 原图地址
* @param x 目标切片坐标 X轴起点
* @param y 目标切片坐标 Y轴起点
* @param w 目标切片 宽度
* @param h 目标切片 高度
*/
public void cutImage(String imagePath, int x ,int y ,int w,int h){
try {
Image img;
ImageFilter cropFilter;
// 读取源图像
BufferedImage bi = ImageIO.read(new File(imagePath));
int srcWidth = bi.getWidth(); // 源图宽度
int srcHeight = bi.getHeight(); // 源图高度
//若原图大小大于切片大小,则进行切割
if (srcWidth >= w && srcHeight >= h) {
Image image = bi.getScaledInstance(srcWidth, srcHeight,Image.SCALE_DEFAULT);
int x1 = x*srcWidth/400;
int y1 = y*srcHeight/270;
int w1 = w*srcWidth/400;
int h1 = h*srcHeight/270;
cropFilter = new CropImageFilter(x1, y1, w1, h1);
img = Toolkit.getDefaultToolkit().createImage(new FilteredImageSource(image.getSource(), cropFilter));
BufferedImage tag = new BufferedImage(w1, h1,BufferedImage.TYPE_INT_RGB);
Graphics g = tag.getGraphics();
g.drawImage(img, 0, 0, null); // 绘制缩小后的图
g.dispose();
// 输出为文件
ImageIO.write(tag, "JPEG", new File(imagePath));
}
} catch (IOException e) {
e.printStackTrace();
}
}
}

Stellungnahme:
Der Inhalt dieses Artikels wird freiwillig von Internetnutzern beigesteuert und das Urheberrecht liegt beim ursprünglichen Autor. Diese Website übernimmt keine entsprechende rechtliche Verantwortung. Wenn Sie Inhalte finden, bei denen der Verdacht eines Plagiats oder einer Rechtsverletzung besteht, wenden Sie sich bitte an admin@php.cn
Vorheriger Artikel:JS保留两位小数 四舍五入函数的小例子_javascript技巧Nächster Artikel:浅析JavaScript中的常用算法与函数_javascript技巧
In Verbindung stehende Artikel
Mehr sehen- Eine eingehende Analyse der Bootstrap-Listengruppenkomponente
- Detaillierte Erläuterung des JavaScript-Funktions-Curryings
- Vollständiges Beispiel für die Generierung von JS-Passwörtern und die Erkennung der Stärke (mit Download des Demo-Quellcodes)
- Angularjs integriert WeChat UI (weui)
- Wie man mit JavaScript schnell zwischen traditionellem Chinesisch und vereinfachtem Chinesisch wechselt und wie Websites den Wechsel zwischen vereinfachtem und traditionellem Chinesisch unterstützen – Javascript-Kenntnisse

