三级联动使用中是非常频繁的.比如商城的用户选择所在地等
以下是我的代码
实例
<!DOCTYPE html>
<html lang="en">
<head>
    <meta charset="UTF-8">
    <title>城市的三级联动</title>
</head>
<body>
省 <select name="" id="pro"></select>
市 <select name="" id="city"></select>
区 <select name="" id="area"></select>
<p id="addr"></p>
<script src="../lib/jQuery.js"></script>
<script>
    $(function(){
        $.getJSON('inc/1.json',function(data){
            let option = '<option value="">选择(省)</option>';
            $.each(data,function(i){
                option += '<option value="'+data[i].proId+'">'+data[i].proName+'</option>';
            });
            $('#pro').html(option);

        });

        $('#pro').change(function(){
            //查看当前选择中元素内容
           let pro = $(this).find(':selected').text();
            console.log(pro);
            $.getJSON('inc/2.json',function(data){
                let option = '<option value="">选择(市)</option>';
                $.each(data,function(i){
                    if (data[i].proId == $('#pro').val()) {
                        option += '<option value="'+data[i].cityId+'">'+data[i].cityName+'</option>';
                    }

                });
                $('#city').html(option);
            });
        });
        $('#city').change(function(){
            //查看当前选择中元素内容
            let city = $(this).find(':selected').text();
            console.log(city);
            $.getJSON('inc/3.json',function(data){
                let option = '<option value="">选择(县区)</option>';
                $.each(data,function(i){
                    if (data[i].cityId == $('#city').val()) {
                        option += '<option value="'+data[i].areaId+'">'+data[i].areaName+'</option>';
                    }
                });
                $('#area').html(option);
            });
        });

        $('#area').change(function(){
            //查看当前选择中元素内容
            let area = $(this).find(':selected').text();
            console.log(area);
        });
    });
</script>
</body>
</html>
运行实例 »
点击 "运行实例" 按钮查看在线实例
用户注册页面在实际运用中是非常常见的,使用ajax的异步处理可以让用户的体验非常的好
以下是我的代码
实例
<!DOCTYPE html>
<html lang="en">
<head>
    <meta charset="UTF-8">
    <title>用户注册</title>
</head>
<body>
<h2>用户注册</h2>
<p><label for="email">邮箱:</label><input type="email" id="email" name="email"></p>
<p><label for="password">邮箱:</label><input type="password" id="password" name="password"></p>
<p><button>提交</button></p>
<script src="../lib/jquery.js"></script>
<script>

    $('#email').focus();//设定默认选中邮箱文本框
        $('#email').blur(function() {
            if ($(this).val().length === 0) {
                $(this).after('<span style="color:red">邮箱不能为空</span>').next().fadeOut(3000);
                $(this).css('background', 'lightcoral');//把背景改成淡红色提醒用户
                $('button').attr('disabled', true);//禁用掉按钮
                return false;
            } else {
                $(this).css('background', '');//清空背景
                $('button').attr('disabled', false);//启用按钮

            }
            $.ajax({//失去焦点的时候顺便判断邮箱是否已经存在数据库中
                type: 'post',   // 请求类型
                url: 'inc/check.php',   // 请求的处理脚本
                data: {
                    email: $('#email').val(),
                },
                dataType: 'json',
                success: function (data) {
                    if (data.status === 1) {//等于1表示邮箱已经存在数据库
                        $('#email').after('<span style="color: red"></span>').next().html(data.message).fadeOut(3000);
                        $('button').attr('disabled', true); //禁用掉按钮
                        $('#email').css('background', 'lightcoral');//把背景颜色改成淡红色提醒用户账号已经存在
                    } else {
                        $('#email').after('<span style="color: green"></span>').next().html(data.message).fadeOut(3000);
                        $('button').attr('disabled', false);//启用按钮
                        $('#email').css('background', '');//清空背景
                    }
                }
            });
        });

        $('button').click(function () {
        if ($('#password').val().length === 0) {
            $('#password').after('<span style="color:red">密码不能为空</span>').next().fadeOut(3000);
            return false;
        }else if ($('#password').val().length < 6) {
            $('#password').after('<span style="color:red">密码不能少于6位</span>').next().fadeOut(3000);
            return false;
    };

         $.ajax({
            type: 'post',   // 请求类型
            url: 'inc/register.php',   // 请求的处理脚本
            data: {
                email: $('#email').val(),
                password: $('#password').val()
            },
            dataType: 'json',
            success: function (data) {
                console.log($(this));
                // console.log(data.message);
                if (data.status === 1) {
                    $('button').after('<span style="color: green"></span>').next().html(data.message).fadeOut(3000);
                    $('button').attr('disabled', true); //禁用掉按钮
                    setTimeout(function () {
                        if (data.status ===1){
                            location.href = 'index.html';//验证成功进行跳转
                        }
                    },3000);
                } else {
                    $('button').after('<span style="color: red"></span>').next().html(data.message).fadeOut(3000);
                }
            }
        });
        });

</script>

</body>
</html>
运行实例 »
点击 "运行实例" 按钮查看在线实例
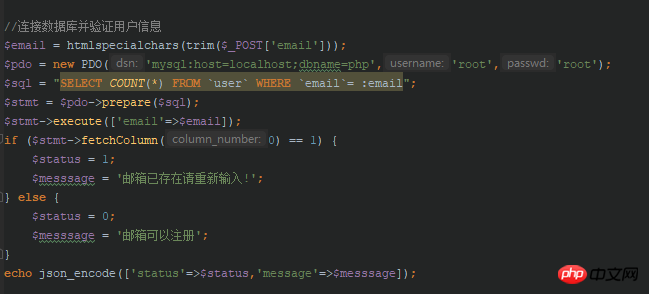
下面是当用户输入账号时候在php中进行账号的唯一性验证防止重复注册,
以下是我的代码

当用户已经通过账号的唯一性验证后进行账号的注册
以下是我的代码
实例
<?php
//连接数据库并验证用户信息
$email = htmlspecialchars(trim($_POST['email']));
$password = sha1(htmlspecialchars(trim($_POST['password'])));
$pdo = new PDO('mysql:host=localhost;dbname=php','root','root');
$sql = "INSERT IGNORE `user` SET `email`=:email,`password`=:password ";
$stmt = $pdo->prepare($sql);
$stmt->execute(['email'=>$email,'password'=>$password]);
if ($stmt->rowCount() == 1) {
    $status = 1;
    $messsage = '注册成功正在登录!';
} else {
    $status = 0;
    $messsage = '注册失败请检查';
}
echo json_encode(['status'=>$status,'message'=>$messsage]);
运行实例 »
点击 "运行实例" 按钮查看在线实例