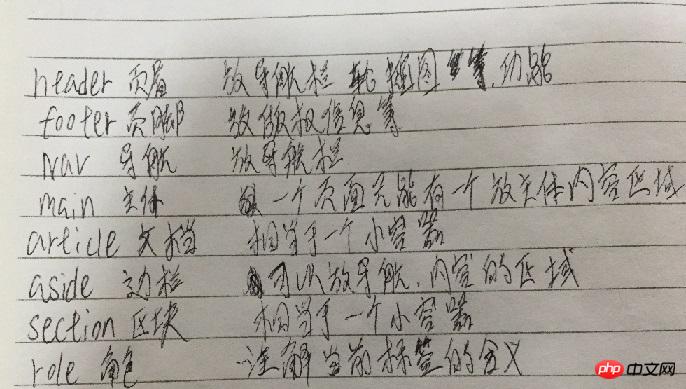
根据昨晚所学的知识进行布局的实战操作。
以下是我的代码。
实例
<!DOCTYPE html>
<html lang="en">
<head>
    <meta charset="UTF-8">
    <title>文档管理</title>
    <style>
        table, th, td {
            border: 1px solid black;
        }
        table {
            width: 650px;
            margin: auto;
            border-collapse: collapse;
            text-align: center;
        }

        td {
            padding: 10px;
        }
        a {
            text-decoration-line: none;
            color: black;
        }

        a:hover {
            color: #a58722;
            text-decoration-line: underline;
        }

        tr:first-child {
            margin-top: 20px;
            background-color: steelblue;
        }

        table caption {
            font-size: 1.5rem;
            font-weight: bolder;
            margin-bottom: 20px;
        }

        p {
            text-align: center;
        }

        p a:first-child {
            width: 56px;
        }

        p a:last-child {
            width: 56px;
        }
        p a {
            display: inline-block;
            width: 28px;
            height: 24px;
            border: 1px solid black;
            margin-left:2px;
            line-height: 24px;

        }

        .active {
            background-color: black;
            color: white;
        }

        .more {
            border: none;
        }

    </style>
</head>
<body>
<table>
    <caption>文档管理</caption>
    <tr>
        <td>ID</td>
        <td>标题图片</td>
        <td>文档标题</td>
        <td>所属分类</td>
        <td>操作</td>
    </tr>
    <tr>
        <td>1</td>
        <td><img src="./static/images/1.jpg" alt="" width="50"></td>
        <td><a href="">这是苹果的简介</a></td>
        <td>苹果</td>
        <td><a href="">编辑</a> | <a href="">删除</a></td>
    </tr>
    <tr>
        <td>2</td>
        <td><img src="./static/images/2.jpg" alt="" width="50"></td>
        <td><a href="">这是葡萄的简介</a></td>
        <td>葡萄</td>
        <td><a href="">编辑</a> | <a href="">删除</a></td>
    </tr>
    <tr>
        <td>3</td>
        <td><img src="./static/images/3.jpg" alt="" width="50"></td>
        <td><a href="">这是香蕉的简介</a></td>
        <td>香蕉</td>
        <td><a href="">编辑</a> | <a href="">删除</a></td>
    </tr>
    <tr>
        <td>4</td>
        <td><img src="./static/images/4.jpg" alt="" width="50"></td>
        <td><a href="">这是一个西瓜的简介</a></td>
        <td>西瓜</td>
        <td><a href="">编辑</a> | <a href="">删除</a></td>
    </tr>
</table>

<p>
    <a href="">首页</a>
    <a href="" class="active">1</a>
    <a href="">2</a>
    <a href="">3</a>
    <a href="">4</a>
    <a href="" class="more">...</a>
    <a href="">尾页</a>
</p>
</body>
</html>
运行实例 »
点击 "运行实例" 按钮查看在线实例
在附上我对html5的新增语义标签的手抄理解
以下是图片。


