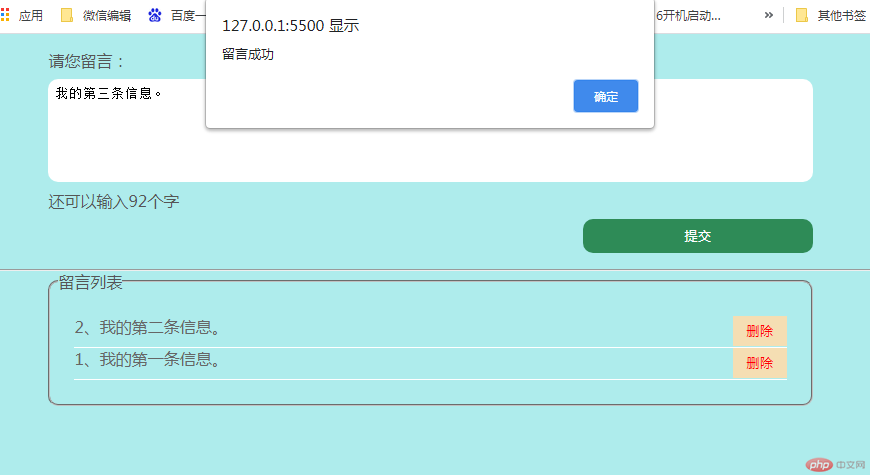
一、留言本实例
熟悉事件添加及传递机制,创建留言本实例。具备留言字数实时统计与禁止超出功能。
输入留言内容:
留言按钮提交:
删除留言信息:
html+css+js代码:
<!DOCTYPE html><html lang="en"><head><meta charset="UTF-8" /><meta http-equiv="X-UA-Compatible" content="IE=edge" /><meta name="viewport" content="width=device-width, initial-scale=1.0" /><title>留言本实例</title><style>* {margin: 0;padding: 0;box-sizing: border-box;}li {list-style: none;}body {background-color: rgb(174, 236, 236);color: #555;}.comment {width: 85%;margin: 1em auto;display: grid;gap: 0.5em;}.comment #content {resize: none;border: none;padding: 0.5em;outline: none;border-radius: 10px;}.comment #content:focus,.comment #content:hover {box-shadow: 0 0 8px steelblue;transition: 0.6s;}.comment .submit {width: 30%;margin-left: auto;background-color: lightseagreen;border: none;border-radius: 10px;outline: none;color: white;height: 2.5em;}.comment .submit:hover {background-color: seagreen;transition: 0.6s;cursor: pointer;}.contentlist {width: 85%;margin: auto;padding: 0.5em;border-radius: 10px;}.contentlist .list {width: 100%;/* background-color: yellow; */margin: auto;padding: 1em;color: #666;}.del-btn {background-color: wheat;color: red;padding: 0.5em 1em;/* height: 2.2em; */border: none;outline: none;}.del-btn:hover {cursor: pointer;background-color: lime;}</style></head><body><form class="comment" method="post"><label for="content">请您留言:</label><textarea name="content" id="content" cols="30" rows="6" placeholder="请在此留言"></textarea><label class="tishi"></label><button type="button" name="submit" class="submit">提交</button></form><hr width="100%" align="center" /><fieldset class="contentlist"><legend>留言列表</legend><ul class="list"></ul></fieldset><script>// 获取元素const comment = document.querySelector(".comment");const content = comment.content;const submitBtn = comment.submit;const contishi = document.querySelector(".tishi");const comlist = document.querySelector(".list");//输入留言提示,超出限制字数截取显示content.oninput = (ev) => {if (content.value.trim().length < 100) {contishi.textContent = `还可以输入${100 - content.value.trim().length}个字`;} else {contishi.textContent = `还可以输入0个字`;content.value = content.value.substr(0, 100);}};// 提交留言按钮事件let i = 0;submitBtn.onclick = (ev) => {++i;let str = i + "、" + content.value;// 将留言插入到列表中const newComment = document.createElement("li");newComment.textContent = str;newComment.style.borderBottom = "1px solid white";newComment.style.minHeight = "2em";// 为每一条留言添加删除按钮const delBtn = document.createElement("button");delBtn.textContent = "删除";delBtn.style.float = "right";delBtn.classList.add("del-btn");//删除留言按钮事件delBtn.onclick = function () {if (confirm("是否删除")) {// 确定:true,取消: falsethis.parentNode.remove();alert("删除成功");content.focus();return false;}};// 判断留言长度,添加列表if (content.value.length > 0 && content.value.length <= 100) {// 将删除按钮添加到新留言的后面newComment.append(delBtn);// 将新留言添加到列表的头部comlist.prepend(newComment);// 通知用户alert("留言成功");content.value = null;contishi.textContent = null;content.focus();} else {alert("未输入留言或留言内容超过100字");content.focus();return false;}};</script></body></html>
二、字符串数组方法
1、字符串
| 方法 | 含义 |
|---|---|
| concat() | 字符串拼装 |
| slice() | 取子串,可以正负数取数(start, end) |
| substr() | 取子串,可以正负数取数(start, size) |
| trim() | 删除字符串两边的空白字符 |
| split() | 将字符打散成数组 |
//concat() 拼接let str = "html".concat("css", "js", "php", "!", 888);console.log(str); // htmlcssjsphp!888
//slice(start, end) 从字符串中截取,不改变原字符串const email = 'tp@qq.com';let emailS = email.slice(3);console.log(emailS); // qq.com
//substr(start, size) 从字符串中截取,不改变原字符串res = str.substr(0, 5);console.log(res); // hellores = str.substr(-6, 3);console.log(res); // php
//trim()删除两端空白字符let str = " Hello Edureka! ";console.log(str.length); // 24console.log(str.trim()); // Hello Edureka!console.log(str.trim().length); // 14
//split("") 把字符串拆分为数组let str = "abcdefg";let res = str.split('');console.log(res); // ["a", "b", "c", "d", "e", "f", "g"]// 从一个邮箱中解析出用户名和邮箱地址let email = "abc@qq.com";res = email.split("@");console.log(email.split("@")); // ["abc", "qq.com"]console.log("userName=",res[0]); // abcconsole.log("emailAddress=",res[1]); // qq.com
2、数组
| 方法 | 含义 |
|---|---|
| concat() | 字符串、数组拼装 |
| push() | 尾部添加,入栈 |
| pop() | 尾部删除,出栈 |
| unsift() | 在数组头部添加 |
| shift() | 在数组头部删除 |
| join() | 将数组转为字符串 |
| slice() | 取部分成员(start,end) |
| splice() | 数组增删改(index,howmany,item1,…..,itemX) |
| filter() | “过滤”功能,对每个成员应用回调函数进行处理返回true的成员 |
| reduce() | 归纳操作,将多个成员进行统计后单值返回 |
//concat() 拼接,返回由两个数组组合而成的新数组arr = ['a','b','c','d'];console.log(arr.concat(['aa','bb'])); //[a,b,c,d,aa,bb]
//push() 数组尾部添加元素, 返回数组长度arr = ['a','b','c','d'];console.log(arr.push('e')); //5console.log(arr); //[a,b,c,d,e]
//pop() 从数组尾部取出一个, 返回取出的元素arr = ['a','b','c','d'];console.log(arr.pop()); //dconsole.log(arr); //[a,b,c]
//unshift 从数组头部添加元素arr = ['a','b','c','d'];console.log(arr.unshift('aa'));console.log(arr); //[aa,a,b,c,d]
//shift 从数组头部取出一个元素arr = ['a','b','c','d'];console.log(arr.shift()); //5console.log(arr); //[b,c,d]
//join() 将数组元素以指定字符拼接为字符串,返回一个字符串,原数组不变。arr = ['a','b','c','d'];console.log(arr.join()); //'a,b,c,d'let arr = [1,2,3,4,5,6];console.log(arr.join()); // 1,2,3,4,5,6console.log(arr.join("-")); // 1-2-3-4-5-6
//slice(start,end) 取对应部分的成员arr = [1, 2, 3, 4, 5];res = arr.slice(0, 3);console.log(res); // [1,2,3]res = arr.slice(-2);console.log(res); // [4,5]
//splice(index,howmany,item1,.....,itemX)//howmany 为0表示增加成员arr = [1, 2, 3, 4, 5];// 不删除元素,将第2个参数设为0,但是要传入第三个参数res = arr.splice(1, 0, 88, 99);console.log(arr); // [1, 88, 99, 2, 3, 4, 5]//howmany 为非0表示数字,表示删除成员arr = [1, 2, 3, 4, 5];// 删除2个参数res = arr.splice(2, 2);console.log(res); // [3,4]console.log(arr); // [1,2,5]//howmany 数量与第三个参数数量相同时相当于更新// 更新元素,将第2个参数设为删除数量,但是要传入第三个参数,用来替换掉被删除的元素arr = [1, 2, 3, 4, 5];res = arr.splice(1, 2, ...[88, 99]);console.log(arr); // [1,88,99,4,5]
//filter() 对数组的每个元素调用定义的回调函数,并返回回调函数为其返回 true 的数组。arr = [1,2,3,4,5];console.log(arr.filter((ev)=>ev%2)); //取奇数
//reduce()方法从数组的第一项开始,逐个遍历到最后。res = [1, 2, 3, 4, 5];// res = arr.reduce(function (prev, curr) {// return (prev += curr);// });res = arr.reduce((prev, curr) => (prev += curr), 20); // 可以增加个初始值20console.log(res); // 35

