JSON二个函数
- JSON 是什么
-JSON: JavaScript Object Notation(JS 对象表示法)
- JSON 独立于任何编程语言, 几乎所有编程语言都提供了访问 JSON 数据的 API 接口
- JSON 是一种语法,用来序列化其它语言创建的数据类型
- JSON 仅支持 6 种数据类型:对象,数组,数值,字符串,布尔值,null
- JSON 只是借用了 JS 中的一些数据表示语法,与 JS 并无关系
- JSON 数据类型
简单值 : 数值,字符串,布尔,null
复合值 : 对象,数组
*注意: 不支持undefined(因为除 JS 外,其它语言中没有这个东西)
- JS 解析 JSON 的 API 有两个方法
JSON.stringify()将 JS 对象,序列化为 JSON 字符串
JSON.parse()将 JSON 字符串,解析为 JS 对象
JSON.stringify(data,replacer,space):将js数据转为json
第一个参数data:需要转换的数据可以是 ‘数组 ‘也可以是 ‘对象’
第二个参数replacer:可选。支持数组 和 函数
第三个参数space:可选。用来格式化输出的json字符串
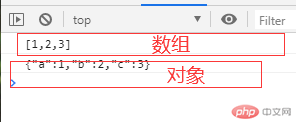
当一个参数时:
<script>// 数组console.log(JSON.stringify([1, 2, 3]));// 对象console.log(JSON.stringify({ a: 1, b: 2, c: 3 }));</script>
图例:
当两个参数时:
<script>// 第二个参数时数组时// 这里我只拿到a和bconsole.log(JSON.stringify({ a: 1, b: 2, c: 3 },["a", "b"]));// 第二个参数是函数时// 这里我只拿到cconsole.log(JSON.stringify({ a: 1, b: 2, c: 3 }, (k, v) => {// 将需要过滤掉的数据直接返回undefinedif (v < 3) return undefined;return v;}));</script>
图例:
// 第三个参数,用来格式化输出的json字符串
当不需要第二个参数时 可以给个null
<script>console.log(JSON.stringify({ a: 1, b: 2, c: 3 }, null, 2));console.log(JSON.stringify({ a: 1, b: 2, c: 3 }, null, "->"));</script>
图例:
- JSON.parse(str,reviver),将json转为js对象
第一个参数data:需要转换的数据可以是 ‘数组 ‘也可以是 ‘对象’
第二个参数reviver:可选。可以对json的数据进行处理后再返回
<script>let obj = JSON.parse(`{"a":1,"b":2,"c":3}`);console.log(obj);// 这里的k为键,v为值obj = JSON.parse(`{"a":1,"b":2,"c":3}`, (k, v) => {// json对象是由内向外解析if (k === "") return v;return v * 2;});console.log(obj);</script>
图例:
get,post发起ajax请求
Ajax 异步请求
- 同步与异步的定义
同步: 前端发请求, 必须等到后端响应完成,才允许发送另一个请求
异步: 前端发请求后不等待后端响应结果继续执行,后端响应完成通过事件通知前端处理
ajax-get请求
js代码
<script>const btn = document.querySelector('button');// 为btn创建点击事件btn.onclick = () => {// 1. 创建 xhr 对象:const xhr = new XMLHttpRequest();// 2. 配置 xhr 参数:xhr.open("get", "ajax-get.php?id=1");// 设置响应类型xhr.responseType = 'json';// 3. 处理 xhr 响应:xhr.onload = () => {// response属性:保存返回的数据// console.log(xhr.response);// console.log(xhr.response.name);// dom:将响应结果渲染到页面user = xhr.response.name;email = xhr.response.email;document.querySelector("p").innerHTML = `${user} ${email}`;}// 4. 发送 xhr 请求:// send参数课题不传默认值为nullxhr.send(null);}</script>
php代码
// 以二维数组模拟数据表信息$users = [['id'=>1, 'name'=>'天蓬','email'=>'tp@php.cn','password' => md5('123456')],['id'=>2, 'name'=>'灭绝','email'=>'mj@php.cn','password' => md5('abc123')],['id'=>3, 'name'=>'西门','email'=>'xm@php.cn','password' => md5('abc888')],];// 查询条件$id = $_GET['id'];// 在id组成的数组中查询是否存在指定的id,并返回对应的键名$key = array_search($id,array_column($users,'id'));// 根据键名返回指定的用户信息echo json_encode($users[$key]);

ajax-post请求
js代码
<script>
const form = document.querySelector(‘form’);
const btn = document.querySelector(‘button’);
const span = document.querySelector(‘span’);
console.log(span);
btn.onclick = (ev)=>{
// preventDefault()禁用提交按钮的默认提交行为
ev.preventDefault();
// 1. 创建 xhr 对象:
const xhr = new XMLHttpRequest();
// 2. 配置 xhr 参数:
xhr.open(“post”, “ajax-post.php”);
// 3. 处理 xhr 响应:
xhr.onload = () => {
console.log(xhr.response);
if(xhr.response ===’验证成功’){
span.innerHTML = xhr.response;
span.style.color = ‘darkgreen’;
}else{
span.innerHTML = xhr.response;
span.style.color = ‘#ef5b9c’;
}
};
// 4. 发送 xhr 请求:
// FormData是表单数据构造器
xhr.send(new FormData(form));
}
</script>
php代码
<?php// 使用二维数组模拟用户数据表信息$users = [['id'=>1, 'name'=>'天蓬','email'=>'tp@php.cn','password' => md5('123456')],['id'=>2, 'name'=>'灭绝','email'=>'mj@php.cn','password' => md5('abc123')],['id'=>3, 'name'=>'西门','email'=>'xm@php.cn','password' => md5('abc888')],];// 将通过post获取的数据保存到临时变量中$email = $_POST['email'];$password = md5($_POST['password']);// 使用数组过滤器查询是否存在指定的用户并返回结果$res = array_filter($users,function($user) use ($email,$password){return $user['email'] === $email && $user['password'] === $password;});// 将结果做为请求响应返回到前端echo count($res) === 1 ? '验证成功' : '验证失败';
图例:
ajax-get-cors: 跨域
CORS定义一种跨域访问的机制,可以让AJAX实现跨域访问。CORS 允许一个域上的网络应用向另一个域提交跨域 AJAX 请求。
js代码部分
<script>const btn =document.querySelector('button');const span = document.querySelector('span');btn.onclick = (ev)=>{// 1. 创建 xhr 对象:const xhr =new XMLHttpRequest();// 2. 配置 xhr 参数:xhr.open('get','http://cors.io/index.php');xhr.responseType = "json";// 3. 处理 xhr 响应:xhr.onload = ()=>{console.log(xhr.response.name);name=xhr.response.name;email=xhr.response.email;span.innerHTML = `用户: ${name} 邮箱:${email}`;};// 4. 发送 xhr 请求:xhr.send(null);}</script>
跨域服务器端代码
// 在服务器端开启跨域许可// header('Access-Control-Allow-Origin: http://hello.io');// *: 任何来源header('Access-Control-Allow-Origin: *');$data = '{ "name": "admin", "email": "admin@php.cn" }';echo $data;// echo 'CORS: 跨域请求成功';
图例
ajax-post-cors跨域
js代码
<script>
const form = document.querySelector(“.login form”);
const btn = document.querySelector(“.login button”);
const tips = document.querySelector(“.tips”);
btn.onclick = ev => {
ev.preventDefault();
// 1. 创建 xhr 对象:
const xhr = new XMLHttpRequest();
// 2. 配置 xhr 参数:
xhr.open(“post”, “http://cors.io/index2.php“);
// // 3. 处理 xhr 响应:
xhr.onload = () => (tips.innerHTML = xhr.response);
// 4. 发送 xhr 请求:
let formData = new FormData(form);
xhr.send(formData);
};
</script>
跨域服务器端代码
// 在服务器端开启跨域许可// header('Access-Control-Allow-Origin: http://hello.io');// *: 任何来源header('Access-Control-Allow-Origin: *');$data = ['email'=>'admin@php.cn','password'=>'123456'];if($_POST['email'] !==$data['email']){echo '邮箱不正确';return;}if($_POST['password'] !==$data['password']){echo '密码不正确';return;}echo '登录成功';
jsonp-cors
jsonp: JSON with padding (将json填充进来)
jsonp: 读 json padding, 别读:json屁
jsonp 看上去与 json 很像,是的
jsonp: 只是将json数据包含在一个函数调用中
jsonp: callback({“id”:1,”name”:”admin”})
jsonp: 包括二部分: 回调函数 + json数组
回调函数: 请求接收到响应时回调的函数,可动态设置
回调参数: 做为参数传递能函数的json数据
jsonp 巧妙的利用了script标签发起的请求不受跨域限制的特征
将跨域请求的url做为script的src属性值,实现不需要服务器授权的跨域请求
jsonp只能完成 get 请求
js代码
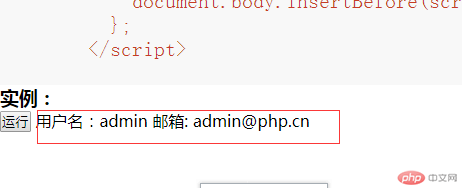
<script>// 1. jsonp调用函数function getUser(data) {// console.log(data);let user ="用户名:" + data.name + " 邮箱: " + data.email;document.querySelector("p").innerHTML = user;}const btn = document.querySelector("button");btn.onclick = () => {// 1. 动态生成一个允许跨域请求的html元素let script = document.createElement("script");// 2. 将跨域请求的url添加到src属性上script.src = "http://cors.io/index3.php?call=getUser";// 3. 将script挂载到页面中document.body.insertBefore(script, document.body.firstElementChild);};</script>
跨域服务器端代码
// jsonp 不需要授权给前端// 只要返回一个使用json做为参数的函数调用语句就可以// 将前端需要的数据以json格式放到这个函数的参数中就行了// 必须要知道前端js要调用 的函数名称$call = $_GET['call'];// 服务器中需要返回的数据$data = '{ "name": "admin", "email": "admin@php.cn" }';// 在后端生成一条js函数调用语句: getUser({ "name": "admin", "email": "admin@php.cn" });echo $call . '(' .$data. ')';
运行图例

