表格与表单实战练习
一、表格(购物车)
代码:
<!DOCTYPE html><html lang="en"><head><meta charset="UTF-8" /><meta name="viewport" content="width=device-width, initial-scale=1.0" /><title>购物车</title><style>* {font-size: 16px;/* 设置全局字体大小 */}/* 设置表格宽度,居中显示在网页上,并且内部居中对齐 */table {width: 70%;margin: auto;text-align: center;}/* 设置标题字体大小,字体颜色,位置 */caption {font-size: 2rem;color: lightgreen;margin: 20px 0;}/* 设置单元格的下边框,内边距 */td,th {border-top: 2px solid #ccc;padding: 10px;}/* 设置最后一个div标签,用伪类表示 ,宽度70%,为了和表格对齐,在页面居中*/div:last-of-type {width: 70%;margin: auto;}/* 设置结算按钮的样式,浮动,宽高,背景颜色,去掉默认边框,相对定位 */div:last-of-type button {float: right;width: 150px;height: 50px;background: lightgreen;border: none;position: relative;top: 20px;}/* 设置button的鼠标点击状态为小手,字体为蓝色,背景为浅橘色,字体为25px; */div:last-of-type button:hover {font-size: 25px;color: blue;background: lightsalmon;cursor: pointer;}/* 设置thead的背景颜色, */thead {background: lightskyblue;}/* 设置表格主体的偶数行背景颜色 */tbody > tr:nth-of-type(even) {background: #e1d5d5;}/* 设置表格尾部字体大小,颜色,字宽 */tfoot {font-size: 1.2rem;color: #ff2913;font-weight: bolder;}/* 设置鼠标滑过表格主体内容时的背景颜色 */tbody > tr:hover {background: mediumaquamarine;}</style></head><body><table cellspacing="0" cellpadding="0"><caption>购物车</caption><thead><tr><th>ID</th><th>品名</th><th>单价/元</th><th>单位</th><th>数量</th><th>金额/元</th></tr></thead><tbody><tr><td>1</td><td>HUAWEI MateBook X Pro 2020</td><td>9988.00</td><td>台</td><td>1</td><td>9988.00</td></tr><tr><td>2</td><td>HUAWEI Mate 30 Pro 5G</td><td>6399.00</td><td>部</td><td>2</td><td>12798.00</td></tr><tr><td>3</td><td>小度在家X8智能音箱</td><td>589.00</td><td>件</td><td>1</td><td>589.00</td></tr><tr><td>4</td><td>小米全面屏65英寸 E65A</td><td>2599.00</td><td>台</td><td>1</td><td>2599.00</td></tr><tr><td>5</td><td>小米AloT路由器 AX3600</td><td>599.00</td><td>个</td><td>1</td><td>599.00</td></tr><tr><td>6</td><td>iPhone Xs Max 4G</td><td>5599.00</td><td>部</td><td>1</td><td>5599.00</td></tr></tbody><tfoot><tr><td colspan="4">总计:</td><td>数量:7</td><td>32172.00</td></tr></tfoot></table><div class=""><button>去结算</button></div></body></html>
显示结果:

- 鼠标停留在表格上时:

- 鼠标停留在结算按钮上时:

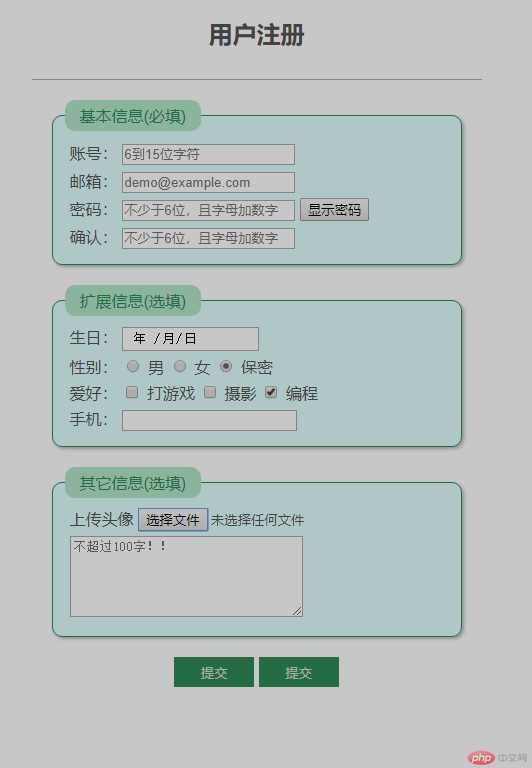
二、表单(注册页面)
代码:
<!DOCTYPE html><html lang="en"><head><meta charset="UTF-8" /><meta name="viewport" content="width=device-width, initial-scale=1.0" /><title>注册</title><style>body {color: #555;/* 设置全部字体颜色 */}h2 {text-align: center;/* 把h3居中 */}form {width: 450px;margin: 30px auto;border-top: 1px solid #aaa;/*设置表单宽度 外边距且居中显示,上边框为1像素*/}form fieldset {border: 1px solid seagreen;background-color: lightcyan;box-shadow: 2px 2px 4px #bbb;border-radius: 10px;margin: 20px;/*设置控件样式,边框为1px,背景颜色,边框阴影,圆角,外边距*/}form fieldset legend {background-color: rgb(178, 231, 201);border-radius: 10px;color: seagreen;padding: 5px 15px;/*设置legend元素背景颜色,圆角,字体颜色,内边距*/}form div {margin: 5px; /*div外边距*/}form > div:last-of-type {text-align: center; /*字体居中*/}form .btn {width: 80px;height: 30px;border: none;background-color: seagreen;color: #ddd;/*按钮宽高,边框,背景颜色,字体颜色*/}form .btn:hover {background-color: coral;color: white;cursor: pointer;/*当鼠标停留在按钮上时背景颜色,字体颜色,鼠标样式*/}input:focus {background-color: rgb(226, 226, 175);/*光标在输入框时,输入框的背景颜色*/}</style></head><body><h2>用户注册</h2><form action="" method="POST"><!-- 控件组 --><fieldset><legend>基本信息(必填)</legend><div><label for="username">账号:</label><inputtype="text"id="username"name="username"placeholder="6到15位字符"autofocusrequired/></div><div><label for="email">邮箱:</label><inputtype="email"id="email"name="email"placeholder="demo@example.com"required/></div><div><label for="password">密码:</label><inputtype="password"name="password"id="password"requiredplaceholder="不少于6位,且字母加数字"/><button onclick="showpwd()" id="btn" type="button">显示密码</button></div><div><label for="password1">确认:</label><inputtype="password"name="password1"id="password1"requiredplaceholder="不少于6位,且字母加数字"/></div></fieldset><fieldset><legend>扩展信息(选填)</legend><div><label for="date">生日:</label><input type="date" id="date" name="date" /></div><div><label for="baomi">性别:</label><input type="radio" name="gender" value="man" id="man" /><label for="man">男</label><input type="radio" name="gender" value="woman" id="woman" /><label for="woman">女</label><input type="radio" name="gender" value="baomi" id="baomi" checked /><label for="baomi">保密</label></div><div><!-- 因为复选框返回的是一个值或多个值,最方便用后端数组来处理,所有将name名称设置为数组形式便于后端脚本处理 --><label for="biancheng">爱好:</label><input type="checkbox" name="hobby[]" id="game" value="game" /><label for="game">打游戏</label><input type="checkbox" name="hobby[]" id="sheying" value="sheying" /><label for="sheying">摄影</label><inputtype="checkbox"name="hobby[]"id="biancheng"value="biancheng"checked/><label for="biancheng">编程</label></div><div><!-- 选项列表 --><label for="">手机:</label><input type="search" list="phone" name="brand" /><datalist id="phone"><option value="apple"></option><option value="huawei"></option><option value="xiaomi"></option><option value="oppo"></option><option value="vivo"></option></datalist></div></fieldset><fieldset><legend>其它信息(选填)</legend><div><label for="uploads">上传头像</label><inputtype="file"id="uploads"name="user_pic"accept="image/png,image/jpeg,image/gif"/></div><div><label for=""></label><textareaname="resume"id="resume"cols="30"rows="5"placeholder="不超过100字!!"></textarea></div></fieldset><!-- 隐藏域 hidden 不需要用户填写,可以将用户注册时间,用户id,登录时间随表单上传到服务器--><input type="hidden" name="user_id" value="123" /><div><button class="btn">提交</button><input type="submit" value="提交" class="btn" /></div></form></body><script>function showpwd() {document.querySelector("#password").type = "text";const btn = document.querySelector("#btn").innerHTML;console.log(btn);if (btn == "显示密码") {document.querySelector("#btn").innerHTML = "隐藏密码";}if (btn == "隐藏密码") {document.querySelector("#password").type = "password";document.querySelector("#btn").innerHTML = "显示密码";}}</script></html>
- 显示结果:

- 显示密码:

- 隐藏密码:

三、换个姿势玩表格
代码:
<!DOCTYPE html><html lang="en"><head><meta charset="UTF-8" /><meta name="viewport" content="width=device-width, initial-scale=1.0" /><title>换个姿势玩表格</title><style>* {font-size: 20px;}/* 表格 */.table {display: table;border: 1px solid #000;width: 500px;text-align: center;}/* 标题 */.table-caption {display: table-caption;}/* 表头 */.table-thead {display: table-header-group;}/* 行 */.table-row {display: table-row;}/* 列 */.table-cell {display: table-cell;border: 1px solid #000;padding: 10px;}/* 主体 */.table-tbody {display: table-row-group;}/* 底部 */.table-tfoot {display: table-footer-group;}/* 列分组样式 */.table-colgroup {display: table-column-group;}.table-colgroup .table-col:first-of-type {display: table-column;background-color: cyan;}</style></head><body><!-- 表格 --><div class="table"><!-- 表格标题 --><div class="table-caption">员工信息表</div><!-- 列分组 --><div class="table-colgroup"><div class="table-col"></div><div class="table-col"></div><div class="table-col"></div></div><!-- 表头:thead --><div class="table-thead"><!-- 行 --><div class="table-row"><div class="table-cell">ID</div><div class="table-cell">姓名</div><div class="table-cell">职务</div></div></div><!-- 表格主体 --><div class="table-tbody"><div class="table-row"><div class="table-cell">1</div><div class="table-cell">张三</div><div class="table-cell">程序员</div></div></div><div class="table-tbody"><div class="table-row"><div class="table-cell">2</div><div class="table-cell">李四</div><div class="table-cell">组长</div></div></div><div class="table-tbody"><div class="table-row"><div class="table-cell">3</div><div class="table-cell">王五</div><div class="table-cell">程序员</div></div></div><!-- 表格尾部 --><div class="table-tfoot"><div class="table-row"><div class="table-cell">a</div><div class="table-cell">b</div><div class="table-cell">c</div></div></div></div></body></html>
显示结果:

四、学习总结
1.表格:
<table></table>:表格
<caption></caption>:表格标题
<thead></thead>:表格头部
<tr></tr>:表示行
<th></th>:表格头部单元格
<tbody></tbody>:表格主体内容
<td></td>:单元格
<tfoot></tfoot>:表格尾部内容
2.另一种表格:
用css样式与div结合来表示
.table:就表示<table>标签,并设置display:table
.table-caption:就表示<caption>标签,并设置display:table-caption
.table-thead:就表示<thead>标签,并设置display:table-header-group
.table-row:就表示<tr>标签,并设置display:table-row
.table-cell:就表示单元格,并设置display:table-cell
.table-tbody:就表示<tbody>标签,并设置display:table-row-group
.table-tfoot:就表示<tfoot>标签,并设置display:table-footer-group
.table-colgroup:表示列分组样式,设置display: table-column-group;
3.表单:
<form action="跳转地址" method="get/post">表单内容</form><fieldset><legend>信息</legend></fieldset>: 控件组<label for="#id">名称:</label>:绑定到input标签<input type="text" id="" name="变量名称" placeholder="占位符" autofocuse required/> 文本框autofocuse输入框默认显示光标,required提交时对输入框内容进行判断是否符合要求<input type="password" id="" name="变量名称" placeholder="占位符"> 密码框<input type="email" id="" name="" /> 邮箱<input type="radio" id="" name="name" value="" /> 单选框<input type="radio" id="" name="name" value="" /> 单选框radio属性name必须是相同的<input type="checkbox" id="" name="name[]" value="" /> 多选框因为复选框返回的是一个值或多个值,最方便用后端数组来处理,所有将name名称设置为数组形式便于后端脚本处理<input type="file" id="" name="" accept="image/png,image/jpeg" />上传文件<input type="search" list="" name="name" />选项列表选项列表与datalist绑定<datalist id="name"><option value=""></option></datalist><textarea name="" id="" rows="" cols=""></textarea>多行文本框<input type="hidden" name="" value="" />隐藏域,用于提交用户信息,登录时间<input type="submit" value="提交" />提交按钮,用于向服务端提交数据

