创建grid容器
display:gird,创建grid容器
grid-auto-flow设置项目在网格中的填充方式,默认行优先
grid-template-columns显示的行
grid-template-rows显示的列
<!DOCTYPE html><html lang="en">
<head>
<meta charset="UTF-8">
<meta name="viewport" content="width=device-width, initial-scale=1.0">
<title>Document</title>
<style>
 .container {
         width: 400px;
         height: 400px;
         background-color: wheat;
         /* 创建grid容器 */
          display: grid;
          /* 设置项目在网格中的填充方式,默认行优先 */
          grid-auto-flow: row;
          /* grid-auto-flow: column; */
          /* 显示的行与列,三列两行 */
           grid-template-columns: 100px 100px 100px;
          grid-template-rows: 100px 100px;
          /* 对于放置不小的项目,会隐式生产单元格 */
          grid-auto-rows: auto;
          grid-auto-rows: 150px;
        }
        .item {
                  background-color: lightblue;
                   font-style: 2rem;
                }
     </style>
     </head>
<body>
    <div class="container">
       <div class="item item1">1</div>
       <div class="item item2">2</div>
       <div class="item item3">3</div>
       <div class="item item4">4</div>
       <div class="item item5">5</div>
       <div class="item item6">6</div>
        <div class="item item7">7</div>
    </div>
</body>
</html>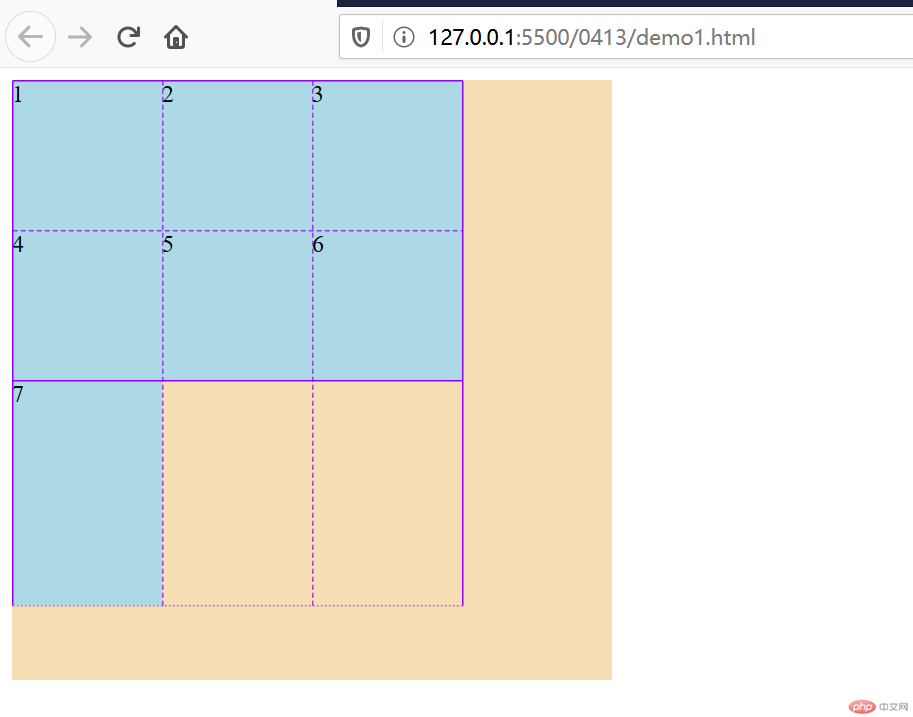
2.单元格的数量和大小
gird布局设置单元格的数量和大小可以有这几种方式:固定值、百分比、按比例、重负设置、按分组设置、弹性设置、自动填充。
<style>
        .container {
            width: 400px;
            height: 400px;
            background-color: wheat;

            /* 创建grid容器 */
            display: grid;

            /* 固定值 */
            grid-template-columns: 100px 100px 100px;
            grid-template-rows: 100px 100px 100px;

            /* 百分比 */
            grid-template-columns: 20% 30% 50%;
            grid-template-rows: 100px auto 100px;

            /* 按比例 */
            grid-template-columns: 1fr 2fr 2fr;
            grid-template-rows:  1fr auto 2fr;

            /* 重复设置 */
            grid-template-columns: repeat(3,100px);
            grid-template-rows: repeat(3,100px);

            /* 按分组来设置 50px  100px*/
            grid-template-columns: repeat(2,50px 100px);
            /* grid-template-rows: repeat(2,50px 100px); */

            /* 弹性设置 */
            grid-template-columns: repeat(2, minmax(50px,100px));
            grid-template-rows: repeat(3, minmax(150px,1fr));

            /* 自动填充 */
            grid-template-columns: repeat(auto-fill,100px);
            grid-template-rows: repeat(auto-fill,100px);
        }

        .item {
            background-color: lightblue;
            font-style: 2rem;
        }
    </style>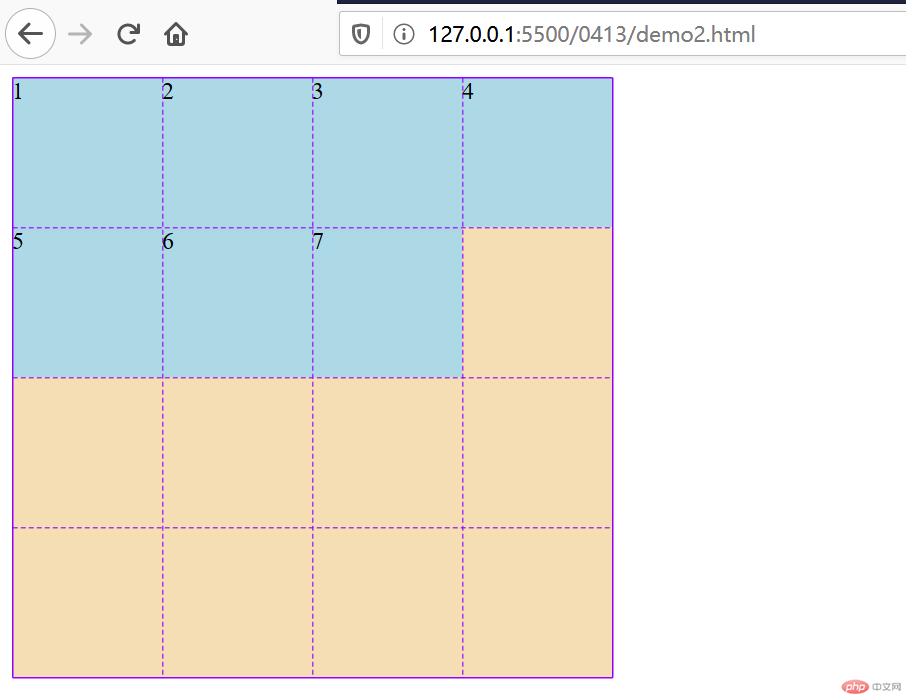
3使用默认网格线来划分单元格
grid-row-start:单元格行开始网格线
grid-row-end:单元格行结束网格线
grid-column-start:单元格列开始网格线
grid-column-end:单元格列结束网格线
还可以通过偏移量来简化
<style>
        .container {
            width: 400px;
            height: 400px;
            background-color: wheat;

            /* 创建grid容器 */
            display: grid;
            grid-template-columns: repeat(4,1fr);
            grid-template-rows: repeat(4,1fr);

        }

        .item {
            font-style: 2rem;
        }

        .item.item1 {
            background-color: lightgreen;
            grid-row-start: 1;
            grid-row-end: 3;
            grid-column-start: 1;
            grid-column-end: 3;

            /* grid-row-start: -1;
            grid-row-end: -3;
            grid-column-start: -1;
            grid-column-end: -3; */

            /* grid-row-start: 2;
            grid-row-end: 4;
            grid-column-start: 2;
            grid-column-end: 4; */

            /* grid-row-start: 1;
            grid-row-end: -1;
            grid-column-start: 1;
            grid-column-end: -1; */
        }

        /* 简写 */
        .item.item2{
            background-color: lightpink;
            grid-row-start: 1;
            grid-row-end: 3;
            grid-column-start: 3;
            grid-column-end: 5;

            grid-row: 1/3;
            grid-column: 3/5;

        }

        /* 使用偏移量来简化,将第三个移动到左下角 */
        .item.item3 {
            background-color: yellow;
            /* grid-row-start: 3;
            grid-row-end: span 2;
            grid-column-start: 1;
            grid-column-end: span 2; */

            grid-row: 3 / span 2;
            grid-column: 1 / span 2;
        }

        .item.item4{
            background-color: lightgrey;
            /* grid-row-start: 3; */
            grid-row-end: span 2;
            /* grid-column-start: 3; */
            grid-column-end: span 2;
        }
    </style>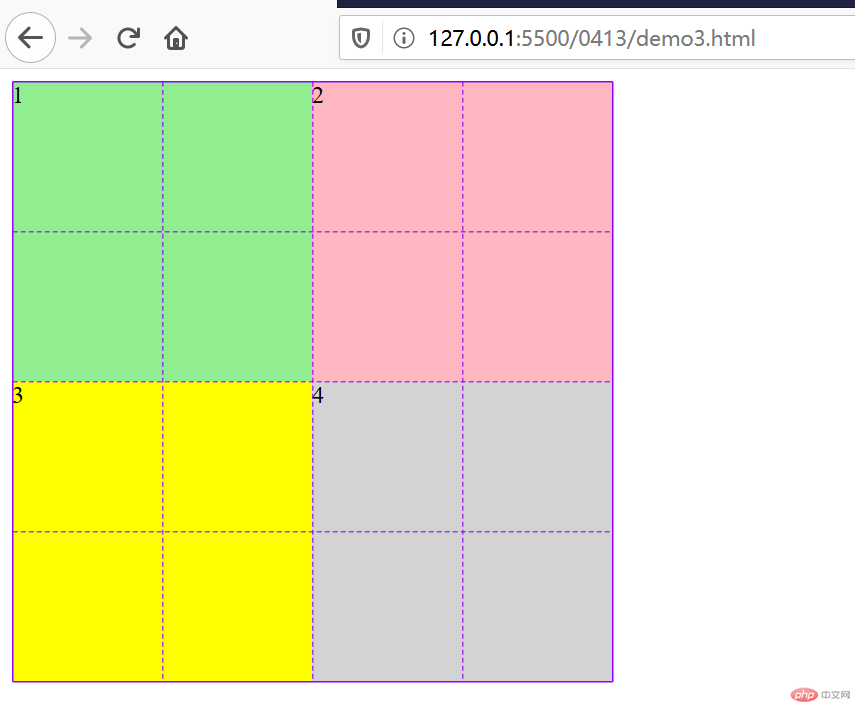
4.使用命名网格线来划分单元格
<style>
        .container {
            width: 400px;
            height: 400px;
            background-color: wheat;

            /* 创建grid容器 */
            display: grid;
            grid-template-columns: [c1-start]100px[c1-end c2-start] 100px[c2-end c3-start] 100px[c3-end];
            grid-template-rows: [r1-start]100px[r1-end r2-start] 100px[r2-end r3-start] 100px[r3-end];;

        }

        .item {
            font-style: 2rem;
        }

        .item.item1 {
            background-color: lightgreen;
            /* 默认就是跨越一行/一列,所以可以省略 */
            grid-row-start: r2-start;
            grid-row-end: r1-end;
            grid-column-start: c3-start;

        }

        /* 简写 */
        .item.item2{
            background-color: lightpink;
            grid-column-end: span 3;
        }

        /* 使用偏移量来简化,将第三个移动到左下角 */
        .item.item3 {
            background-color: yellow;
            grid-column-end: span 2;
            grid-row-end: span 2;
        }

        .item.item4{
            background-color: lightgrey;
        }
    </style>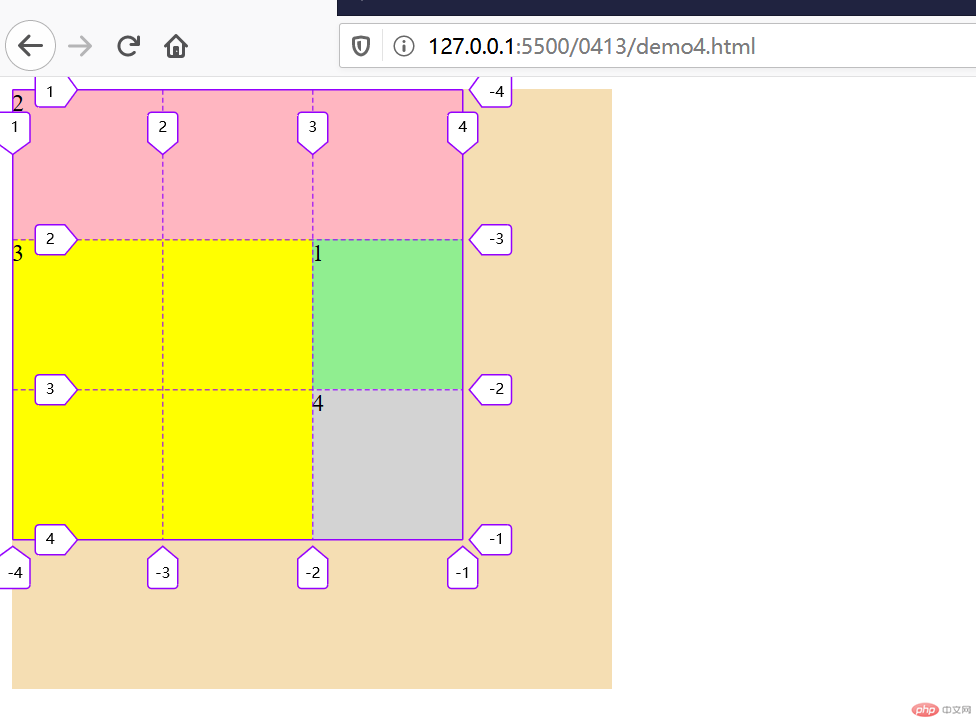
5.默认网格区域
grid-area: row-srart/col-start/row-end/col-end;
<style>
        .container {
            width: 400px;
            height: 400px;
            background-color: wheat;

            /* 创建grid容器 */
            display: grid;
            grid-template-columns: repeat(4,1fr);
            grid-template-rows: repeat(4,1fr);

        }

        .item {
            font-style: 2rem;
        }

        .item.item1 {
            background-color: lightgreen;
            /* grid-area: 1 / 1 / 2 / 5; */
            /* 用偏移量进行简化 */
            /* grid-area: 1 / 1 / span 1 / span 4; */
            /* 是从当前位置开始的填充 */
            grid-area: span 1 / span 4;
        }

        /* 简写 */
        .item.item2{
            background-color: lightpink;
            /* grid-area: 2 / 1 / span 2 /span 1; */
            /* grid-area: span 2 / span 1; */
            /* 默认就是偏移一行/一列 */
            grid-area: span 2;
        }

        /* 使用偏移量来简化,将第三个移动到左下角 */
        .item.item3 {
            background-color: yellow;
        }

        .item.item4{
            background-color: lightgrey;
        }

        .item.item5{
            background-color: violet;
            /* grid-area: row-srart/col-start/row-end/col-end; */

        }
    </style>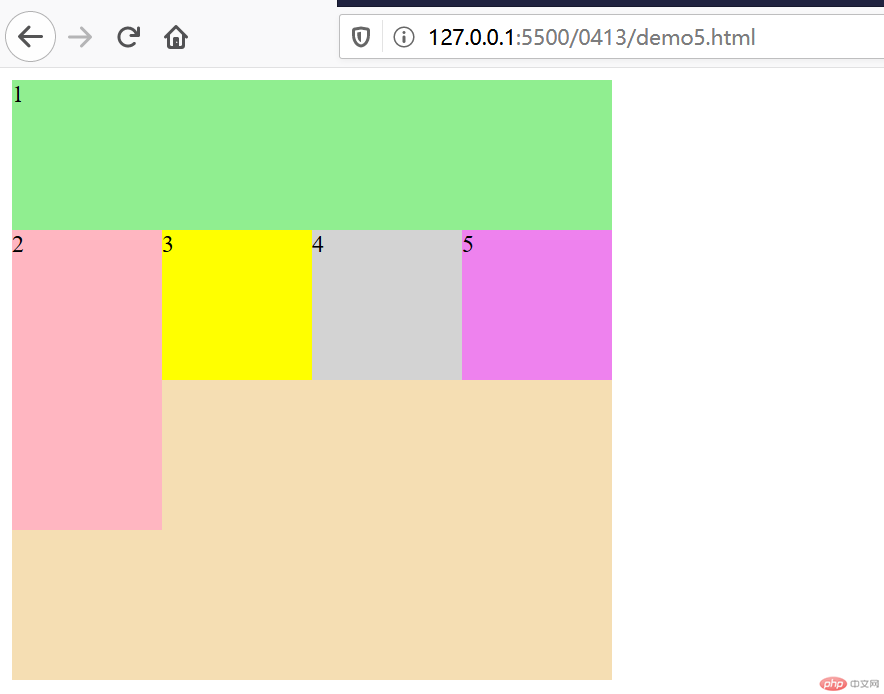
6.命名网格区域
使用grid-template-areas这个属性来命名网格区域
<style>
        .container {
            width: 400px;
            height: 400px;
            background-color: wheat;

            /* 创建grid容器 */
            display: grid;
            grid-template-columns: 80px auto 80px;
            grid-template-rows: 40px auto 40px;

            /* 设置命名网格区域 */
            grid-template-areas:
            "header header header"
            "left main right"
            "footer footer footer"
            ;

        }

        .item {
            font-style: 2rem;
        }

        .item.item1 {
            background-color: lightgreen;
            grid-area: header;
        }

        /* 简写 */
        .item.item2{
            background-color: lightpink;
            grid-area: left;
        }

        /* 使用偏移量来简化,将第三个移动到左下角 */
        .item.item3 {
            background-color: yellow;
            grid-area: main;
        }

        .item.item4{
            background-color: lightgrey;
            grid-area: right;
        }

        .item.item5{
            background-color: violet;
            grid-area: footer;
        }
    </style>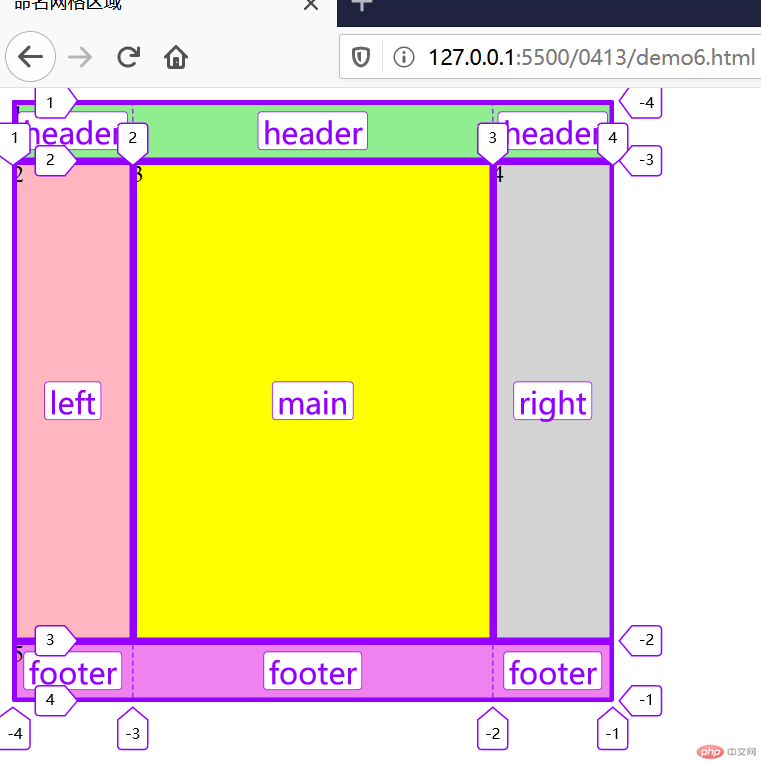
7.网格区域占位符
"."使用点来进行网格区域占位
<style>
        .container {
            width: 400px;
            height: 400px;
            background-color: wheat;

            /* 创建grid容器 */
            display: grid;
            grid-template-columns: 80px auto 80px;
            grid-template-rows: 40px auto 40px;

            /* 设置命名网格区域 */
            grid-template-areas:
            "header header header"
            " .  .  ."
            "footer footer footer"
            ;

        }

        .item {
            font-style: 2rem;
        }

        .item.item1 {
            background-color: lightgreen;
            grid-area: header;
        }

        /* 简写 */
        .item.item2{
            background-color: lightpink;
            /* 多余 */
            /* grid-area: left; */
        }

        /* 使用偏移量来简化,将第三个移动到左下角 */
        .item.item3 {
            background-color: yellow;
            /* 多余 */
            /* grid-area: main; */
        }

        .item.item4{
            background-color: lightgrey;
            /* 多余 */
            /* grid-area: right; */
        }

        .item.item5{
            background-color: violet;
            grid-area: footer;
        }
    </style>
8.网格区域默认先名称
<style>
        .container {
            width: 400px;
            height: 400px;
            background-color: wheat;

            /* 创建grid容器 */
            display: grid;
            grid-template-columns: 80px 1fr;
            grid-template-rows: 40px auto 40px;

            /* 设置命名网格区域 */
            grid-template-areas:
            "header header"
            " .  . "
            "footer footer "
            ;

        }

        .item {
            font-style: 2rem;
        }

        .item.item1 {
            background-color: lightgreen;
            grid-area: header-start / header-start /header-end / header-end;
        }

        /* 简写 */
        .item.item2{
            background-color: lightpink;
            /* 多余 */
            /* grid-area: left; */
        }

        /* 使用偏移量来简化,将第三个移动到左下角 */
        .item.item3 {
            background-color: yellow;
            /* 多余 */
            /* grid-area: main; */
        }

        .item.item4{
            background-color: lightgrey;
            /* 多余 */
            /* grid-area: right; */
            grid-area: footer-start / footer-start /footer-end / footer-end
        }

    </style>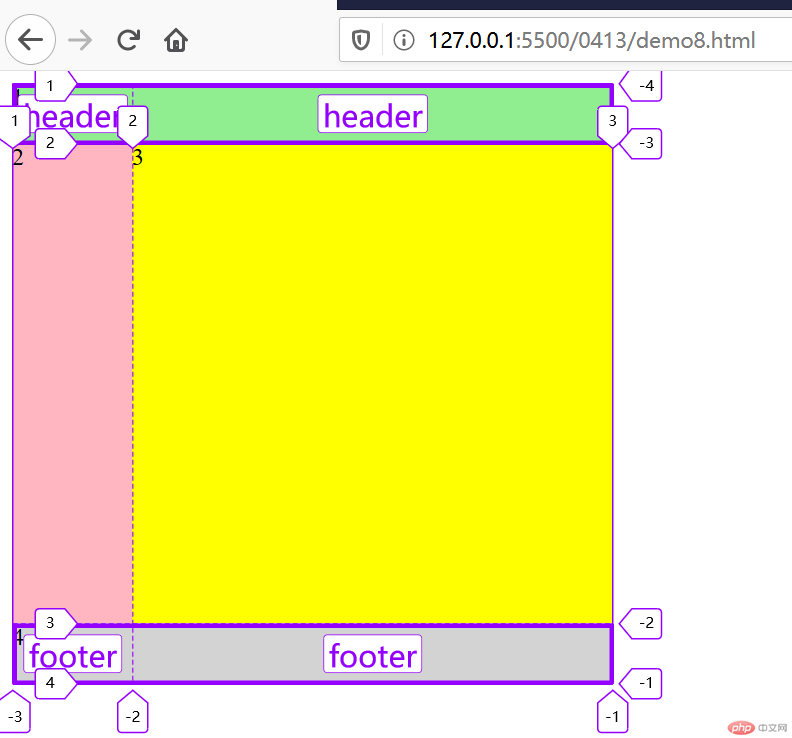
9.设置单元格在容器中的对齐方式
主要是使用 justify-content来设置垂直方向的对齐方式和align-content来设置水平方向的对齐方式
<style>
        .container {
            width: 400px;
            height: 400px;
            background-color: wheat;

            /* 创建grid容器 */
            display: grid;
            grid-template-columns: repeat(3, 50px);
            grid-template-rows: repeat(3,50px);

           justify-content: center;
           align-content: center;

            justify-content: space-between;
            justify-content: space-around;
            justify-content: space-evenly;

            align-content: space-between;
            align-content: space-around;
            align-content: space-evenly;

            /* justify-content: stretch;
            grid-template-columns: repeat(3,auto);
            align-content: stretch;
            grid-template-rows: repeat(3,1fr); */

            /* place-content: 垂直对齐,水平对齐; */
            place-content: center start;
            place-content: center;


        }
        .item {
            background-color: violet;
            font-style: 2rem;
        }
    </style>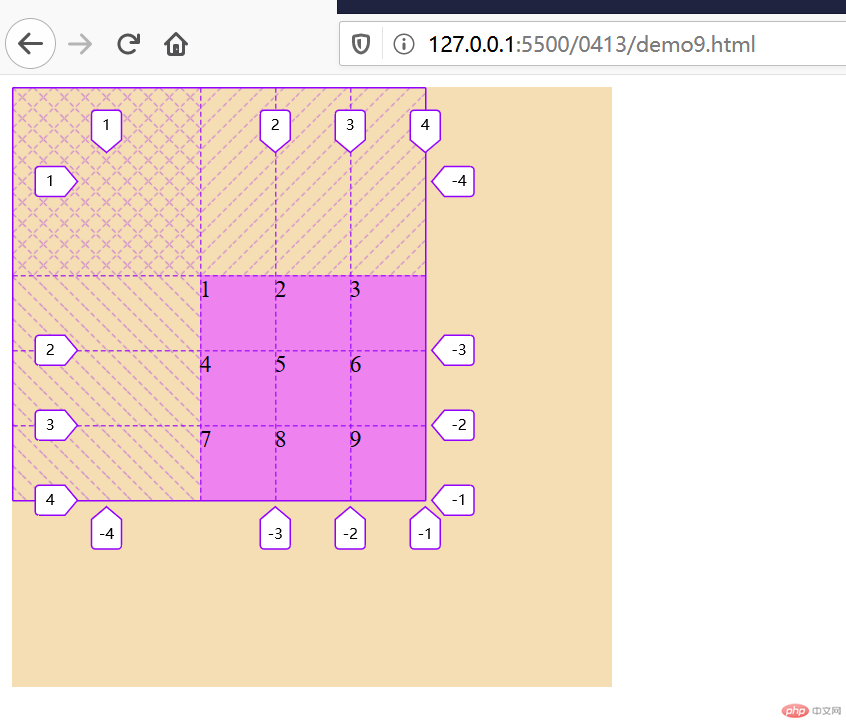
10.设置项目单元格在容器中的对齐方式
使用justify-self设置项目单元格在容器中的行对齐方式
align-items设置项目单元格在容器中的列对齐方式
上面两个属性也可以简写为place-items: 垂直 水平;
<style>
        .container {
            width: 400px;
            height: 400px;
            background-color: wheat;

            /* 创建grid容器 */
            display: grid;
            grid-template-columns: repeat(3, 1fr);
            grid-template-rows: repeat(3,1fr);

            justify-content: stretch;
            align-content: stretch;

            justify-self: center;
            align-items: center;

            /* place-items: 垂直  水平; */
            place-items: start end;
            place-items: center center;
            place-items: center;

        }
        .item {
            width: 50px;
            height: 50px;
            background-color: violet;
            font-style: 2rem;
        }
    </style>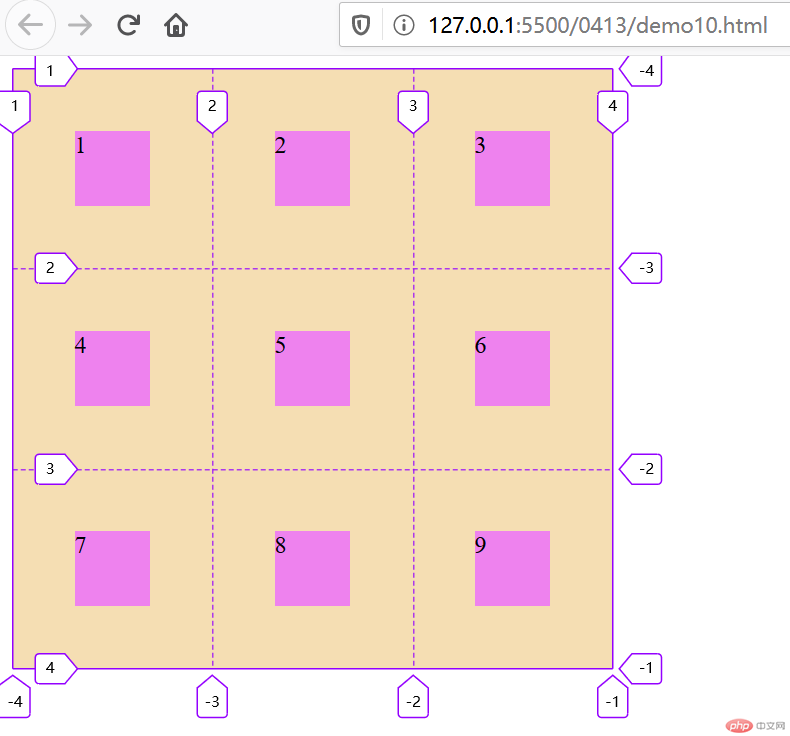
总结:gird布局主要是模仿表格,我们也可以把一个网页看成是由多个表格单元格来组成的,单元格的属性设置就能使得元素在网页中排列。对于gird对齐方式这一块,和flex布局的属性是一样的,可以一起结合起来记忆。

