1.献上老夫的手写图

2.下面是我对于循环的使用与测试代码
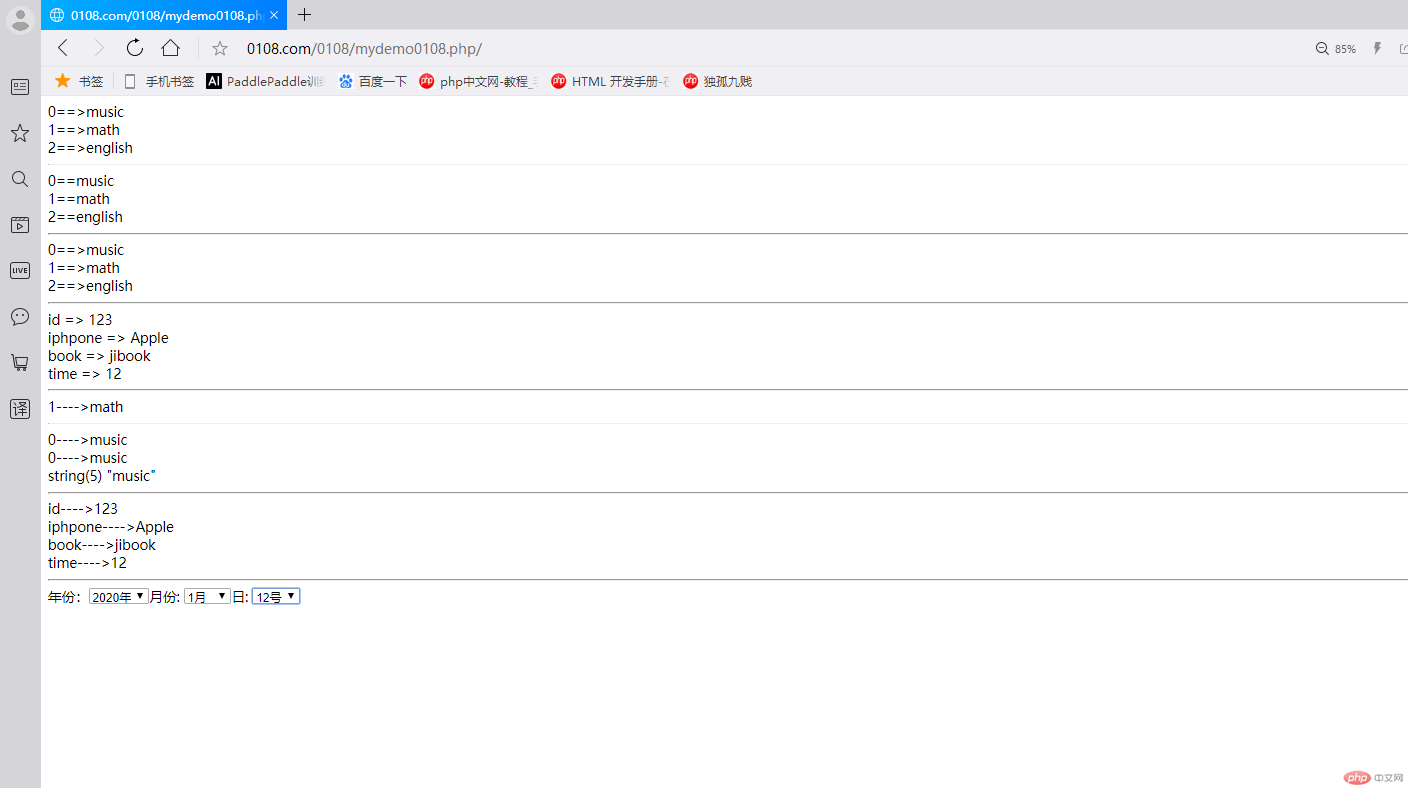
效果图

老夫的代码,你值得尝试
<?php// 建立数组$kemu = ['music','math','english'];// 用for循环遍历数组for ($i=0; $i <count($kemu) ; $i++) {// echo "{$i}={$kemu[$i]}<br/>";echo $i.'==>'.$kemu[$i].'<br>';}// 用while循环遍历数组echo "<hr>";$a=0;while ( $a< count($kemu)) {echo "{$a}=={$kemu[$a]}<br/>";$a++;}// 用do..while循环遍历数组echo "<hr>";$b=0;do {echo $b.'==>'.$kemu[$b].'<br>';$b++;}while ($b<count($kemu)) ;// 用foreach遍历数组echo "<hr>";$arr2 = ['id'=>123, 'iphpone'=>'Apple', 'book'=>'jibook', 'time'=>12];foreach ($arr2 as $key => $value) {echo "$key => $value <br>";}echo '<hr>';//数组指针的使用next($kemu);echo key($kemu) .'---->' . current($kemu) . '<br>';echo '<hr>';// 向前移动一位及复位prev($kemu);echo key($kemu) .'---->' . current($kemu) . '<br>';reset($kemu);echo key($kemu) .'---->' . current($kemu) . '<br>';// 返回当前所在位的值var_dump(current($kemu));echo '<hr>';// 数组指针遍历函数while (current($arr2)) {echo key($arr2) .'---->' . current($arr2) . '<br>';next($arr2);}echo "<hr>";// 循环表单的使用$years = range(2000,2020);$select = '年份:<select name="year">';foreach ($years as $year) {$select .='<option value=". $year .">'. $year .'年</option>';}$select .= '</select>';echo $select;$months = range(1, 12);$select = '月份: <select name="month">';foreach ($months as $month) {$select .= '<option value="' .$month . '">' . $month . '月</option>';}$select .= '</select>';echo $select;$days = range(1, 31);$select = '日: <select name="day">';foreach ($days as $day) {$select .= "<option value='${day}'>${day}号</option>";}$select .= '</select>';echo $select;
3.下面是我对表单的创建与验证
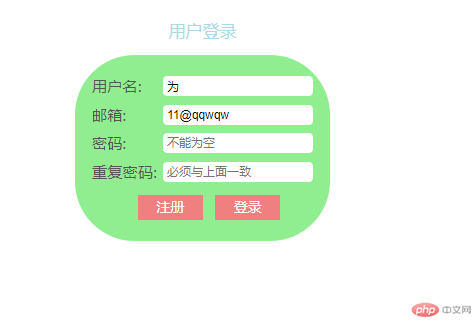
效果图


要想生活过得去,必须生活多点绿,感觉绿色不错
表单的html代码
<!DOCTYPE html><html lang="en"><head><meta charset="UTF-8"><title>用户登录</title><style>/*总体样式设计*/.register {width: 300px;display: flex;flex-direction: column;color: #555;font-size: 14px;margin: auto;}.register>h2 {color:lightblue;align-self: center;font-weight: normal;font-size: 20px;}/* 表单样式 */.register>form {display: flex;flex-direction: column;padding: 20px;background-color: lightgreen;border-radius: 70px;}.register>form:hover {box-shadow: 0 0 20px #888;}/* 表单中所有inpu控件样式 */.register>form input {border: none;outline: none;border-radius: 5px;padding-left: 5px;margin-left: 2px;}.register>form input:hover {background-color: lightgoldenrodyellow;}.register>form>span {margin: 5px 0;display: flex;justify-content: space-between;}.register>form> span>label {font-size: 18px;}/* 对按钮所在元素进行设置 */.register>form>span:last-of-type {display: flex;justify-content: center;}/* 提交按钮样式 */.register>form>span:last-of-type > button>a {color: white;font-size: 16px;text-decoration: none;}.register>form>span:last-of-type > button {margin-top: 5px;margin-left: 15px;background-color: #888;border: none;background-color: lightcoral;color: white;width: 76px;height: 30px;font-size: 16px;}.register>form>span:last-of-type > button:hover {background-color: blue;cursor: pointer;}.register>form>span:last-of-type > a> button:hover {background-color: blue;cursor: pointer;}</style></head><body><div class="register"><h2>用户登录</h2><!-- 使用post请求,隐藏传输过程中的信息 --><form action="mydemo3.php" method="post"><span><label for="username">用户名:</label><input type="text" name="username" id="username" placeholder="不超过10个字符" required autofocus></span><span><label for="email">邮箱:</label><input type="email" name="email" id="email" placeholder="不能为空" required></span><span><label for="password1">密码:</label><input type="password" name="password1" id="password1" placeholder="不能为空" required></span><span><label for="password2">重复密码:</label><input type="password" name="password2" id="password2" placeholder="必须与上面一致" required></span><span><button > <a href="demo2.php">注册</a></button><button >登录</button></span></form></div></body></html>
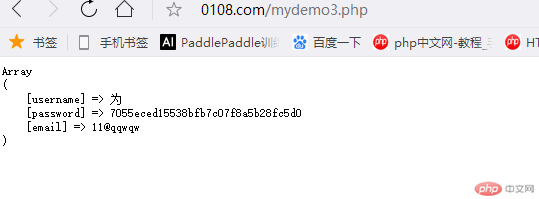
下面是用于验证的代码
<?php// echo '请求类型: ' . $_SERVER['REQUEST_METHOD'] . '<br>';if ($_SERVER['REQUEST_METHOD'] === 'POST') {// 检查是否为空if (!empty($_POST['username'])) $username = $_POST['username'];if (!empty($_POST['password1'])) $password1 = $_POST['password1'];if (!empty($_POST['password2'])) $password2 = $_POST['password2'];if (!empty($_POST['email'])) $email = $_POST['email'];// 检查密码是否一致if ($password1 === $password2) {$password = md5(sha1($password1));} else {exit('<script>alert("二次密码不一致");history.back();</script>');}$data = compact('username', 'password', 'email');echo '<pre>' . print_r($data, true) . '</pre>';} else {exit('<h3 style="color:red">请求类型错误!请返回确认!</h3>');}
4.小结
对于循环遍历数组的使用,我觉得多用用就熟悉了。对于表单的验证,按照步骤来不会出错,值得我注意的是表单主页代码的<form action="mydemo3.php" method="post">两个属性要根据实际需求来设置。