mysql的主从复制
主服务器配置
主服务器配置用户 用户名为slave 密码为123456
grant replication slave on *.* to 'slave'@'%' identified by '123456';
查看配置后的用户
select User,Password,Host from mysql.user;
配置可远程登录用户
grant all[权限] on 数据库.数据表 to '用户名称'@'主机名或者ip地址' identified by '用户密码'grant all on *.* to 'root'@'%' identified by '123456';flush privileges; #刷新权限
在linux防火墙开启3306端口
iptables -I INPUT 4 -p tcp -m state --state NEW -m tcp --dport 3306 -j ACCEPTservice iptables save #保存iptables规则
查看所有日志文件
show binary logs 或者 show master logs
查看正在写入的日志文件
show master status
+—————————+—————+———————+—————————+—————————-+
| File | Position | Binlog_Do_DB | Binlog_Ignore_DB | Executed_Gtid_Set |
+—————————+—————+———————+—————————+—————————-+
| mysql-bin.000011 | 891 | | | |
+—————————+—————+———————+—————————+—————————-+
结束正在写入的日志文件 开启新的日志文件
flush logs
清空日志文件 从新开始计数
reset master
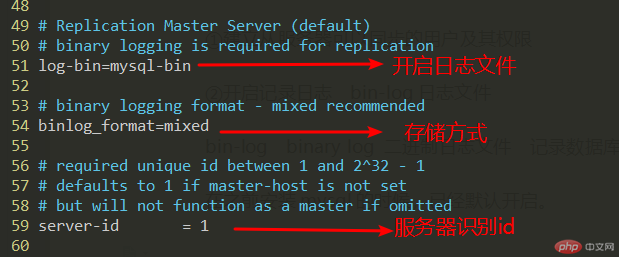
开启日志(默认开启)
配置文件路径/etc/my.cnf 不需要修改,查看一下即可
从服务器配置
vim /etc/my.cnf 修改server-id为2,和主服务器的server-id不一样即可
设置同步
stop slave; 停止从服务,配置,并启动从服务(如果此命名不起作用时 重新登录mysql即可)
配置告知从服务器的相关信息。
语法:change master to master_host=”主服务器的ip地址”,master_user=”授权同步用户的名称”,master_password=”授权同步用户的密码”,master_log_file=”二进制日志文件的名称”,master_log_pos=记录的pos位置;
show master status
+—————————+—————+———————+—————————+—————————-+
| File | Position | Binlog_Do_DB | Binlog_Ignore_DB | Executed_Gtid_Set |
+—————————+—————+———————+—————————+—————————-+
| mysql-bin.000011 | 891 | | | |
+—————————+—————+———————+—————————+—————————-+change master to master_host="192.168.0.131",master_user="slave",master_password="123456",master_log_file="mysql-bin.000001",master_log_pos=891;
开启服务
start slave;
查看情况
show slave status\G;
* 1. row *
Slave_IO_State: Waiting for master to send event
Master_Host: 192.168.0.131
Master_User: slave
Master_Port: 3306
Connect_Retry: 60
Master_Log_File: mysql-bin.000001
Read_Master_Log_Pos: 120
Relay_Log_File: mysql-relay-bin.000003
Relay_Log_Pos: 283
Relay_Master_Log_File: mysql-bin.000001
Slave_IO_Running: Yes
Slave_SQL_Running: Yes
Replicate_Do_DB:
Replicate_Ignore_DB:
Replicate_Do_Table:
Replicate_Ignore_Table:
Replicate_Wild_Do_Table:
Replicate_Wild_Ignore_Table:
Last_Errno: 0
Last_Error:
Skip_Counter: 0
Exec_Master_Log_Pos: 120
Relay_Log_Space: 456
Until_Condition: None
Until_Log_File:
Until_Log_Pos: 0
Master_SSL_Allowed: No
Master_SSL_CA_File:
Master_SSL_CA_Path:
Master_SSL_Cert:
Master_SSL_Cipher:
Master_SSL_Key:
Seconds_Behind_Master: 0
Master_SSL_Verify_Server_Cert: No
Last_IO_Errno: 0
Last_IO_Error:
Last_SQL_Errno: 0
Last_SQL_Error:
Replicate_Ignore_Server_Ids:
Master_Server_Id: 1
Master_UUID: 1c10016d-f480-11e9-9d34-000c29455efb
Master_Info_File: /data/mysql/master.info
SQL_Delay: 0
SQL_Remaining_Delay: NULL
Slave_SQL_Running_State: Slave has read all relay log; waiting for the slave I/O thread to update it
Master_Retry_Count: 86400
Master_Bind:
Last_IO_Error_Timestamp:
Last_SQL_Error_Timestamp:
Master_SSL_Crl:
Master_SSL_Crlpath:
Retrieved_Gtid_Set:
Executed_Gtid_Set:
Auto_Position: 0
1 row in set (0.00 sec)

