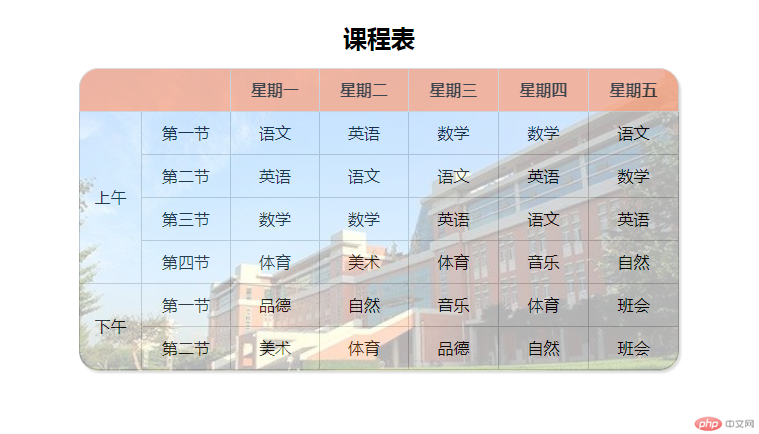
思路:在table表单中border-collapse:collapse和border-radius不相容,使用border-collapse:separate可以实现圆角,但单元格边框不会合并,所以边框单独设置,如:

其他边框也分别指定。
实例
<!DOCTYPE html>
<html lang="en">

<head>
    <meta charset="UTF-8">
    <meta name="viewport" content="width=device-width, initial-scale=1.0">
    <meta http-equiv="X-UA-Compatible" content="ie=edge">
    <title>使用CSS制作一张带有四个圆角的表格</title>
    <style>
        table {
            border-collapse: separate;
            border-spacing: 0;
            /* border: 1px solid #ccc;  */
            width: 600px;
            position: relative;
            margin: 30px auto;
        }

        table::before {
            content: "";
            width: 600px;
            height: 302px;
            position: absolute;
            left: 0;
            top: 47px;
            background-image: url("111.jpg");
            background-size: cover;
            opacity: 0.3;
            border-radius: 20px;
            box-shadow: 2px 2px 2px #888;
        }

        table>caption {
            font-size: 24px;
            font-weight: bolder;
            margin-bottom: 15px;
        }
        /* 边框和圆角 */
        table>thead>tr>th,
        table>tbody>tr>td {
            border-right: 1px solid #ccc;
            border-bottom: 1px solid #ccc;
        }/* 所有单元格的右边框、下边框 */
        table>thead>tr>th:first-child {
            border-left: 1px solid #ccc;
        }/* 表头第一个单元格左边框 */
        table>thead>tr>th {
            border-top: 1px solid #ccc;
        }/* 表头所有单元格上边框 */
        table>tbody>tr:first-child>td:first-child{
            border-left: 1px solid #ccc;
        }/* 表格主体第1行第1列左边框 */
        table>tbody>tr:nth-child(5)>td:first-child{
            border-left: 1px solid #ccc;
        }/* 表格主体第5行第1列左边框 */
        table>thead>tr>th:first-child {
            border-top-left-radius: 20px ;/*左上圆角*/
        }
        table>thead>tr>th:last-child {
            border-top-right-radius: 20px ;/*右上圆角*/
        }
        table>tbody>tr:nth-child(5)>td:first-child {
            border-bottom-left-radius: 20px ;/*左上圆角*/
        }
        table>tbody>tr:nth-child(6)>td:last-child {
            border-bottom-right-radius: 20px ;/*右上圆角*/
        }
        /* 边框和圆角end */
        table>thead>tr,
        table>tbody>tr {
            height: 40px;
            line-height: 40px;
        }

        table>tbody>tr>td {
            text-align: center;
        }

        table>thead>tr {
            background-color: lightsalmon;
            opacity: 0.7;
            /* border-radius: 10px 10px 0 0; */
        }


    </style>
</head>

<body>
    <table>
        <caption>
            课程表
        </caption>
        <thead>
            <tr>
                <th colspan="2"></th>
                <th>星期一</th>
                <th>星期二</th>
                <th>星期三</th>
                <th>星期四</th>
                <th>星期五</th>
            </tr>
        </thead>
        <tbody>
            <tr>
                <td class="am" rowspan="4">上午</td>
                <td>第一节</td>
                <td>语文</td>
                <td>英语</td>
                <td>数学</td>
                <td>数学</td>
                <td>语文</td>
            </tr>
            <tr>

                <td>第二节</td>
                <td>英语</td>
                <td>语文</td>
                <td>语文</td>
                <td>英语</td>
                <td>数学</td>
            </tr>
            <tr>

                <td>第三节</td>
                <td>数学</td>
                <td>数学</td>
                <td>英语</td>
                <td>语文</td>
                <td>英语</td>
            </tr>
            <tr>

                <td>第四节</td>
                <td>体育</td>
                <td>美术</td>
                <td>体育</td>
                <td>音乐</td>
                <td>自然</td>
            </tr>
            <tr>
                <td class="pm" rowspan="2">下午</td>
                <td>第一节</td>
                <td>品德</td>
                <td>自然</td>
                <td>音乐</td>
                <td>体育</td>
                <td>班会</td>
            </tr>
            <tr>
                <td>第二节</td>
                <td>美术</td>
                <td>体育</td>
                <td>品德</td>
                <td>自然</td>
                <td>班会</td>
            </tr>
        </tbody>
    </table>

</body>

</html>
运行实例 »
点击 "运行实例" 按钮查看在线实例
运行效果如图:

总结:单独设置边框有点繁琐,要提前想好先后顺序,用尽可能的少的步骤设置,可能还有其他实现方式,还需要学习。

