详解Angular中组件间通讯的几种方法

- 青灯夜游 转载
- 2021-04-25 10:19:58 2201浏览
本篇文章带大家详细了解一下angular中组件间通讯的几种。有一定的参考价值,有需要的朋友可以参考一下,希望对大家有所帮助。
Angular 组件间的通讯
组件间三种典型关系: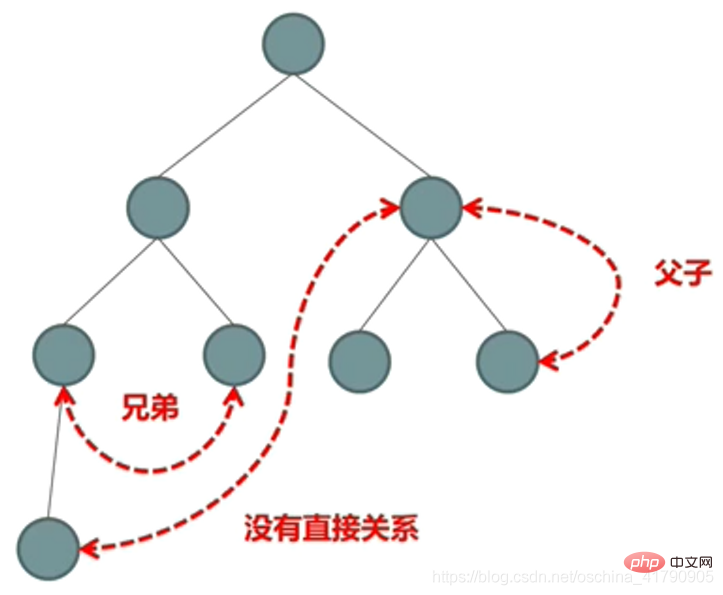
父好组件之间的交互(@Input/@Output/模板变量/@ViewChild)
非父子组件之间的交互(Service/localStorage)
还可以可以利用 Session、 路由参数来进行通讯等
相关教程推荐:《angular教程》
父子组件之间交互
子组件编写
- child.component.ts
@Component({
selector: 'app-child',
templateUrl: './child.component.html',
styleUrls: ['./child.component.css']
})
export class ChildComponent implements OnInit {
private _childTitle = '我是子组件';
@Input()
set childTitle(childTitle: string) {
this._childTitle = childTitle;
}
get childTitle(): string {
return this._childTitle;
}
@Output()
messageEvent: EventEmitter<string> = new EventEmitter<string>();
constructor() { }
ngOnInit(): void {
}
sendMessage(): void {
this.messageEvent.emit('我是子组件');
}
childFunction(): void {
console.log('子组件的名字是:' + this.childTitle);
}
}- child.component.html
<div class="panel panel-primary">
  <div class="panel-heading">{{childTitle}}</div>
  <div class="panel-body">
      <button (click)="sendMessage()" class="btn btn-success">给父组件发消息</button>
  </div>
</div>
父组件
- parent-and-child.component.ts
@Component({
  selector: 'app-parent-and-child',
  templateUrl: './parent-and-child.component.html',
  styleUrls: ['./parent-and-child.component.css']
})
export class ParentAndChildComponent implements OnInit {

  constructor() { }

  ngOnInit(): void {
  }

  doSomething(event: any): void {
    alert(event);
  }

}- parent-and-child.component.html
<div class="panel panel-primary">
  <div class="panel-heading">父组件</div>
  <div class="panel-body">
    <app-child #child (messageEvent) = "doSomething($event)"></app-child>
    <button (click)="child.childFunction()" class="btn btn-success">调用子组件的方法</button>
  </div>
</div>
@Input 属性绑定是单向的,父组件的属性变化会影响子组件的属性变化, 子组件的属性变化不会反过来影响父组件的的属性变化。
不过,可以利用 @Input() 和 @Output() 实现属性的双向绑定。
@Input()
value: string;
@Output()
valueChange: EventEmitter<any> = new EventEmitter();

// 实现双向绑定
<input [(value)] = "newValue"></input>
注意: 使用 [()] 进行双向绑定时,输出属性名必须是输入属性名与 Change 组成, 形如: xxxChange。
非父子组件之间交互
使用 Service 进行交互
- event-bus.service.ts
/**
 * 用于充当事件总线
 */
@Injectable()
export class EventBusService {

  evnetBus: Subject<string> = new Subject<string>();

  constructor() { }
}- child1.component.ts
@Component({
  selector: 'app-child1',
  templateUrl: './child1.component.html',
  styleUrls: ['./child1.component.css']
})
export class Child1Component implements OnInit {

  constructor(private eventBusService: EventBusService) { }

  ngOnInit(): void {
  }

  triggerEventBus(): void {
    this.eventBusService.evnetBus.next('child1 触发的事件');
  }
}- child1.component.html
<div class="panel panel-primary">
  <div class="panel-heading">child1 组件</div>
  <div class="panel-body">
    <button (click)="triggerEventBus()" class="btn btn-success">触发事件</button>
  </div>
</div>- child2.component.ts
@Component({
  selector: 'app-child2',
  templateUrl: './child2.component.html',
  styleUrls: ['./child2.component.css']
})
export class Child2Component implements OnInit {

  events: Array<string> = new Array<string>();

  constructor(private eventBusService: EventBusService) { }

  ngOnInit(): void {
    this.listenerEvent();
  }

  listenerEvent(): void {
    this.eventBusService.evnetBus.subscribe( value => {
      this.events.push(value);
    });
  }
}- child2.component.html
<div class="panel panel-primary">
  <div class="panel-heading">child2 组件</div>
  <div class="panel-body">
     <p *ngFor="let event of events">{{event}}</p>
  </div>
</div>- brother.component.ts
@Component({
  selector: 'app-brother',
  templateUrl: './brother.component.html',
  styleUrls: ['./brother.component.css']
})
export class BrotherComponent implements OnInit {

  constructor() { }

  ngOnInit(): void {
  }

}- brother.component.html
<div class="panel panel-primary">
  <div class="panel-heading">第二种:没有父子关系的组件间通讯</div>
  <div class="panel-body">
    <app-child1></app-child1>
    <app-child2></app-child2>
  </div>
</div>
使用 localStorage 进行交互
- local-child1.component.ts
@Component({
  selector: 'app-local-child1',
  templateUrl: './local-child1.component.html',
  styleUrls: ['./local-child1.component.css']
})
export class LocalChild1Component implements OnInit {

  constructor() { }

  ngOnInit(): void {
  }

  writeData(): void {
    window.localStorage.setItem('message', JSON.stringify({name: 'star', age: 22}));
  }

}- local-child1.component.html
<div class="panel panel-primary">
  <div class="panel-heading"> LocalChild1 组件</div>
  <div class="panel-body">
     <button class="btn btn-success" (click)="writeData()">写入数据</button>
  </div>
</div>- local-child2.component.ts
@Component({
  selector: 'app-local-child2',
  templateUrl: './local-child2.component.html',
  styleUrls: ['./local-child2.component.css']
})
export class LocalChild2Component implements OnInit {

  constructor() { }

  ngOnInit(): void {
  }

  readData(): void {
    const dataStr = window.localStorage.getItem('message');
    const data = JSON.parse(dataStr);
    console.log('name:' + data.name, 'age:' + data.age);
  }

}- local-child2.component.html
<div class="panel panel-primary">
  <div class="panel-heading">LocalChild2 组件</div>
  <div class="panel-body">
    <button class="btn btn-success" (click)="readData()">读取数据</button>
  </div>
</div>- local-storage.component.ts
@Component({
  selector: 'app-local-storage',
  templateUrl: './local-storage.component.html',
  styleUrls: ['./local-storage.component.css']
})
export class LocalStorageComponent implements OnInit {

  constructor() { }

  ngOnInit(): void {
  }

}- local-storage.component.html
<div class="panel panel-primary">
  <div class="panel-heading">第三种方案:利用 localStorge 通讯</div>
  <div class="panel-body">
    <app-local-child1></app-local-child1>
    <app-local-child2></app-local-child2>
  </div>
</div>
最后,关于使用 Session、路由参数实现数据交互的方式,这里就不演示了。
更多编程相关知识,请访问:编程视频!!
声明:本文转载于:csdn,如有侵犯,请联系admin@php.cn删除