


Mybatis is quite troublesome to use in the initial stage. It requires various configuration files, entity classes, dao layer mapping associations, and a lot of other configurations. Of course, mybatis has also discovered this shortcoming. In the early stage, it developed a generator that can automatically produce entity classes, configuration files and DAO layer codes based on table results, which can reduce part of the development workload. In the later period, a lot of optimization was also carried out to use annotations and automatically manage DAOs. Layers and configuration files, etc., have developed to the top and this is the model I will talk about today. Mybatis-spring-boot-starter is springboot+mybatis, which can be fully annotated without a configuration file, and can also be easily configured and easily used.
Now think about spring boot, it is awesome. Anything related to spring boot will simplify the complexity.
mybatis-spring-boot-starter
Official description: MyBatis Spring-Boot-Starter will help you use MyBatis with Spring Boot
In fact, myBatis saw that spring boot was so popular and developed a solution to join in the fun, but this It really solves a lot of problems and makes it much smoother to use. mybatis-spring-boot-starter mainly has two solutions, one is to use annotations to solve all problems, and the other is the simplified old tradition.
Of course, any mode needs to first introduce the pom file of mybatis-spring-boot-starter. The latest version now is 1.1.1
<dependency>
    <groupId>org.mybatis.spring.boot</groupId>
    <artifactId>mybatis-spring-boot-starter</artifactId>
    <version>1.1.1</version></dependency>
Okay, let’s introduce the two development modes separately
No configuration file annotation version
That’s everything Use annotations to get it done.
1 Add related maven files
<dependencies>
    <dependency>
        <groupId>org.springframework.boot</groupId>
        <artifactId>spring-boot-starter</artifactId>
    </dependency>
    <dependency>
        <groupId>org.springframework.boot</groupId>
        <artifactId>spring-boot-starter-test</artifactId>
        <scope>test</scope>
    </dependency>
    <dependency>
        <groupId>org.springframework.boot</groupId>
        <artifactId>spring-boot-starter-web</artifactId>
    </dependency>
    <dependency>
        <groupId>org.mybatis.spring.boot</groupId>
        <artifactId>mybatis-spring-boot-starter</artifactId>
        <version>1.1.1</version>
    </dependency>
     <dependency>
        <groupId>mysql</groupId>
        <artifactId>mysql-connector-java</artifactId>
    </dependency>
     <dependency>
        <groupId>org.springframework.boot</groupId>
        <artifactId>spring-boot-devtools</artifactId>
        <optional>true</optional>
    </dependency></dependencies>
The complete pom package will not be posted here. You can look at the source code directly
2. Application.properties Add related configurations
mybatis.type-aliases-package=com.neo.entity

spring.datasource.driverClassName = com.mysql.jdbc.Driver
spring.datasource.url = jdbc:mysql://localhost:3306/test1?useUnicode=true&characterEncoding=utf-8spring.datasource.username = root
spring.datasource.password = root
springboot will automatically load spring.datasource.* related configurations and data The source will be automatically injected into sqlSessionFactory, and sqlSessionFactory will be automatically injected into Mapper. By the way, you don’t have to worry about anything, just pick it up and use it.
Add @MapperScan
@SpringBootApplication@MapperScan("com.neo.mapper")public class Application {
public static void main(String[] args) {
        SpringApplication.run(Application.class, args);
    }
}
to the startup class to scan the mapper package or directly add the annotation @Mapper to the Mapper class. It is recommended to use the above one, otherwise it will be quite troublesome to add annotations to each mapper
3. Develop Mapper
The third step is the most critical one. SQL production is all here
public interface UserMapper {

    @Select("SELECT * FROM users")
    @Results({
        @Result(property = "userSex",  column = "user_sex", javaType = UserSexEnum.class),
        @Result(property = "nickName", column = "nick_name")
    })
    List<UserEntity> getAll();

    @Select("SELECT * FROM users WHERE id = #{id}")
    @Results({
        @Result(property = "userSex",  column = "user_sex", javaType = UserSexEnum.class),
        @Result(property = "nickName", column = "nick_name")
    })
    UserEntity getOne(Long id);

    @Insert("INSERT INTO users(userName,passWord,user_sex) VALUES(#{userName}, #{passWord}, #{userSex})")
    void insert(UserEntity user);

    @Update("UPDATE users SET userName=#{userName},nick_name=#{nickName} WHERE id =#{id}")
    void update(UserEntity user);

    @Delete("DELETE FROM users WHERE id =#{id}")
    void delete(Long id);

}
Note the difference between using the # symbol and the $ symbol:
// This example creates a prepared statement, something like select * from teacher where name = ?;
@Select("Select * from teacher where name = #{name}")
Teacher selectTeachForGivenName(@Param("name") String name);

// This example creates n inlined statement, something like select * from teacher where name = 'someName';
@Select("Select * from teacher where name = '${name}')
Teacher selectTeachForGivenName(@Param("name") String name);
4. Using the above three steps, the development of the relevant dao layer is basically completed. When used, it can be injected as a normal class
@RunWith(SpringRunner.class)@SpringBootTestpublic class UserMapperTest {    @Autowired
    private UserMapper UserMapper;    @Test
    public void testInsert() throws Exception {
        UserMapper.insert(new UserEntity("aa", "a123456", UserSexEnum.MAN));
        UserMapper.insert(new UserEntity("bb", "b123456", UserSexEnum.WOMAN));
        UserMapper.insert(new UserEntity("cc", "b123456", UserSexEnum.WOMAN));

        Assert.assertEquals(3, UserMapper.getAll().size());
    }    @Test
    public void testQuery() throws Exception {
        List<UserEntity> users = UserMapper.getAll();
        System.out.println(users.toString());
    }    @Test
    public void testUpdate() throws Exception {
        UserEntity user = UserMapper.getOne(3l);
        System.out.println(user.toString());
        user.setNickName("neo");
        UserMapper.update(user);
        Assert.assertTrue(("neo".equals(UserMapper.getOne(3l).getNickName())));
    }
}
Minimalist XML version
Minimalist XML version maintains the old tradition of mapping files. The optimization is mainly reflected in the implementation layer that does not need to implement dao. The system will automatically The method name finds the corresponding sql in the mapping file.
1、配置
pom文件和上个版本一样,只是application.properties新增以下配置
mybatis.config-locations=classpath:mybatis/mybatis-config.xm
mybatis.config-locations=classpath:mybatis/mybatis-config.xml
mybatis.mapper-locations=classpath:mybatis/mapper/*.xml
指定了mybatis基础配置文件和实体类映射文件的地址
mybatis-config.xml 配置
<configuration>
    <typeAliases>
        <typeAlias alias="Integer" type="java.lang.Integer" />
        <typeAlias alias="Long" type="java.lang.Long" />
        <typeAlias alias="HashMap" type="java.util.HashMap" />
        <typeAlias alias="LinkedHashMap" type="java.util.LinkedHashMap" />
        <typeAlias alias="ArrayList" type="java.util.ArrayList" />
        <typeAlias alias="LinkedList" type="java.util.LinkedList" />
    </typeAliases></configuration>
这里也可以添加一些mybatis基础的配置
2、添加User的映射文件
<mapper namespace="com.neo.mapper.UserMapper" >
    <resultMap id="BaseResultMap" type="com.neo.entity.UserEntity" >
        <id column="id" property="id" jdbcType="BIGINT" />
        <result column="userName" property="userName" jdbcType="VARCHAR" />
        <result column="passWord" property="passWord" jdbcType="VARCHAR" />
        <result column="user_sex" property="userSex" javaType="com.neo.enums.UserSexEnum"/>
        <result column="nick_name" property="nickName" jdbcType="VARCHAR" />
    </resultMap>

    <sql id="Base_Column_List" >
        id, userName, passWord, user_sex, nick_name    </sql>

    <select id="getAll" resultMap="BaseResultMap"  >
       SELECT
       <include refid="Base_Column_List" />
       FROM users    </select>

    <select id="getOne" parameterType="java.lang.Long" resultMap="BaseResultMap" >
        SELECT
       <include refid="Base_Column_List" />
       FROM users
       WHERE id = #{id}
    </select>

    <insert id="insert" parameterType="com.neo.entity.UserEntity" >
       INSERT INTO
               users
               (userName,passWord,user_sex)
           VALUES
               (#{userName}, #{passWord}, #{userSex})    </insert>

    <update id="update" parameterType="com.neo.entity.UserEntity" >
       UPDATE
               users
       SET
           <if test="userName != null">userName = #{userName},</if>
           <if test="passWord != null">passWord = #{passWord},</if>
           nick_name = #{nickName}
       WHERE
               id = #{id}
    </update>

    <delete id="delete" parameterType="java.lang.Long" >
       DELETE FROM
                users
       WHERE
                id =#{id}
    </delete></mapper>
其实就是把上个版本中mapper的sql搬到了这里的xml中了
3、编写Dao层的代码
public interface UserMapper {

    List<UserEntity> getAll();

    UserEntity getOne(Long id);

    void insert(UserEntity user);

    void update(UserEntity user);

    void delete(Long id);

}
对比上一步这里全部只剩了接口方法
如何选择
两种模式各有特点,注解版适合简单快速的模式,其实像现在流行的这种微服务模式,一个微服务就会对应一个自已的数据库,多表连接查询的需求会大大的降低,会越来越适合这种模式。
老传统模式比适合大型项目,可以灵活的动态生成SQL,方便调整SQL,也有痛痛快快,洋洋洒洒的写SQL的感觉。

 Java之Mybatis的二级缓存怎么使用May 24, 2023 pm 06:16 PM
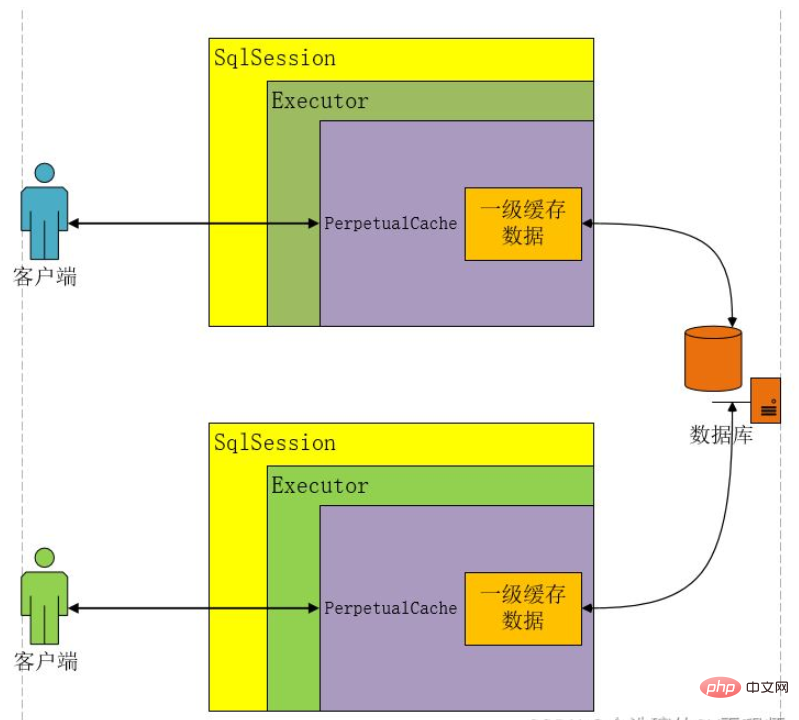
缓存的概述和分类概述缓存就是一块内存空间.保存临时数据为什么使用缓存将数据源(数据库或者文件)中的数据读取出来存放到缓存中,再次获取的时候,直接从缓存中获取,可以减少和数据库交互的次数,这样可以提升程序的性能!缓存的适用情况适用于缓存的:经常查询但不经常修改的(eg:省市,类别数据),数据的正确与否对最终结果影响不大的不适用缓存的:经常改变的数据,敏感数据(例如:股市的牌价,银行的汇率,银行卡里面的钱)等等MyBatis缓存类别一级缓存:它是sqlSession对象的缓存,自带的(不需要配置)不
 怎么使用springboot+mybatis拦截器实现水平分表May 14, 2023 pm 06:43 PM
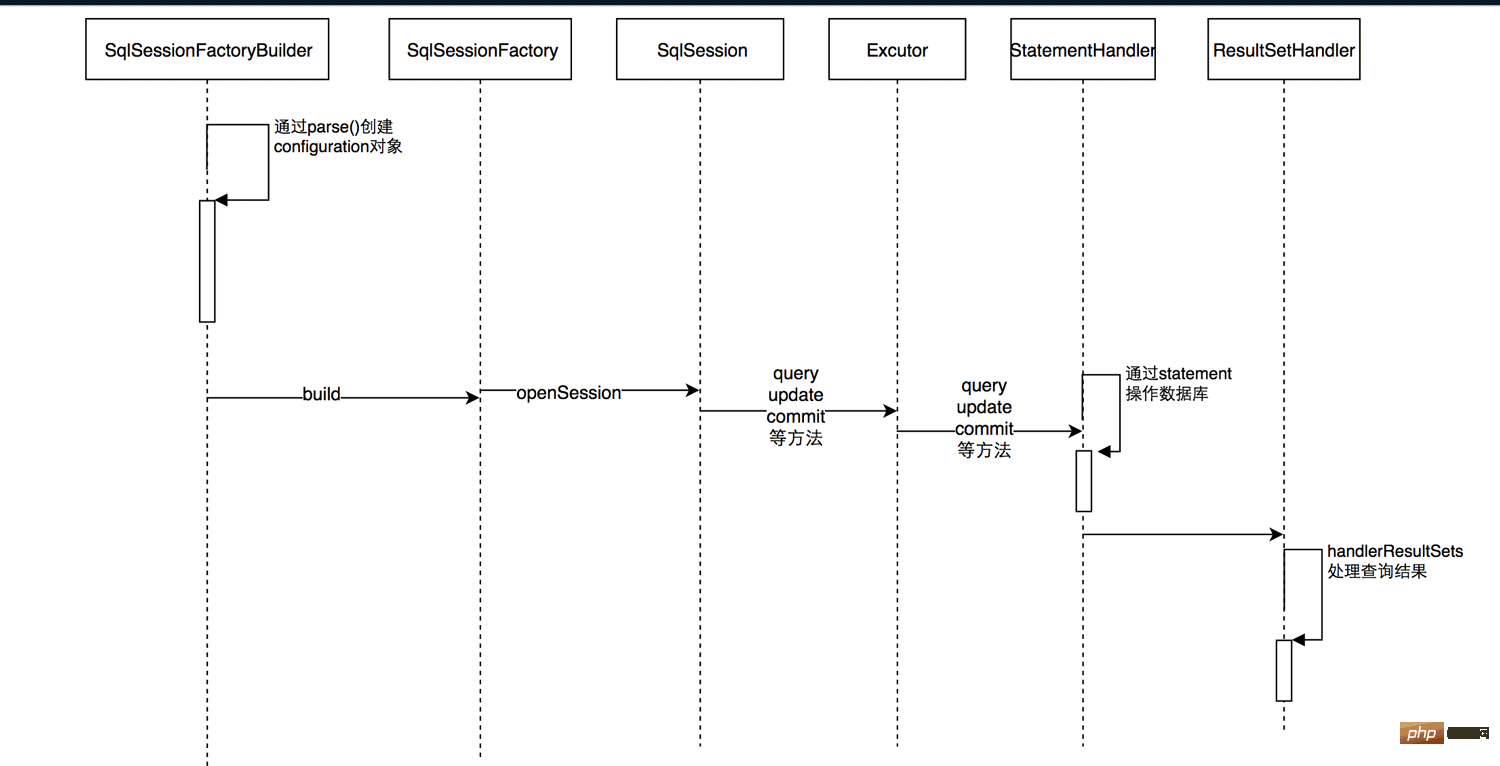
MyBatis允许使用插件来拦截的方法Executor(update,query,flushStatements,commit,rollback,getTransaction,close,isClosed)ParameterHandler(getParameterObject,setParameters)ResultSetHandler(handleResultSets,handleOutputParameters)StatementHandler(prepare,parameterize,ba
 mybatis分页的几种方式Jan 04, 2023 pm 04:23 PM
mybatis分页的方式:1、借助数组进行分页,首先查询出全部数据,然后再list中截取需要的部分。2、借助Sql语句进行分页,在sql语句后面添加limit分页语句即可。3、利用拦截器分页,通过拦截器给sql语句末尾加上limit语句来分页查询。4、利用RowBounds实现分页,需要一次获取所有符合条件的数据,然后在内存中对大数据进行操作即可实现分页效果。
 springboot怎么整合mybatis分页拦截器May 13, 2023 pm 04:31 PM
简介今天开发时想将自己写好的代码拿来优化,因为不想在开发服弄,怕搞坏了到时候GIT到生产服一大堆问题,然后把它分离到我轮子(工具)项目上,最后运行后发现我获取List的时候很卡至少10秒,我惊了平时也就我的正常版本是800ms左右(不要看它很久,因为数据量很大,也很正常。),前提是我也知道很慢,就等的确需要优化时,我在放出我优化的plus版本,回到10秒哪里,最开始我刚刚接到这个app项目时,在我用PageHelper.startPage(page,num);(分页),还没等查到的数据封装(Pa
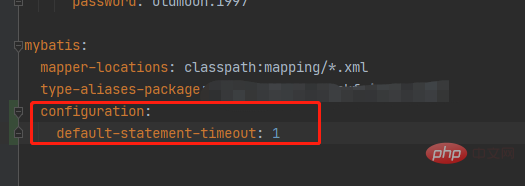 springboot配置mybatis的sql执行超时时间怎么解决May 15, 2023 pm 06:10 PM
当某些sql因为不知名原因堵塞时,为了不影响后台服务运行,想要给sql增加执行时间限制,超时后就抛异常,保证后台线程不会因为sql堵塞而堵塞。一、yml全局配置单数据源可以,多数据源时会失效二、java配置类配置成功抛出超时异常。importcom.alibaba.druid.pool.DruidDataSource;importcom.alibaba.druid.spring.boot.autoconfigure.DruidDataSourceBuilder;importorg.apache.
 mybatis怎么调用mysql存储过程并获取返回值May 27, 2023 am 09:01 AM
mybatis调用mysql存储过程并获取返回值1、mysql创建存储过程#结束符号默认;,delimiter$$语句表示结束符号变更为$$delimiter$$CREATEPROCEDURE`demo`(INinStrVARCHAR(100),outourStrVARCHAR(4000))BEGINSETourStr='01';if(inStr=='02')thensetourStr='02';en
 SpringBoot怎么打印mybatis的执行sql问题May 15, 2023 pm 10:55 PM
SpringBoot打印mybatis的执行sql1、使用场景应为在开发过程之中跟踪后端SQL语句,因什么原因导致的错误。需要在Debug过程之中打印出执行的SQL语句。所以需要配置一下SpringBoot之中,Mybatis打印SQL语句。2、具体实现application.properties(yml)中配置的两种方式:1.logging.level.dao包名(daopackage)=debug2.mybatis.configuration.log-impl=org.apache.ibat
 Java Mybatis一级缓存和二级缓存是什么Apr 25, 2023 pm 02:10 PM
一、什么是缓存缓存是内存当中一块存储数据的区域,目的是提高查询效率。MyBatis会将查询结果存储在缓存当中,当下次执行相同的SQL时不访问数据库,而是直接从缓存中获取结果,从而减少服务器的压力。什么是缓存?存在于内存中的一块数据。缓存有什么作用?减少程序和数据库的交互,提高查询效率,降低服务器和数据库的压力。什么样的数据使用缓存?经常查询但不常改变的,改变后对结果影响不大的数据。MyBatis缓存分为哪几类?一级缓存和二级缓存如何判断两次Sql是相同的?查询的Sql语句相同传递的参数值相同对结


Hot AI Tools

Undresser.AI Undress
AI-powered app for creating realistic nude photos

AI Clothes Remover
Online AI tool for removing clothes from photos.

Undress AI Tool
Undress images for free

Clothoff.io
AI clothes remover

AI Hentai Generator
Generate AI Hentai for free.

Hot Article
Hot Tools

EditPlus Chinese cracked version
Small size, syntax highlighting, does not support code prompt function

MinGW - Minimalist GNU for Windows
This project is in the process of being migrated to osdn.net/projects/mingw, you can continue to follow us there. MinGW: A native Windows port of the GNU Compiler Collection (GCC), freely distributable import libraries and header files for building native Windows applications; includes extensions to the MSVC runtime to support C99 functionality. All MinGW software can run on 64-bit Windows platforms.

SublimeText3 Chinese version
Chinese version, very easy to use

PhpStorm Mac version
The latest (2018.2.1) professional PHP integrated development tool

SublimeText3 Linux new version
SublimeText3 Linux latest version

